Drivers.com

follow us:

facebook twitter
  • Home
  • Download Drivers
  • Drivers Help
  • PC/Mac Resources
  • Software Drivers
  • Mac Fixes and Tips
  • PC Fix Tips
  • Security/ Backup
  • Tablets & Smartphones
  • Tech News
  • Software Drivers
  • Mac Fixes and Tips
  • PC Fix Tips
  • Security/ Backup
  • Tablets & Smartphones
  • Tech News

Resources by Category

Tech News

Best CPUs for Gaming in 2026

Below we provide a guide to the best CPUs for gaming in 2026, covering top picks, what to look for, and why they matter. So whether you are building a high-end rig, a mid-range system, or a budget gaming PC, this post will help.

Best CPUs for Gaming in 2026

How to choose the right processor to get the most out of your games and GPU

A CPU (Central Processing Unit) is one of the most critical components of a gaming PC — it drives game logic, AI, physics calculations, and helps your GPU render frames smoothly. In 2026, both AMD and Intel produce excellent processors, and choosing the right one depends on your budget, resolution, and gaming goals.

Top Gaming CPUs This Year

Best Overall Gaming CPU — AMD Ryzen 7 9800X3D

The Ryzen 7 9800X3D stands out as the best all-around processor for gaming in 2026. Its huge 3D V-Cache design boosts frame rates in CPU-sensitive titles like competitive shooters and open-world games, while keeping power use lower than many rivals.

Why it’s great:

  • Excellent performance at 1080p and 1440p
  • Ideal for pairing with high-end GPUs
  • Efficient and cool compared to many high-end chips

Note: AMD also released an updated version, the Ryzen 7 9850X3D, offering slightly higher clocks and performance gains — but the original 9800X3D remains the best value for pure gaming.

Best High-End Performance — AMD Ryzen 9 9950X3D

For gamers who also do streaming or content creation with gaming, the Ryzen 9 9950X3D brings 16 cores and 3D V-Cache performance together. It matches or even beats other flagship chips in demanding multitasking while still dominating in games.

Pros:

  • Great for gaming + productivity
  • Top-tier performance in heavily threaded workloads

Best CPUs by Category

Mid-Range & Value Picks

  • If you want strong gaming performance without spending a fortune:
  • AMD Ryzen 5 9600X – Excellent fps for 1080p/1440p gaming on a sensible budget.
  • AMD Ryzen 7 9700X – Slightly more cores and multitasking headroom, great all-rounder.

These are ideal for most gamers unless you need the absolute highest frame rates.

Budget & Entry-Level CPUs

If you’re on a strict budget:

  • Midrange Ryzen 5 7600X or Intel Core i5 alternatives can still drive playable frame rates.
  • Modern games are increasingly demanding, but even lower-end CPUs with 6+ cores at higher clock speeds can handle many titles smoothly, especially when paired with a capable GPU.

What To Look For in a Gaming CPU

To choose the right chip, consider:

1. Core Count & Threads
Most modern games benefit from 6–8 cores, with additional threads helping multitasking (e.g., streaming while gaming).
2. Clock Speeds (GHz)
Higher clock speeds help games that depend on fast single-core performance, such as competitive or esports titles.
3. Cache & Architecture
Tech like 3D V-Cache dramatically helps gaming performance by increasing available high-speed cache.
4. Future-proofing
If you plan to hold onto your system for several years, choosing a recent architecture with platform upgrade paths (like AM5 or latest Intel sockets) can extend longevity.

Intel vs AMD: Who Wins?

Both companies offer strong gaming CPUs:

AMD’s 3D V-Cache CPUs currently dominate pure gaming performance.

Intel’s chips still offer competitive performance, especially in multitasking and productivity scenarios, and may be attractive on deals.

Ultimate choice often comes down to price vs performance and whether you value specialised gaming performance (AMD) or broader performance mix (Intel).

If gaming frame rates are your priority, AMD’s 3D V-Cache processors like the Ryzen 7 9800X3D are currently the best choice in 2026.

For mixed use — gaming plus productivity — a higher-end chip like the Ryzen 9 9950X3D or a fast Intel alternative can be more compelling. And for everyday gamers on a budget, CPUs like Ryzen 5 9600X deliver excellent value and performance.
Filed Under: Tech News Tagged With: CPU, gaming, laptop

How to Fix ChatGPT Web Not Working in Google Chrome?

How to Fix ChatGPT Web Not Working in Google Chrome?

ChatGPT is perhaps the most popular and versatile AI assistant out there. People use it for a wide range of tasks, including answering questions, generating text, writing content, etc. ChatGPT provides a convenient way to complete tasks more efficiently, so it can be frustrating when you try to open it in Google Chrome but it doesn’t load.

Fortunately, it doesn’t take much to fix the issue. In this post, we share the top 4 DIY solutions for the ChatGPT Web Not Working on Google Chrome issue.

Solution #1 – Open it using another web browser

Let’s say, you need to access ChatGPT to complete an urgent task and don’t have time to try trial and error. Well, in that case, we recommend you to try opening ChatGPT on another web browser, such as Safari or Firefox.

Most people who encountered the issue were able to open ChatGPT on a different web browser. We’re pretty sure you too will be able to access it using another web browser. Later when you have a little time, you can try the different solutions listed below to have ChatGPT up and running on Google Chrome.

Solution #2 – Clear browser cache and cookies

Clearing browser cache and cookies has worked for many users, so it’s worth a try.

Here’s what you need to do:

  • Open Google Chrome
  • Click the three-dot menu on the top-right corner
  • Click Delete browsing data

  • Select the time range
  • Select the checkboxes for Cookies and other site data and Cached images and files
  • Click Delete data

Solution #3 – Disable browser extensions

Some users said they were able to fix the issue by disabling all Chrome extensions. If the previous solution didn’t work for you, disable all extensions and then reload ChatGPT.

To disable extensions on Chrome, perform these steps:

  • Open Chrome
  • Click the three-dot icon on the top-right corner
  • Click More tools
  • Select Extensions
  • Disable all the extensions one by one
  • Close Chrome and open it again
  • Check if ChatGPT is loading

If it is, repeat the steps listed above to turn on the extensions. Keep in mind you should enable one extension at a time and check whether ChatGPT is loading. This will help you identify the extension that’s causing the issue. Once you’ve identified the culprit, disable it and keep the remaining extensions on.

Solution #4 – Change the language in the settings

For some users, changing the language in the settings to English fixed the issue.

Here’s how you can change the language:

  • Open Google Chrome
  • Click the three-dot menu on the top-right corner
  • Click Settings
  • In the left-side pane, click Languages
  • Change the language to English

That’s it! We hope one of these solutions worked for you. Leave us a comment below and share the post so that others can benefit.

Pro Tip…

Always keep your device drivers up-to-date. Outdated device drivers can slow down your computer and even cause system crashes and freezes. The easiest way to update drivers is by using a reliable driver update tool such as Driver Updater.

Automatic driver update tools offer many benefits, the most important ones being:

  • You can update device drivers automatically
  • The software scans and updates all outdated or missing drivers at one go
  • The tool picks the right drivers for your device and operating system, so you won’t have to worry about installing an incorrect driver by mistake
  • Automatic driver updates are 100% safe

Driver Updater is one of the best driver update tools out there. Outbyte Driver Updater will give you access to a database of over 1 million drivers. It will regularly scan your PC, suggesting new driver versions to install. Driver Updater contains drivers for a variety of Windows devices. With just one click, you can update drivers in your system.

Step 1
Click here to Install and launch the app

Step 2
Scan all devices

Step 3
Install or update drivers automatically


Start Download


Filed Under: Tech News Tagged With: ChatGPT not working

HP OfficeJet Pro 9025e Printer: Features and Ratings

Looking to buy a new printer but not sure which one to pick?

HP OfficeJet Pro 9025e could be an option. HP is a brand that needs no introduction and its OfficeJet series has models that are ideal for someone who needs wireless and automatic two-sided printing. Within its OfficeJet series the Pro 9025e printer is perhaps the most advanced, but is it right for you? By the time you finish reading this article, we promise you’ll know the answer for sure.

In this post, we’ll discuss the main features of this printer. We’ll also walk you through its online ratings on various review websites. Lastly, we’ll share a pro tip to help you get the best out of your HP printer.

So, let’s dive right in.

HP OfficeJet Pro 9025e Printer: Key Features

Pro 9025e is an outstanding printer, thanks to features such as:

  • Wireless printing: Printing documents have never been easier! With Pro 9025e, you can print them from anywhere in the room using either a tablet or smartphone.
  • Large touchscreen display: The printer not only boasts an intuitive interface but it also has a large touchscreen display. Thanks to the latter, you can easily and quickly navigate through various settings.
  • Automatic two-sided printing: This printer can automatically print on both sides of the paper, saving you not only time but also paper.

Apart from these, the HP Pro 9025e printer comes packed with useful features such as:

  • Compatibility with different operating systems
  • Fast print speed
  • High paper capacity

All in all, the Pro 9025e printer includes many advanced features, making it a perfect choice for home-offices and small businesses.

How Users and Experts Have Rated HP Pro 9025e Printer?

By and large, HP Pro 9025e online ratings are positive. Most users and experts are happy with its performance.

  • PCMag: It gives 4 out of 5 stars to HP Pro 9025e, claiming it prints good-looking photos and text and a low cost per page. Small offices with moderate copy and print needs should find it to their liking.
  • TechRadar: It also gives 4 out of 5 stars, declaring it an excellent all-rounder printer with a wide array of attractive features, like fast printing speeds, a big ADF tray, and large paper handling capacity.

Now, that you know the key features of HP Pro 9025e and its online ratings, you should be able to objectively decide if it’s a right fit for you. Keep in mind that regardless of which printer you buy, it is important you keep the printer driver updated.

Why it is Necessary to Update the Printer Driver?

Updating the printer driver, helps fix bugs and issues, improves performance, and ensures compatibility. Long story short, if you want your HP printer to work smoothly, always use the latest printer driver.

At this point, you might be wondering: How can I update my printer driver?

Well, don’t sweat because an advanced driver update tool can take care of that. We recommend you give Driver Updater a try. It will update your printer (and other) drivers automatically in less than a few minutes.

Automatic driver update tools offer many benefits, the most important ones being:

  • You can update device drivers automatically
  • The software scans and updates all outdated or missing drivers at one go
  • The tool picks the right drivers for your device and operating system, so you won’t have to worry about installing an incorrect driver by mistake
  • Automatic driver updates are 100% safe

Driver Updater is one of the best driver update tools out there. Outbyte Driver Updater will give you access to a database of over 1 million drivers. It will regularly scan your PC, suggesting new driver versions to install. Driver Updater contains drivers for a variety of Windows devices. With just one click, you can update drivers in your system.

Step 1
Click here to Install and launch the app

Step 2
Scan all devices

Step 3
Install or update drivers automatically


Start Download


Filed Under: Tech News Tagged With: HP OfficeJet Pro 9025e printer

Is the Ryzen 9 7950X3D worth the hype?

Is the Ryzen 9 7950X3D worth the hype?
3d virtual cache gaming chip


The Ryzen 9 7950X3D is a very powerful AMD CPU (from the 7000-series). This new model uses 3D vertical cache technology to create the world’s fastest gaming desktop processor.

Although the Ryzen 9 7950X3D is now the fastest gaming chip in the world, the innovative design of the chip can mean reduced performance in some applications and games. However, high-end gaming systems will see a significant performance boost. If this is what you are looking for then the Ryzen 9 7950X3D is hard to beat.

The extra cache in this CPU provides an incredible performance boost for gaming and many other tasks.

What is new with the Ryzen 9 7950X3D?

amd ryzen 7950X3D

3D V-Cache or vertical cache is a technology used in computer graphics which vastly improves the performance of 3D scene rendering. This V-Cache system stores the vertices of 3D models in much more efficient format which allows for faster processing when rendering a scene. This has huge performance implications for applications such as video games and animation software.

What is the price of the Ryzen 9 7950X3D?

With added memory and processing power, the Ryzen 9 7950X3D CPU is a great choice for gamers or other users requiring high-level performance for 3D rendering.

The AMD Ryzen 9 7950X3D is priced pretty competitively with no major jump in price with the improved performance. This pricing allows this new X3D to compete with Intel’s i9-13900KS.
What are the specs of the Ryzen 9 7950X3D?

The 7950X3D basis specifications are:

  Ryzen 9 7950X3D
Cores / Threads 16 / 32
Base clock speed / boost clock speed 4.2GHz / 5.7GHz
Cache L3 128MB
TDP 120W
Launch MSRP $699

Is the Ryzen 9 7950X3D worth buying?

The 7950X3D has some very powerful specs and a competitive price for what it offers. For anyone looking for a high performance CPU for gaming or software animation, this AMD offering is a very good option.

https://www.drivers.com/update/pc-fix-tips/specs-gaming-laptop-1/
https://www.drivers.com/update/pc-fix-tips/tips-optimize-pc-gaming/

Filed Under: PC Fix Tips, Tech News Tagged With: 7950X3D, AMD, gaming, Ryzen 9 7950X3D

Windows 11 vs Windows 10

Windows 11 vs Windows 10

Is your PC compatible with Windows 11?

This is Windows first major upgrade in 6 years so understandably there will be questions about compatibility. According to Microsoft the new Operating System should work with most PC’s and they have targeted the middle of 2022 for all Windows 10 devices to have the capability to download and install Windows 11.

Microsoft has a PC Health Check app which will help you determine if your PC meets the basic requirements to run Windows 11.

If you find that the PC Health Check app is not working for you or does not provide enough information, an alternative app is WhyNotWin11 which may be less user-friendly but provides more feedback on compatibility.

System Requirements to run Windows 11

  • Minimum 4GB RAM
  • 64GB storage
  • 1GHz or greater with minimum of 2 cores on 64-bit processor
  • 720p display
  • Internet access for updates which also requires a Microsoft account

Windows 11 features

Windows 11 has a number of new features which aim to help the user work more efficiently and with a recognition of the changing way we are using our devices.

Improved support for touchscreen, voice and pen, better app integration and desktop customisation features all aim to make the user experience more seamless and efficient.

Integration with Android apps

If you are the owner of a Samsung Galaxy phone then you will have had access to Android apps on Windows 10 but Windows 11 includes native integration of Android apps allowing for more seamless operation between mobile and desktop/ laptop devices.

Android apps will be available in the Microsoft Store

Updated interface in Windows 11

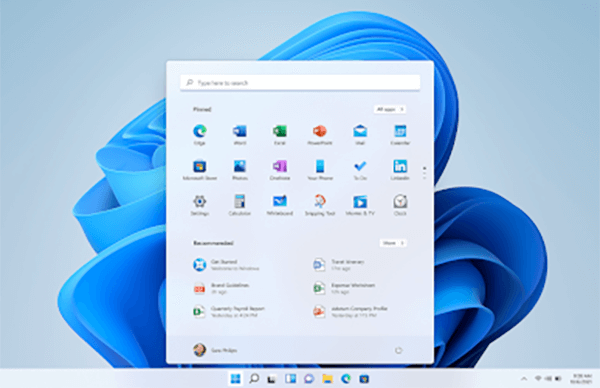
The Windows 11 interface features a cleaner design which has been compared to that of the Mac OS. Along with other visual updates, the Windows 11 start menu has moved to the centre of the Taskbar

windows 11 interface

Microsoft Teams on Taskbar

Teams has been given much greater prominence in Windows 11 and can be accessed directly from the Taskbar. Teams itself has been updated to get a new look. Many users now have a personal and work or school Teams account and this has been taken into account in an interface that labels the accounts so they are accessed separately rather than via one application as before.

Personal Teams accounts will also have an easy-to-access chat function, this feature will not be available on work/ school accounts.

Windows 11 Teams

Desktop customisation features:

Windows 11 features 3 main desktop customisation features: Windows widgets, Snap layouts and Virtual desktops.

Windows widgets

Windows widgets will allow for greater personalisation of your desktop with the ability to customise the widgets according to your preferences.

Snap layouts

Snap layouts will be a very useful feature for jumping between personal and home/ school use on your device. This feature allows you to organise and group apps according to their use, and then open this group with one action, saving you from minimising/ maximising individual windows.
Virtual desktops

Virtual desktops were available in Windows 10 but this feature has been revamped in Windows 11. Virtual desktops allow users to toggle between different desktops such as those for personal use, school or work.

Gaming improvements in Windows 11

Better integration with Xbox gaming consoles recognise the need for improved gaming capability on Windows PCs.

How to upgrade to Windows 11

Windows 10 users can upgrade to Windows 11 for free, click here to check if you are eligible for this upgrade.
Filed Under: PC Fix Tips, Tech News Tagged With: snap layouts, virtual desktops, widgets, windows 11

Top 9 Zoom Alternatives for Video Calling

Top 9 Zoom Alternatives for Video Calling

What are the best alternatives to Zoom for video calling?

This is a very common question these days. While it might seem at the moment like Zoom is the only video calling software out there, there are plenty of alternatives.
Zoom has recently been in the headlines due to security vulnerabilities (read our post on tips for Zoom safety and privacy). If you have privacy concerns, can’t access Zoom or are having issues with Zoom error messages (Zoom error messages and solutions) for some reasons or just want to try out something different, then read on to find out the best alternatives.


Best alternatives to Zoom

Skype

skype videoconferencing software

Remember Skype? Skype is still one of the more popular video chat software programs and it has come up with a new feature that can give Zoom a run for its money – Skype Meet.

Pros:

While not as feature rich as Zoom, Skype Meet is free and can be used on Windows, Android, iOS, Mac, and web. Another very impressive feature is that it can accommodate up to 50 users. Users can simply sign in with a link, which makes it very user-friendly, even for those new to video conferencing software. This basically means users can log in even if they don’t have a Skype account which will be a big selling point.

Cons:

Skype Meet has a text chat window, but that’s just about it. You won’t get to enjoy the meeting organization tools that you find in Zoom.

Main features of Skype:

  • Ability to share presentations
  • Record calls for up to 30 days
  • Can blur the background (very important for privacy and for those of us without the perfect bookcase background!)

GoToMeeting

gotomeeting videoconferencing software

First things first, GoToMeeting is not a free app.

Pros:

Now that we have got that out of the way, let’s see what it has to offer. For starters, you get all the basic goodies you expect from a video conferencing software—namely, screen-sharing, audio and video sessions, and a mobile app for both Android and iOS.

Cons:

The main drawback for most users for this app is that it is not free.

The standard version, which will set you back by $14/month or $12/month annually, allows up to 150 members per meeting, which is pretty good. The business plan tier, on the other hand, can accommodate up to 250 participants and come with a price tag of $19/month. If yours is a large business, perhaps the Enterprise plan may be best for you. It allows up to 3,000 users.

Main features of GoToMeeting:

  • Mobile app for both Android and iOS
  • The standard version allows 150 users
  • Screen-sharing

Microsoft Teams

microsoft teams software

This video conferencing software is one of the top alternatives to Zoom and comes built-in with Office 365. That said, anyone can use the free version of Microsoft Teams; all that is needed is an email address. The basic plan allows up to 300 users, group and one-on-one audio/video calls, guest access, file sharing (10GB per team), and screen sharing.

Pros:

If you want a more robust set of features, check out its business plans. Each team user can share up to 1TB of files and collaborate with others using SharePoint Online and desktop Office programs. The business plans also support training sessions and online webinars, besides giving Administrators access to management, compliance, and security tools.

Cons:

The file structure and permissions settings can be initially confusing. For the uninitiated there is a bit of a learning curve.

Main features of Microsoft Teams:

  • Basic plan allows up to 300 users
  • File sharing (10GB per team) in the free plan
  • Screen Sharing

Cisco Webex

cisco webex app

This application has been around for nearly three decades and primarily serves businesses.

Pros:

The free version offer a pretty good set of features and is certainly worth a look. For the present emergency situation, Cisco has increased the participant limit of its free version to 100 (previously 50). It has also removed the 40-min limit and included call-in abilities.

Cons:

Webex has a free basic plan but there is a fee for the Call Me feature.

Main features of Cisco Webex:

  • 100 participants can join simultaneously
  • Unlimited meeting time
  • Call-in for audio

Jitsi Meet

jitsi videoconferencing software

An open-source platform, Jitsi Meet let’s you meet anyone online at a single click. Simply go to its site and click the “Go” button.

Pros:

While most users would be satisfied with the quick web version, the more tech-savvy can build up their own video app via Jitsi Videobridge. That said, the free version has features that compete with well-known apps, namely chat, the ability to throw away unwanted (or unruly) users, session recording.

Cons:

Administrative functions need work.

Main Features of Jitsi Meet:

  • Private or public chat
  • 75 participants can joint at a time
  • Integrates with Google Calendar, Office 365, and Slack

Google Meet

google meet videoconferencing software

Until recently, this application (previously known as Hangouts Meet) was available only to those who subscribed to G suite (Google’s paid service). However, starting early May 2020, Google made this app available for all its Gmail service users.

Pros:

This app allows you to easily video chat with your family, friends, and colleagues, as long as they have a Google account — a prerequisite for using Google Meet.

To start a meeting, go to Google Meet, click the “Join or start a meeting” button, name your meeting (if you want to), and send the invites. Google Meet, like other video conferencing tools, let you schedule a meeting. You can do that using Google Calendar. Security features included in the app include the ability to kick out unruly participants.

Cons:

You will need to have a Google account to use this.

Main Features of Google Meet:

  • 100 participants can join at a time
  • Unlimited meeting time (till 30th September; after which there will be a 60-min limit)

Facebook Messenger Rooms

facebook messenger videoconferencing software

You can trust Facebook to fight for its digital territory. Precisely for this reason, it’s beefing up the video chat feature with Messenger Rooms, which allows Facebook users to create private or public video chat rooms. This will help secure it’s position as one of the top alternatives to Zoom.

Pros:

Up to 50 people can join a chat room and there’s no time limit on meetings. In comparison, Zoom allows a maximum of 100 people and there’s a 40-min limit on its meetings. Facebook is also allowing non-Facebook users to participate a meeting via a Messenger Room using a link.

Just like in Zoom and other video conferencing apps,  Messenger Room creators can kick out unruly participants any time.

Cons:

Facebook Messenger Rooms has one noticeable drawback. End to end encryption is missing. That said, Facebook says it is not going to eavesdrop on any calls.

Main Features of Facebook Messenger Rooms:

  • 50 people can join a meeting at a time
  • No time limit on meetings
  • Participants can use augmented reality filters

BlueJeans

bluejeans videoconferencing software

Looking for a high-quality streaming option for smaller teams? If yes, BlueJeans may be right up your alley.

Pros:

BlueJeans is a cloud-based video conferencing service that offers three plans — Me, My Team, and My Company. The first plan costs $19.98 per user and allows up to 50 users. The My Team plan will set you back by $23.99/month per host and allows 10 hrs of meeting recordings. It also offers a common dashboard which up to 75 attendees can use. The MyCompany plan has a limit of 150 users and allows access to a room system calendar.

Cons:

Doesn’t offer a free trial for paid plans.

Main Features of BlueJeans:

  • HD content sharing
  • Interactive dashboards
  • Meeting recording

Whereby

whereby videoconferencing software

Pros:

The free version is pretty limited, but nevertheless it can be a good option for catching up with your close friends. You get a single meeting room and no more than 4 users can join at one time. However, you get the ability to lock a room, choose your own URL (provided someone else has not already taken it), share a screen, and kick out or mute users.

Cons:

As the free version has limited features, you may need to upgrade to the pro version. It allows up to 12 users per meeting and gives you three meeting rooms instead of one. You’ll have to cough up $9.99 per month for the pro version.

Main Features of Whereby:

  • YouTube integration
  • Screen-sharing
  • You can “lock” rooms

As you can see from the above, there are lots of videoconferencing alternatives to Zoom out there. It is just a matter of finding which one best suits your needs.

Filed Under: Tech News Tagged With: bluejeans, cisco webex, facebook messenger, google meet, microsoft teams, skype, videoconferencing, whereby, zoom

8 Tips for Zoom Safety and Privacy

Zoom is by far the most popular video conferencing service right now. From office meetings to yoga classes, people are using Zoom in different ways to stay productive and retain some normalcy in their otherwise currently restricted lives because of the Covid-19 virus outbreak.

Thanks to its ease of use and competitive pricing, Zoom has quickly risen to popularity—but that doesn’t mean it is completely safe. No app is, and therefore the onus is on you to take the necessary steps to keep yourself secure on Zoom.

How can you do that?

This post is a good starting point. We will discuss 8 tips for Zoom safety and privacy.  

Protect your account

Look, here’s the thing. Your Zoom account is like any other account, and so you should apply the basic account protection here as well. Namely, make sure your password is strong and unique—a combination of letters, numbers, and special characters that is hard to guess.

Using a two-factor authentication is strongly recommended, as it adds an extra layer of protection. It can prove to be the difference between a compromised and a safe account in case your Zoom account data leaks. While so far Zoom has done a good job of keeping account data safe, things like this have happened in the past. Therefore, enabling an extra layer of protection makes a lot of sense.

Last but not the least—and this one is specific to Zoom only—protect your personal meeting ID. Once you complete registration, you will receive a Personal Meeting ID. Try not to make it public.

Since Zoom lets users create public meetings using their Personal Meeting IDs, one can easily leak it if one gets careless. If you do leak your Personal Meeting ID, anyone privy to it can join all meetings you host. Therefore, share it carefully.

Be wary of links

When you create a Zoom meeting, you can invite the participants by copying a URL generated by Zoom. However, this is hardly the safest way to invite people or enter a meeting.

Why? Glad you asked.

One of the most common tricks used by online scammers to dupe people is to send out a malicious link in an email. When the recipient clicks it, either he or she is encouraged to share their confidential information or a malware takes control of their computer and steal personal information.

When you create a meeting on Zoom, you have the option of inviting people by sending out a link which starts with https://zoom.us/ and then is followed by a string of letters and numbers.

However, there is another, much safer of inviting participants.

Instead of using the link that appears on your screen when you create a Zoom meeting, note down the meeting ID and the password. Next, list this information in an email, add a personal note to it, and then send out the email to the participants. They can use this shared information to join the meeting via the Zoom app or through Zoom official website. 

Download the Zoom app from the official website

Do you know the number of malicious files using the names of other popular video conference services has grown rapidly in the last two months?

Hackers are trying to use the rapidly-growing popularity of Zoom and other similar services to their advantage by disguising malware as online videoconferencing clients.

Precisely for this reason, you should always—we repeat always—download Zoom from its official website: zoom.us. If you want the videoconferencing client for your android phone or iPhone, visit Google Play or the App Store.  

Don’t share your conference links on social media

If you are organizing an online public event, you may want to use social media to share the link to it. However, that is not a good idea at all.

Ever heard of terms like Zoombombing or Zoom-bombing or Zoom raiding?

Well, they all refer to a situation when an uninvited person joins a Zoom meeting, usually with the intention of disrupting it. 

Which brings us to the question: How do these people learn about upcoming events? You guessed it right—social media.  Therefore, avoid publicly posting links to your Zoom meetings. In case you still want to do that, ensure you don’t turn on the option Use Personal Meeting ID.

Use a password for your every meeting

Protecting your meetings with passwords remain the most effective way to ensure only those people who have been invited can attend it. Some time back, Zoom enabled password protection by default, which is definitely a smart move. However, remember your Zoom account password and the meeting password are two different things. Furthermore, the meeting password—much like the meeting link—should not be posted on social media. Else, trolls may get a free hand to disrupt your meetings.

Enable the Waiting Room option

Waiting Room is another option that lets you control your meetings. Recently, Zoom enabled it by default, and we recommend you let it stay that way.

When this option is checked, all participants must wait in a “virtual waiting room” till the meeting host approves each one of them separately. As you may guess, this gives the host more control over who joins their meeting, even if an individual who wasn’t invited managed to somehow get hold of the meeting password. Also, the meeting host, if they want, can kick out an unwanted person from their meeting into the “virtual waiting room.”

Choose the web client as much as possible

In the absence of a reliable security advanced, the Zoom app—like other apps in the market—remains vulnerable. Precisely for this reason, more than anything else, we recommend you stick with its web client as much as possible.

The web client doesn’t enjoy the same permissions as an installed app. Given this, if it gets compromised, the harm will be much less than compared to a compromise Zoom app.

But what if it’s not possible to use the web client?

In that scenario, try installing the app on a secondary laptop or phone, that is, a device that has little personal information of yours. While this may sound a bit paranoid, it’s better to take precautions now than repent later.

Don’t believe Zoom’s end-to-end encryption claim

In addition to its impressive feature set and competitive pricing, Zoom gained popularity on account of its claim of end-to-end encryption, which means any communication between you and other person is encrypted in such a way that only you two can decipher it, not others.

Sounds impressive—but this is almost impossible to achieve, as pointed out by many security researchers. Unwillingly Zoom also acknowledged that, stating that by the other end they meant the Zoom server, not the person on the other side.

This means even though video is encrypted, it is encrypted only till the Zoom server. Therefore, Zoom employees have access to the data. Law enforcement groups may also access it. Your text chats, however, are literally encrypted end-to-end.  

Final Words

Self-isolation is boring. It is also be lonely at times. The good part is we have apps such as Zoom that allows us to work and do so many other things—like enjoy our daily Yoga classes—remotely. Imagine current lock-down happening before broadband or videoconferencing!

We’re thankful apps like Zoom exist. All you have got to do is use it safely, which you now know how to.

Filed Under: Tech News Tagged With: Zoom safety

How to Install Covenant add-on in Kodi

How to Install Covenant add-on in Kodi

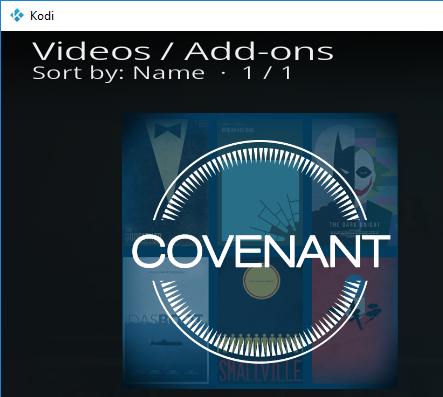
Covenant is one of the most popular add-ons for Kodi users. It has one of the best user interfaces that give you easy access to different content categories. The covenant add-on has the power to unlock the Koid’s potential by offering you access to a huge library of entertainment content.

covenant add-on

After being offline for few months, the Covenant add-on is now available for installation on Kodi again.

If you want to install covenant add-on in Kodi, this post is for you. Here we have discussed three different methods to install Covenant add-on in Kodi player. If you are facing any errors while installing the add-on, you need to update your Kodi Player before installing Covenant add-on. If you already have covenant add-on installed but are facing difficulties in using it, you need to update the Covenant add-on to get rid of errors.

The Pre-requisites/Before installing the Covenant add-on

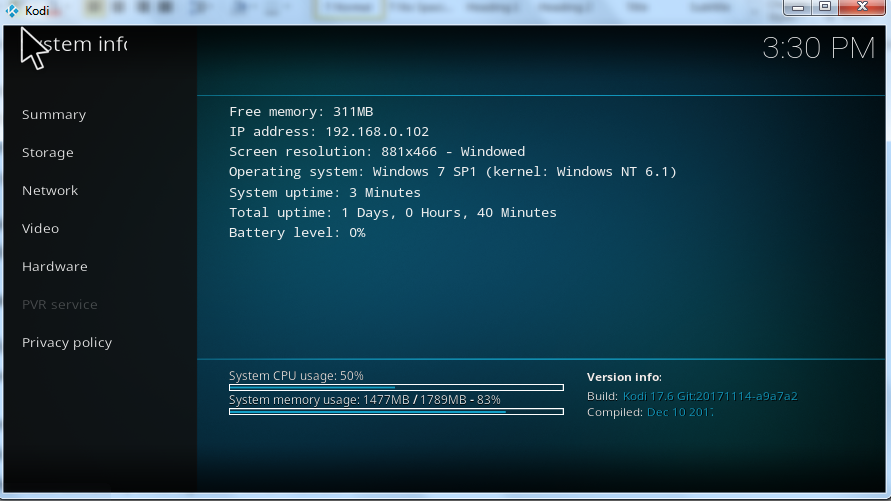
Before you follow any methods given below to install Covenant add-on in Kodi, you need to ensure you have the latest version of the Kodi player (Kodi 17.6 Krypton).

Here are the steps to check Kodi version:

  • Open Kodi Player
  • Click the Settings (gear icon)
  • In the next window, click System information
  • In the left-hand panel, look for Build number under Version info
build info

If the build number is Kodi 17.6, you can straightway go ahead and follow any of the listed methods to install covenant add-on.

However, if your Kodi player version is older than 17.6, you must first update Kodi player and only then proceed to install the Covenant add-on.

Allow installation from unknown sources in Kodi

Kodi is an open-source player and it does not encourage users to install add-ons from unknown sources. This restriction is specifically put in place to secure the Kodi player from malicious programs. However, you can override this security feature by enabling the option to allow installation from unknown sources.

Here are the steps to follow:

  • Open Kodi Player
  • Click the Settings(gear icon)
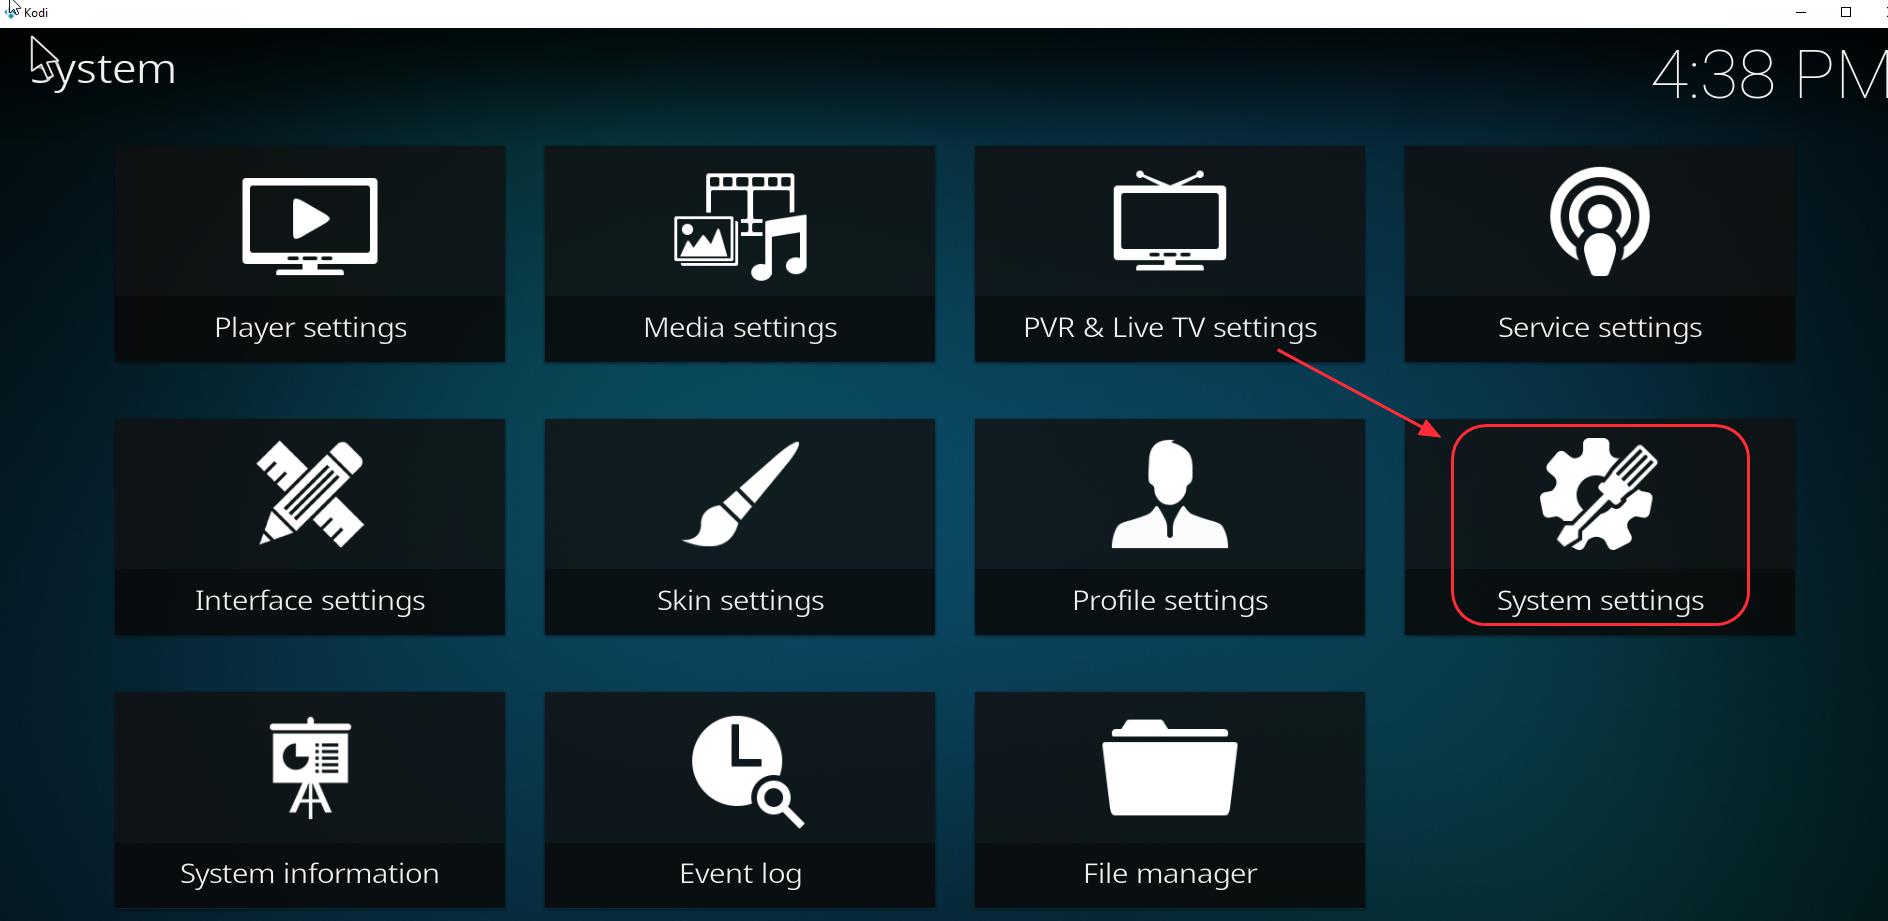
  • In the next window, click System Settings
system settings
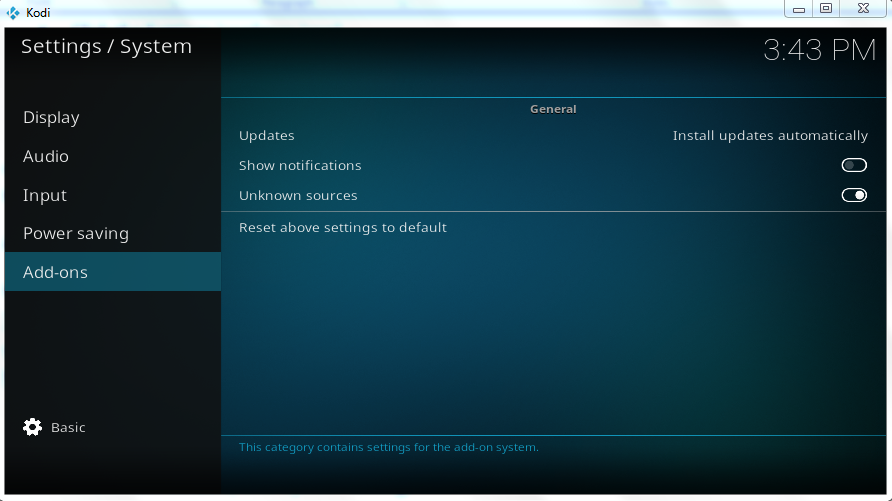
  • Click Add-ons
  • In the left pane, click the toggle switch Unknown sources. (the color of the dot in the toggle switch turns white which indicates the features is activated)
  • addons unknown sources

Once you have activated the option to install add-ons from unknown sources, you can go ahead and follow any method to install Covenant add-on in Kodi player.

Method One- Install Covenant on Kodi from the Kodil Zip file

One of the methods to install covenant add-on is using Kodil zip file. Here are the steps to follow.

  • Download the Kodil zip file to your computer
  • Launch Kodi player
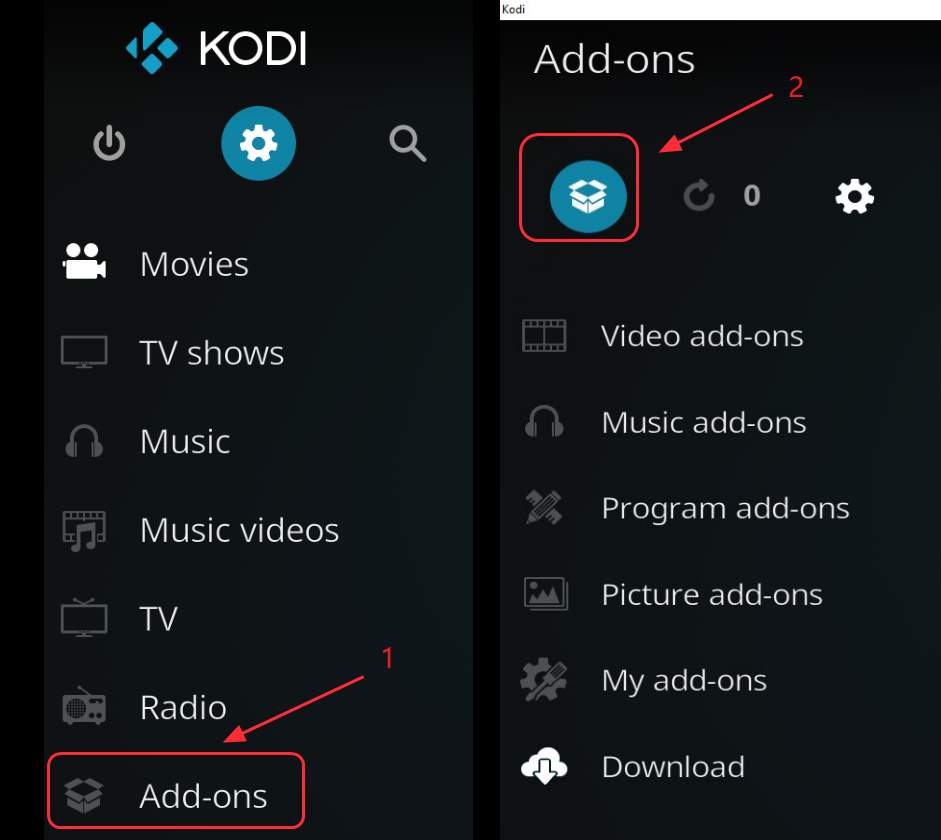
  • Click Add-ons and then click Package icon in the upper left corner in the left panel
addons-package icon
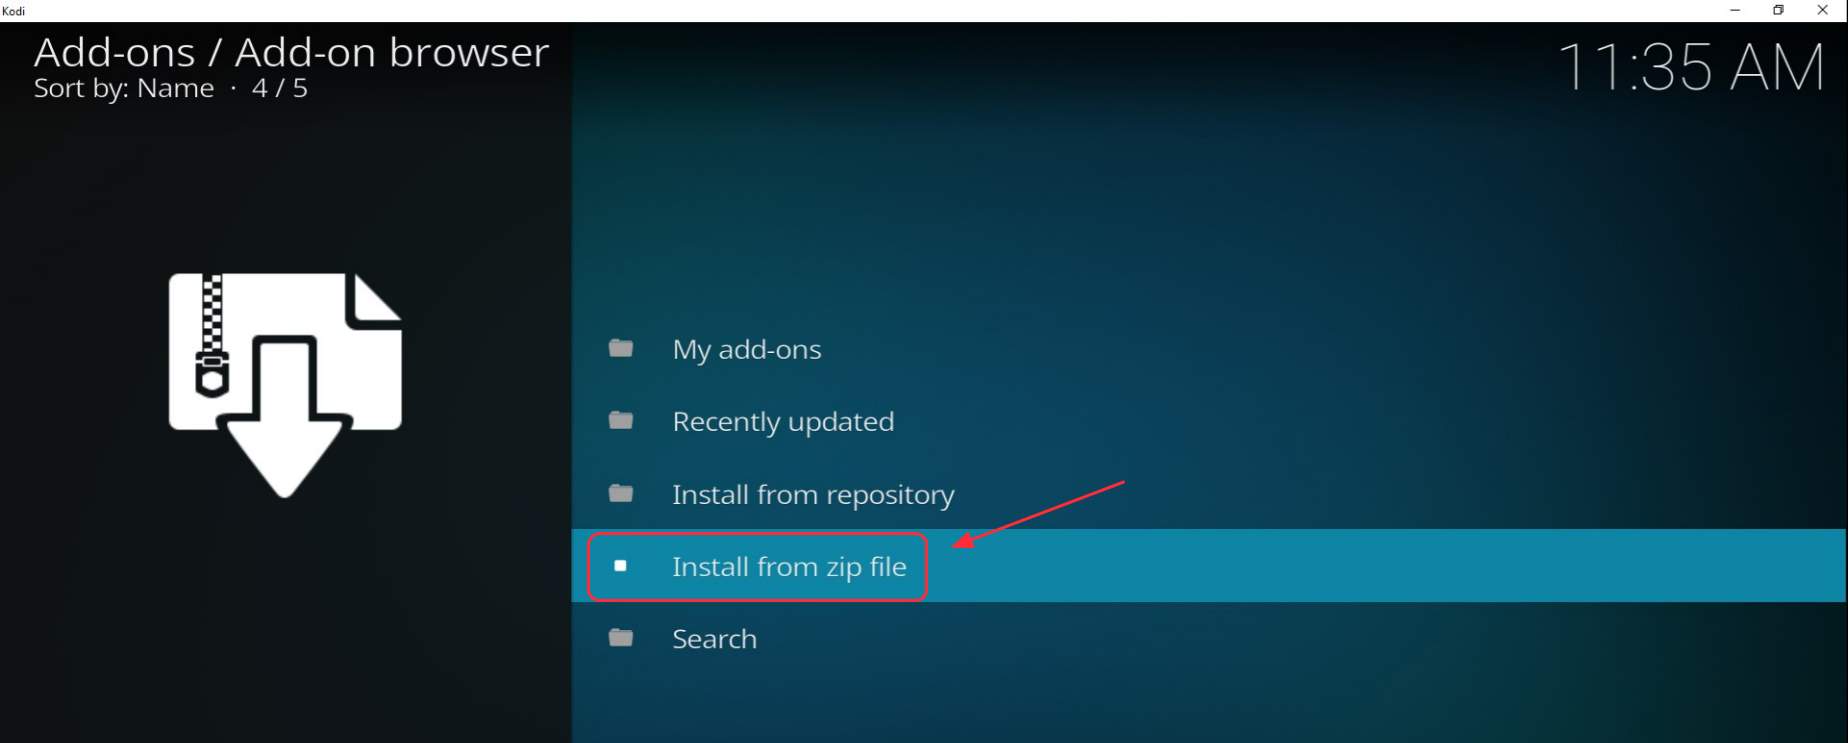
  • In the next window, click Install from zip file
install from zip
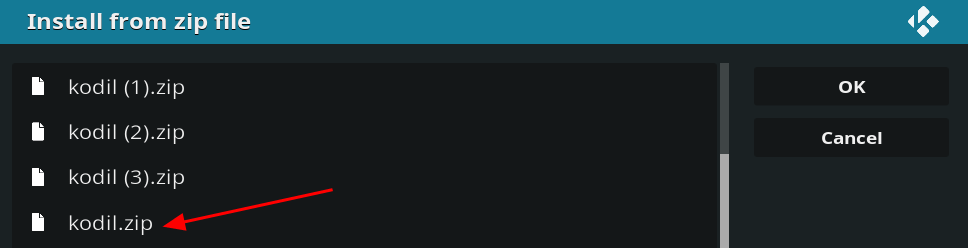
  • Browse to the folder/location where you saved the Kodil zip file and select the Kodil.zip file
kodi zip
  • Wait for some time until the Kodi Player uploads the zip file and install the Kodil repository. Once it is uploaded you can see Kodil Repository installed in the upper right corner.
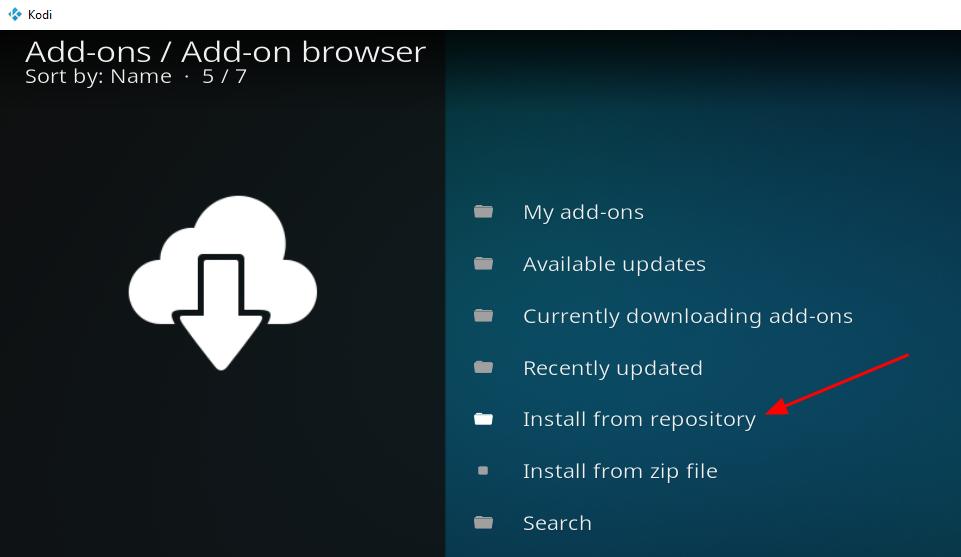
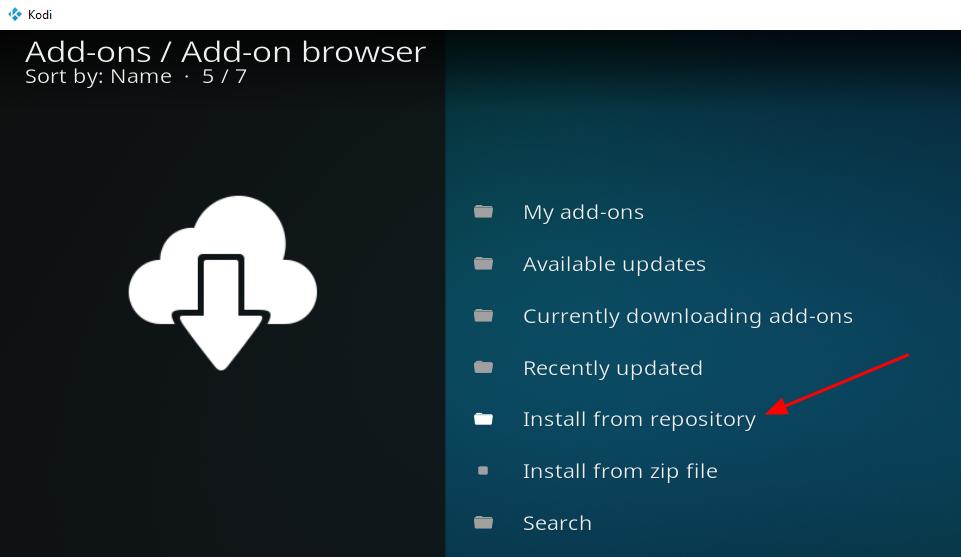
  • go back to the Add-on / Add-on Browser page and click Install from repository
install from repository
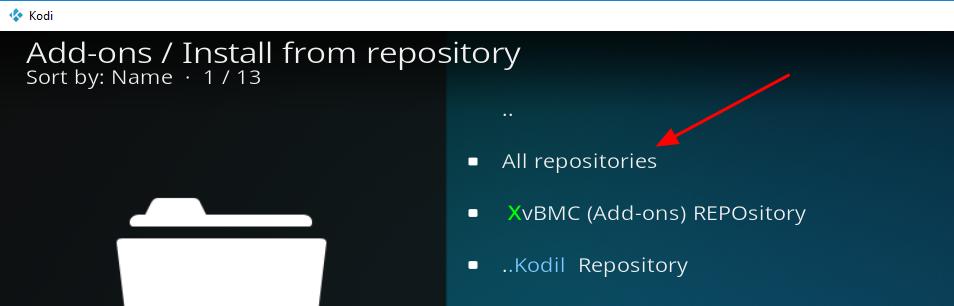
  • Click All repositories
all repositories
  • Select Video add-ons
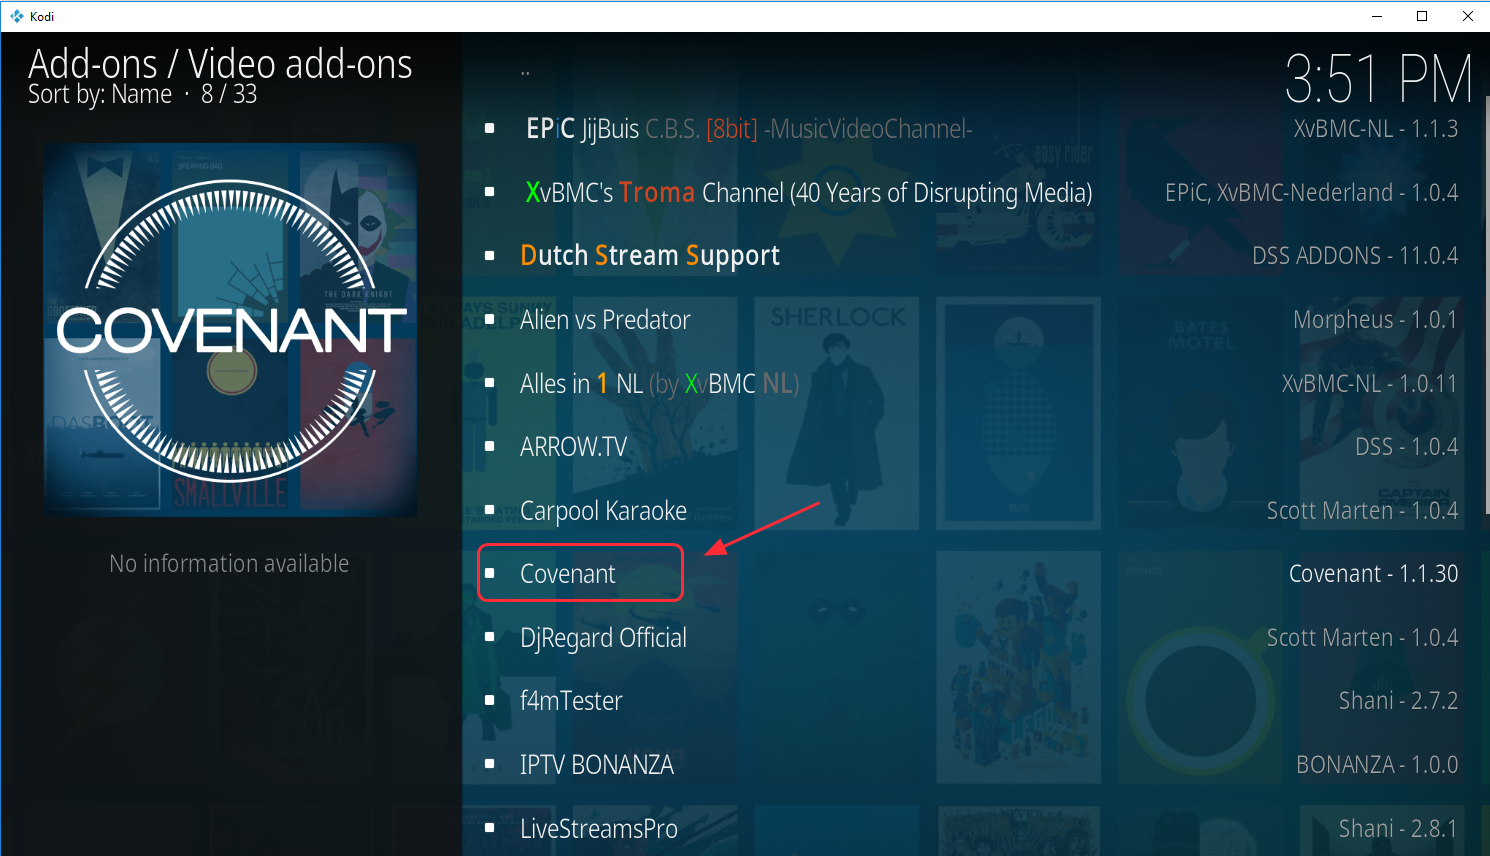
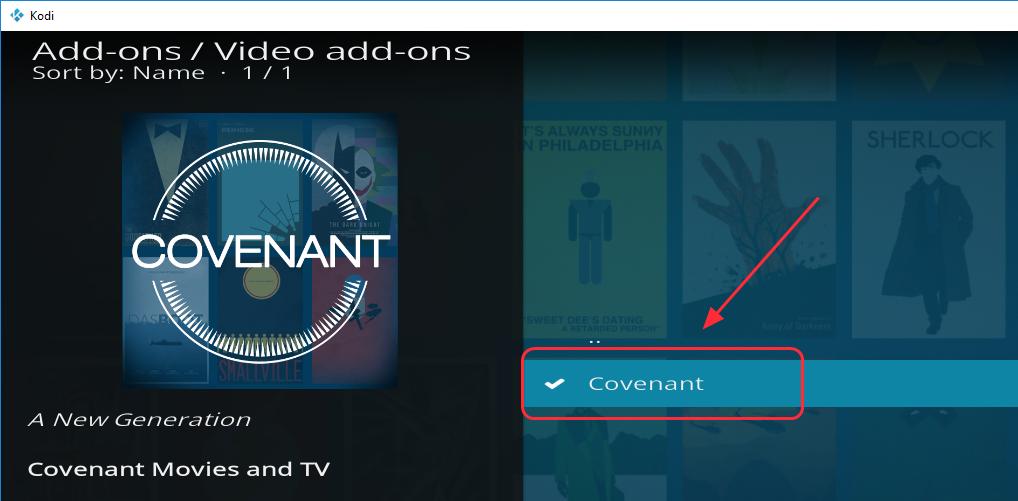
  • Scroll down the list and select Covenant
covenant 3
  • Wait for some time, the Kodi player will now download and install Covenant add-on. After the Covenant add-on is installed, you will see a notification mentioning successful installation in the right-hand corner.
  • Now go to Kodi home page and click in the following order – Add-ons-> Video add-ons -> Covenant

Many users have complained of Kodil zip link being offline and getting an error “404 not found”. If you face a similar issue, you can use the XvBMC repository to install Covenant add-on in Kodi player.

Method Two – Install Covenant on Kodi with the XvBMC repository

The Covenant add-on is also available through XvBMC repository, which is one of the more stable repositories and has many Kodi add-ons. The software repository refers to a central place to keep software resources.

Users can access these repositories and download and install software from repositories. To install Covenant add-on in Kodi with the XvBMC, follow the steps given below.

  • Open Kodi Player
  • Click the Settings(gear icon)
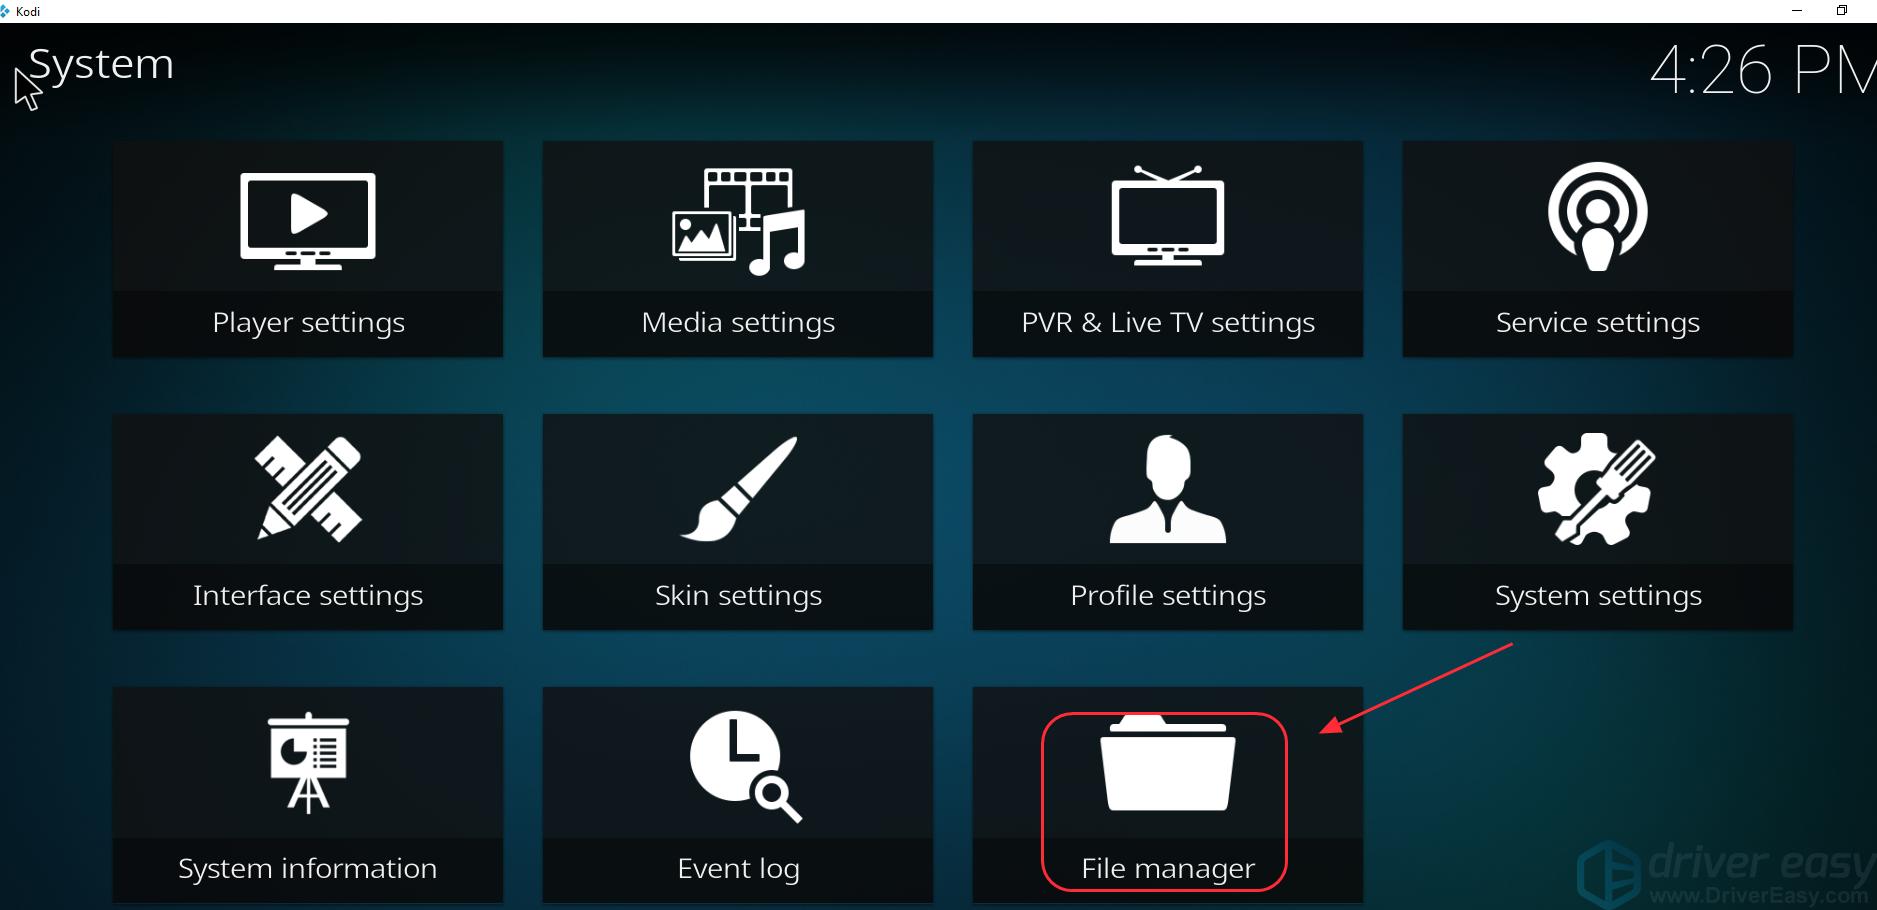
  • Click File Manager
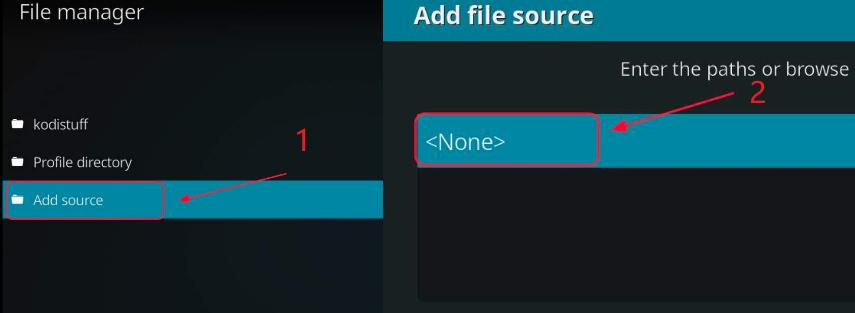
  • Double click Add Source and then click None
add source none
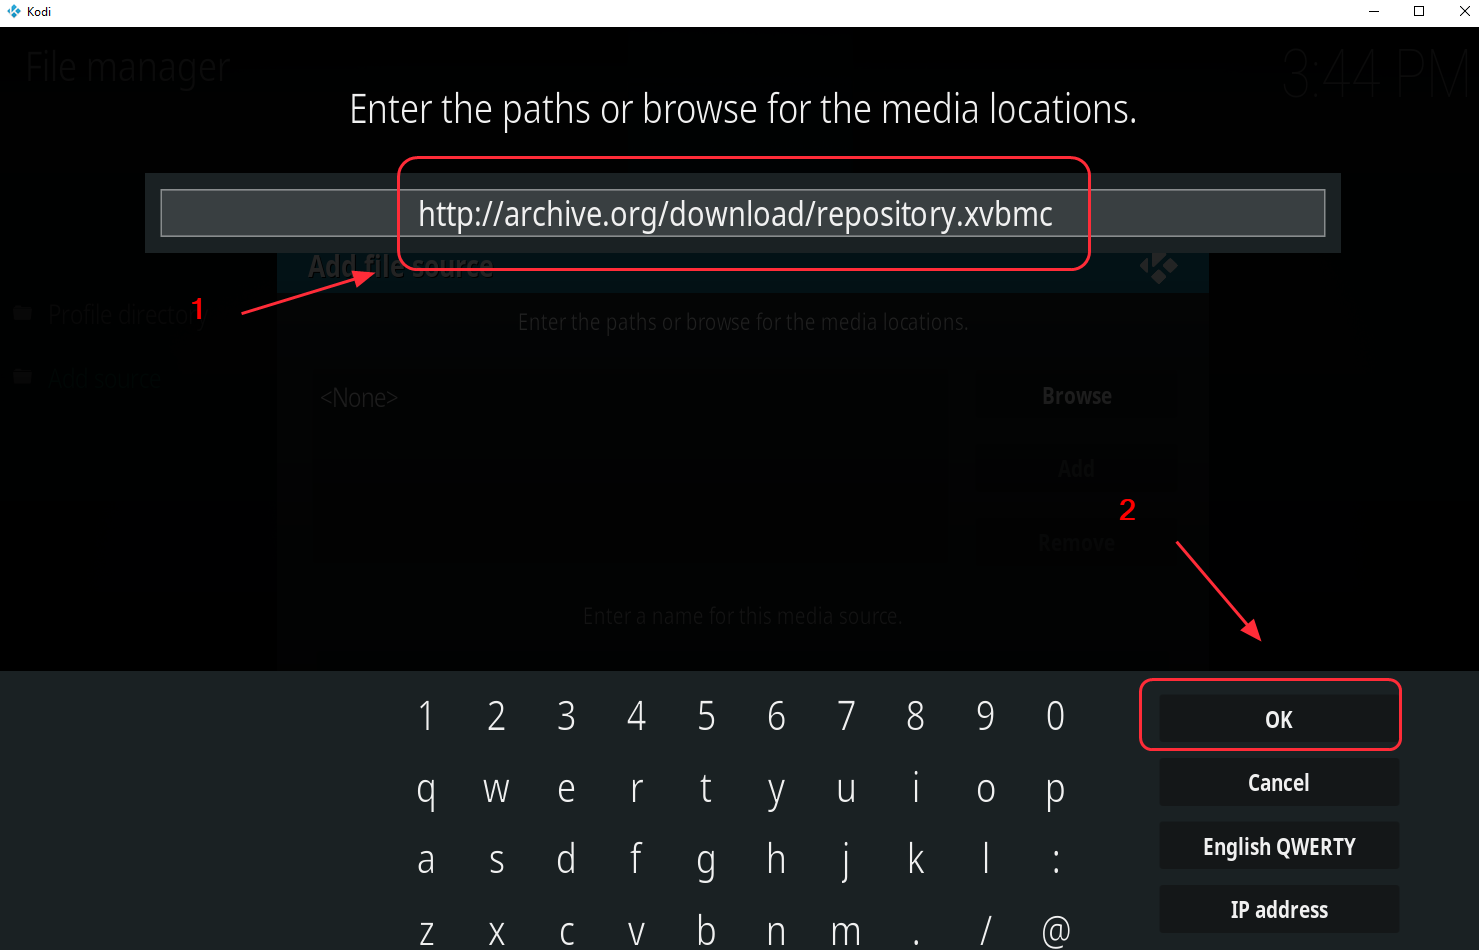
  • Type the following URL – http://archive.org/download/repository.xvbmc and click OK
xvbmc repository
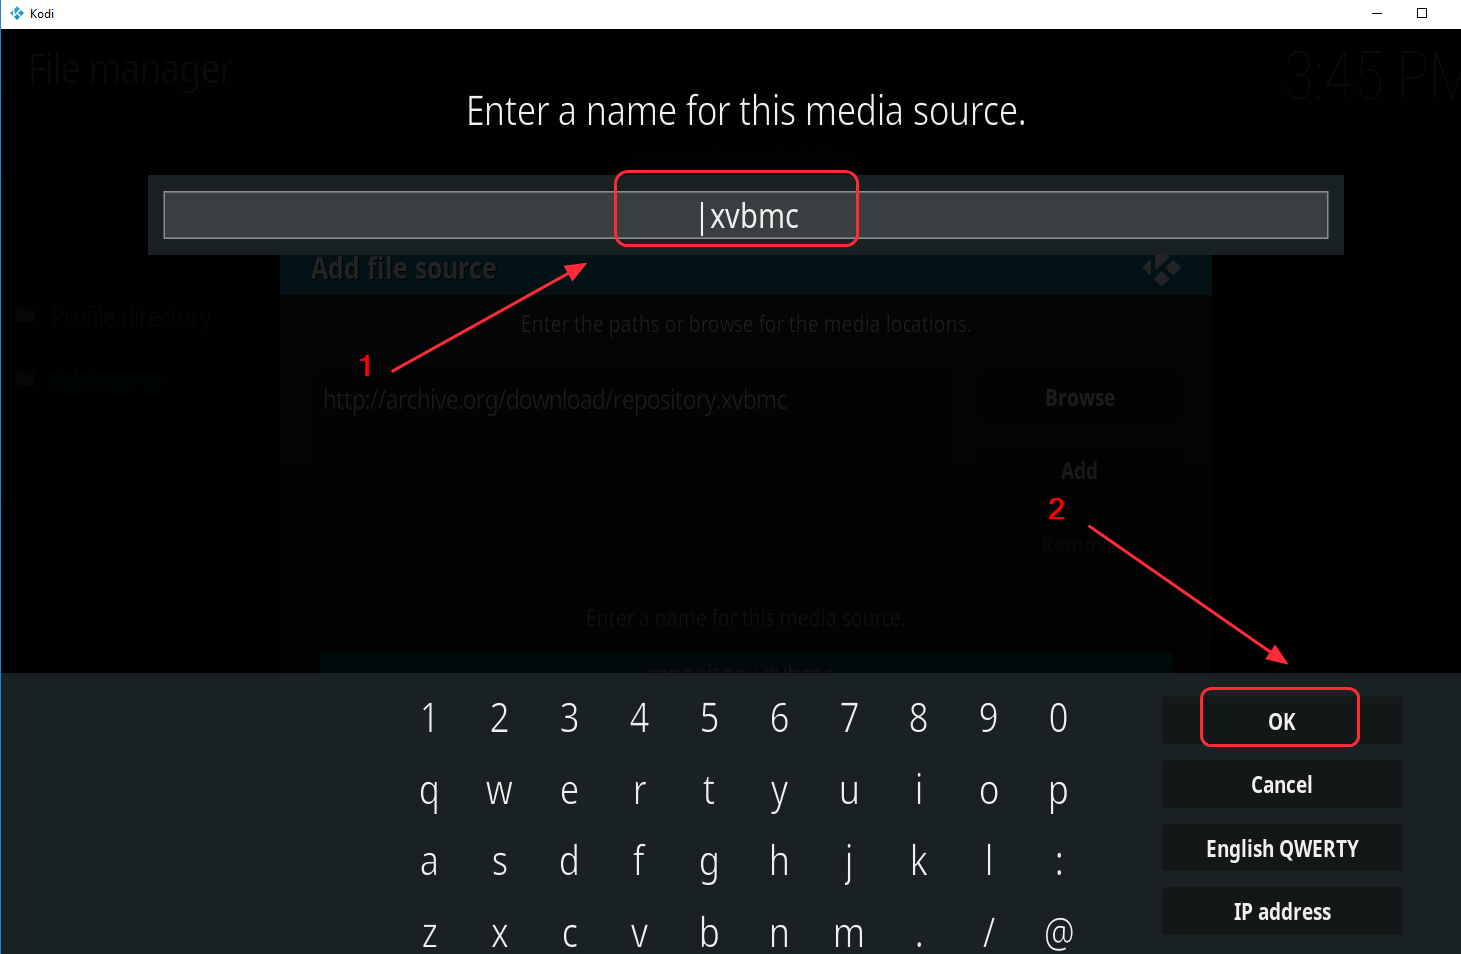
  • Enter any relevant name to save the source. I have typed xvbmc for easy identification and click OK twice to save it.
xvbmc
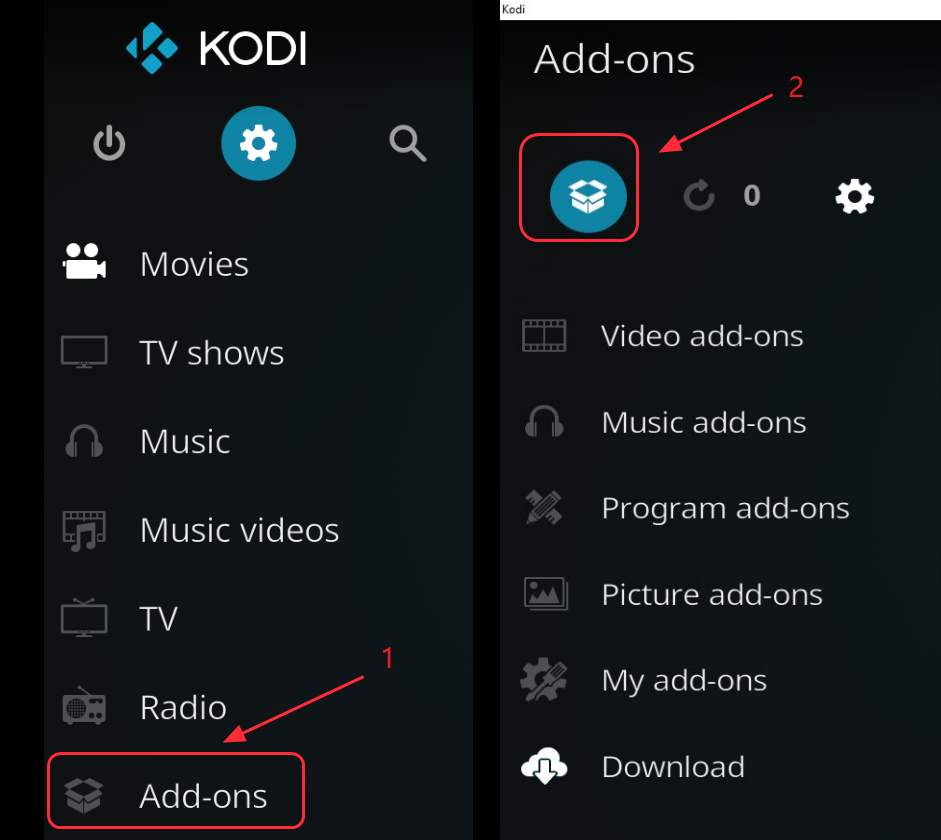
  • go back to Kodi player home page and click Add-ons and then click Package icon on the upper left
addons-package icon
  • Click Install from zip file
install from zip
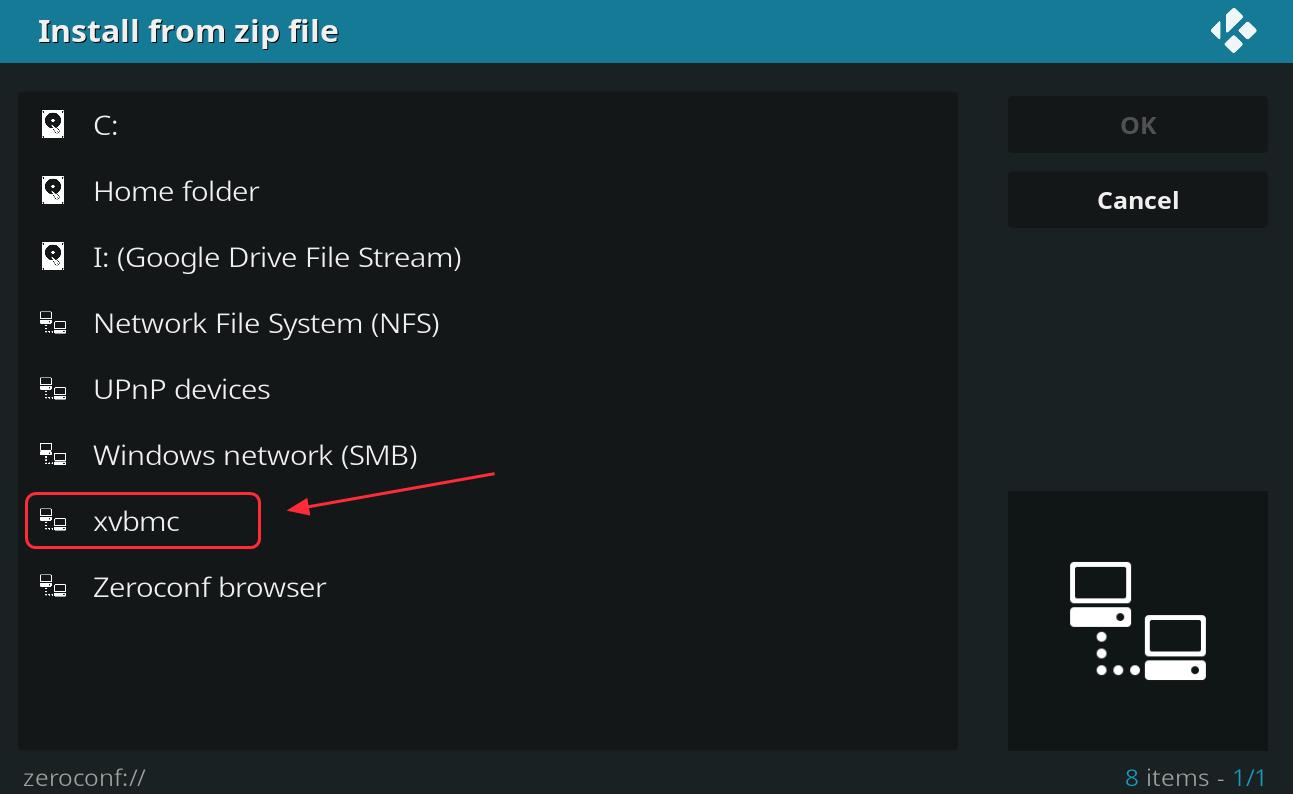
  • Select the file you just saved, I have selected xvbmc
install zip
  • Select repository.xvbmc-x.x.x.zip, so I clicked repository.xvbmc.4.2.0.zip
  • Click
  • Wait for the add-on enabled notification
  • Click Install from repository
install from repository
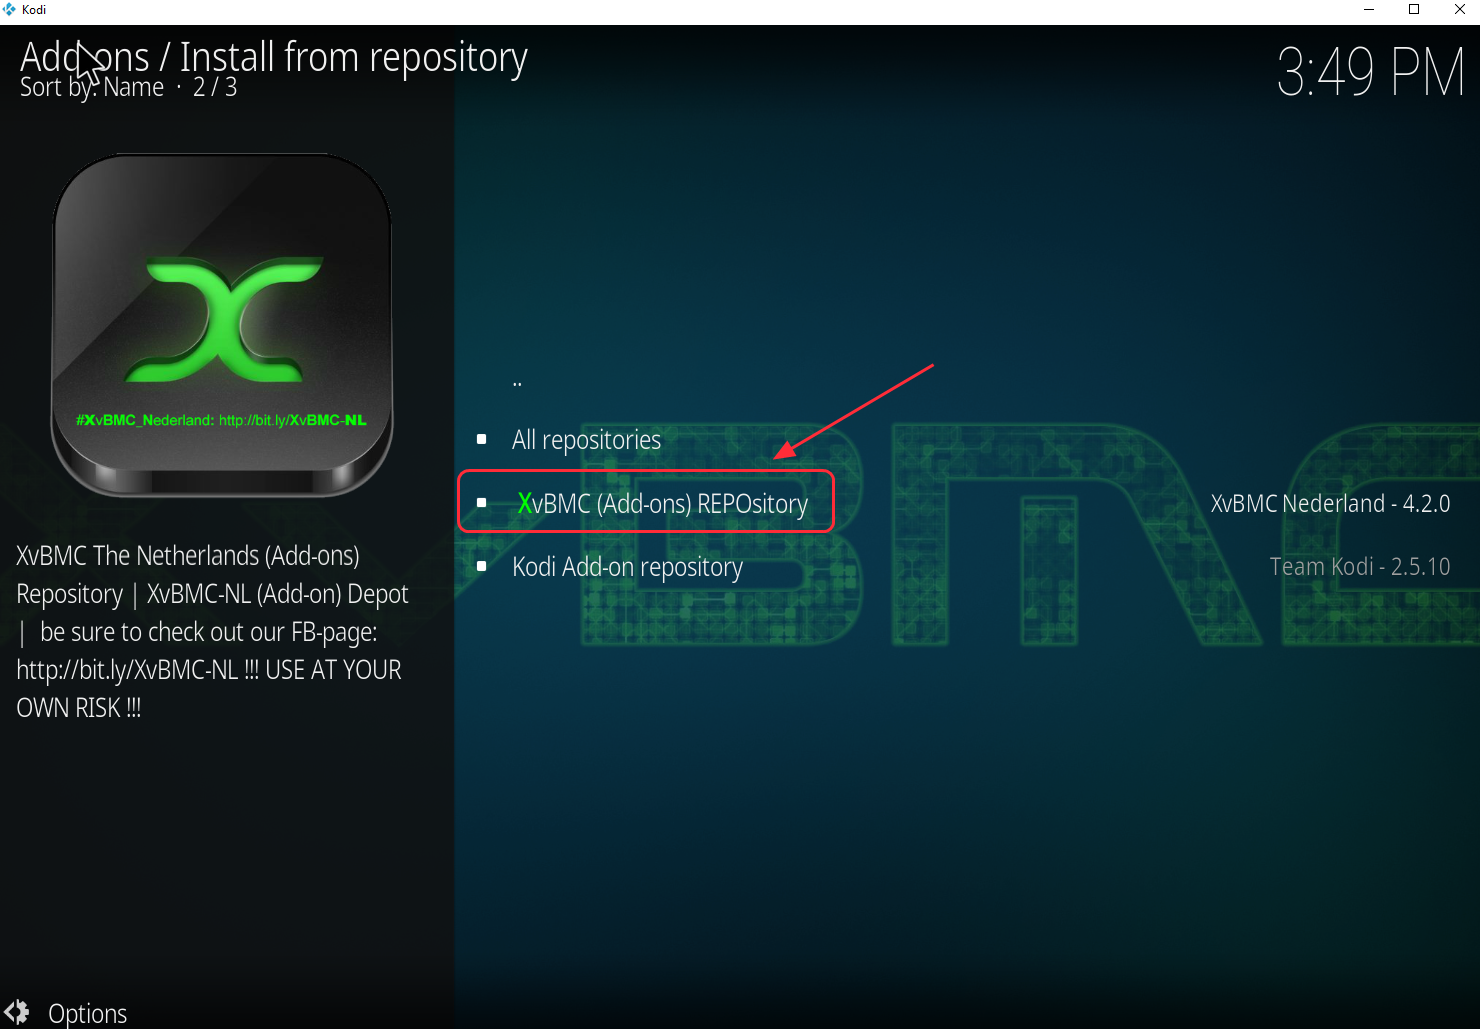
  • Click XvBMC (Add-ons) REPOsitory
XVBMC addons REPOsitory
  • Click the type of add-on. Since Covenant is a video add-on, you need to Click Video add-ons
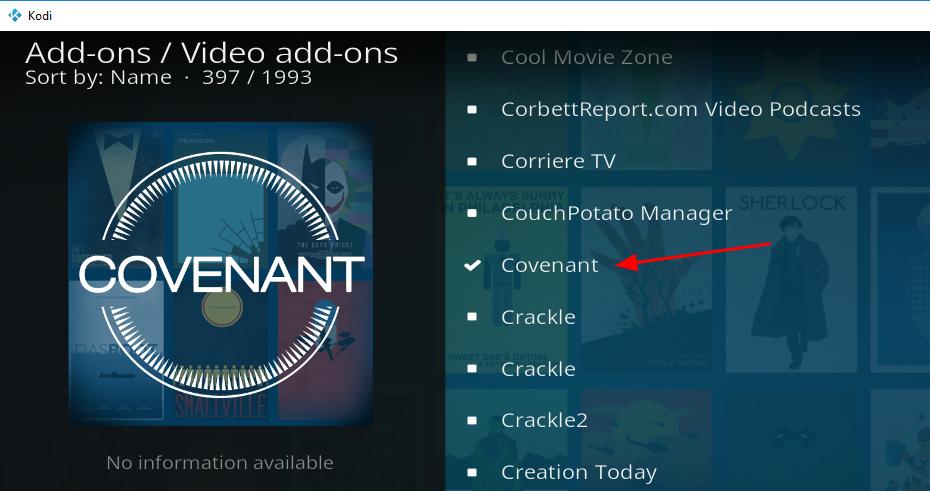
  • Click Covenant from the list
covenant
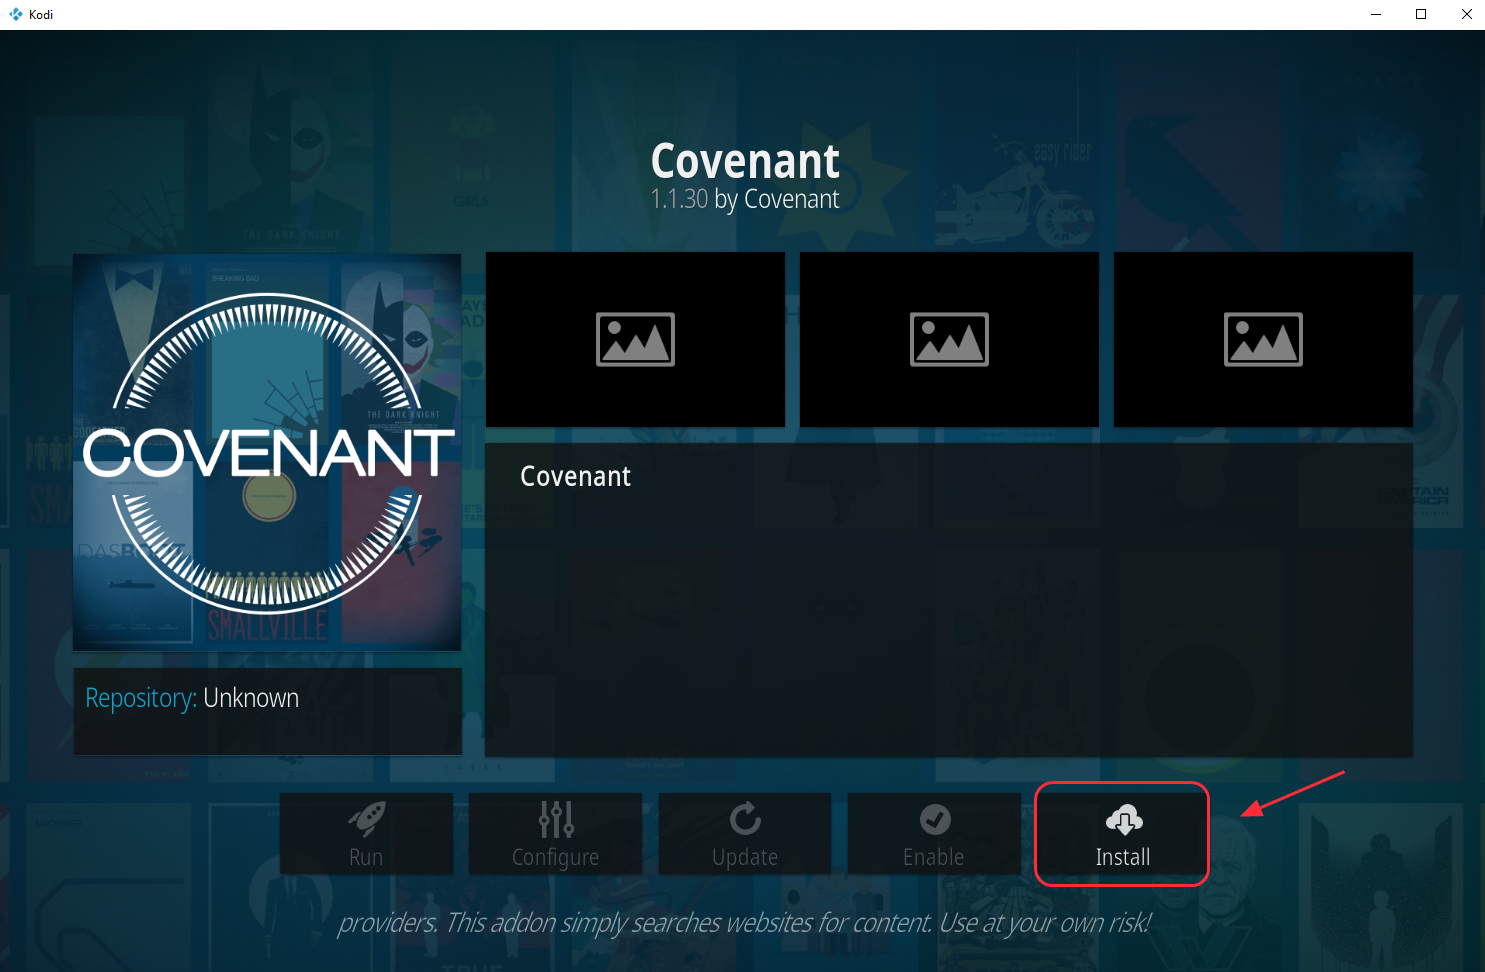
  • Click Install at the bottom right
install
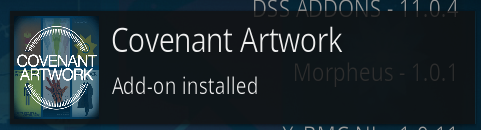
  • Wait for the Add-on installed notification. When you see the notification, it indicates covenant add-on is successfully installed
add on installed
  • Now go back to Kodi home page and click in the following order to enjoy Covenant- Add-ons-> Video add-ons -> Covenant

If you are not able to install covenant add-on through XvBMC repository, you can try the next installation method.

Method 3 – Install Covenant on Kodi through the Kodil repository

Kodil repository stores different add-ons that can be installed in Kodi player. Here are the steps to follow to install Covenant add-on through Kodil repository.

  • Open Kodi Player
  • Click the Settings(gear icon)
  • Click File Manager
file manager
  • Double click Add Source and then click None.
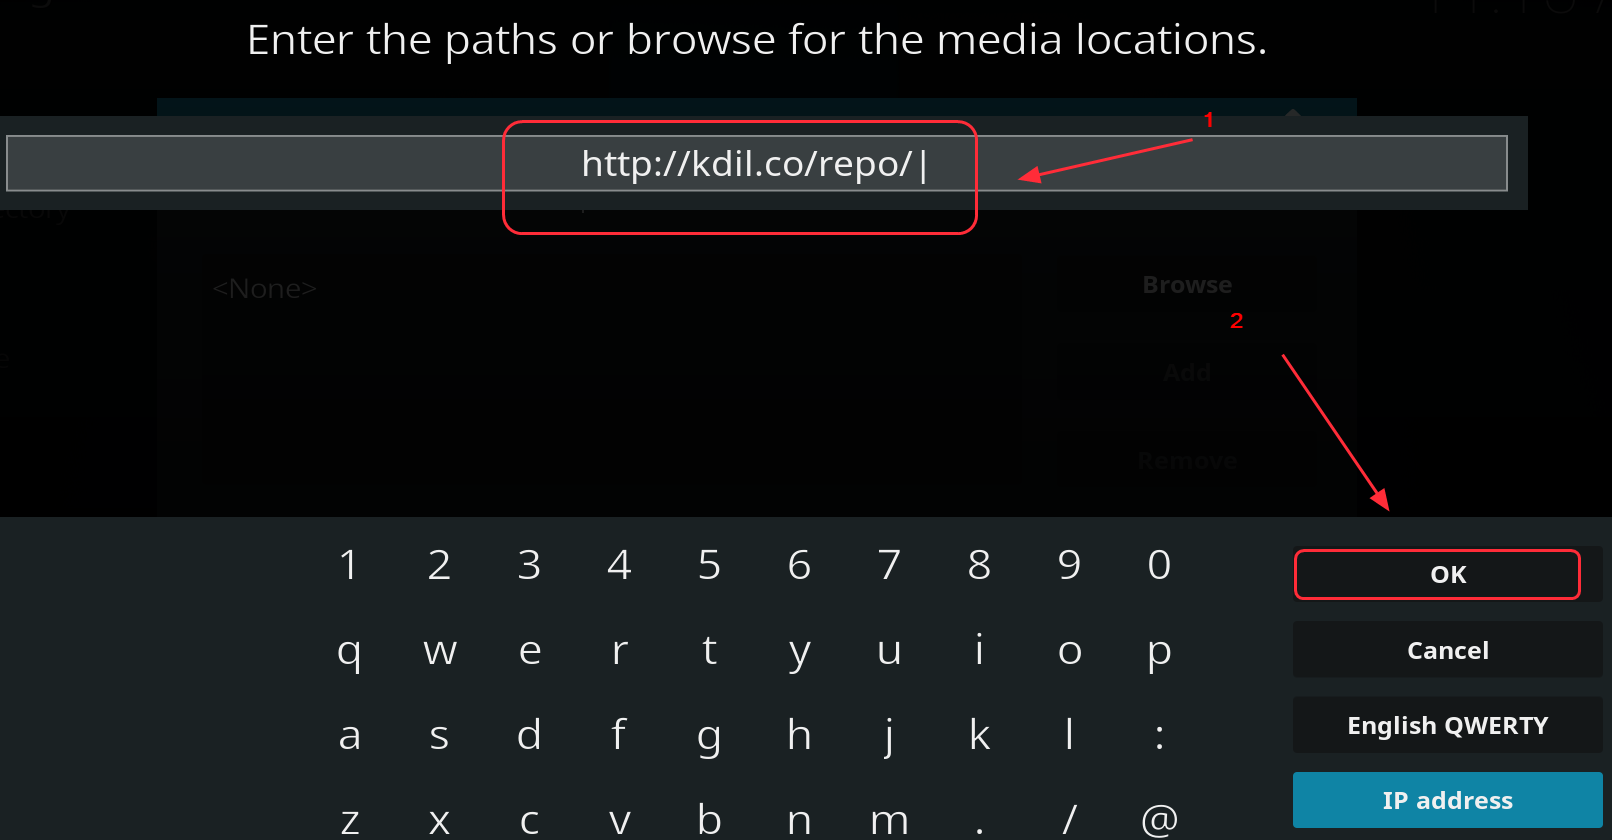
  • Type the following URL – http://kdil.co/repo/ and click OK. Alternatively, you can also paste the URL and click OK
kdil.co-repository
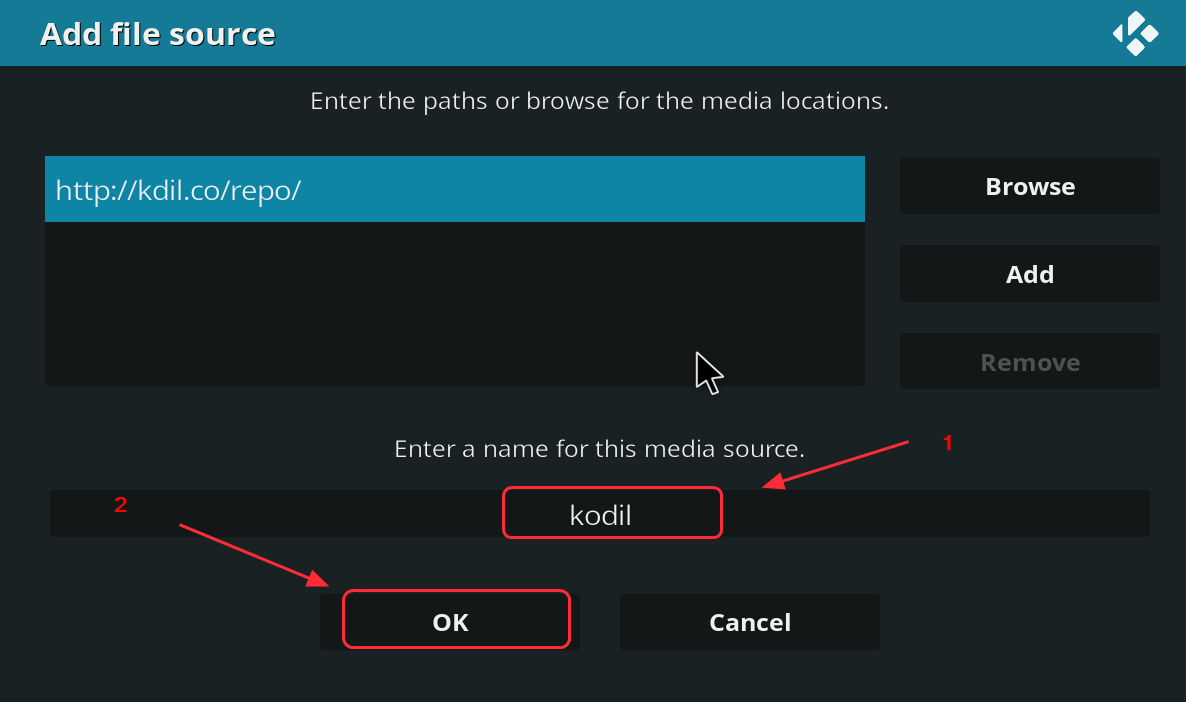
  • Type a relevant name for the source. I have typed kodil for easy identification. Click OK twice to save the source
http-kdil.co-repo
  • Press Esc until you go back to Kodi home page
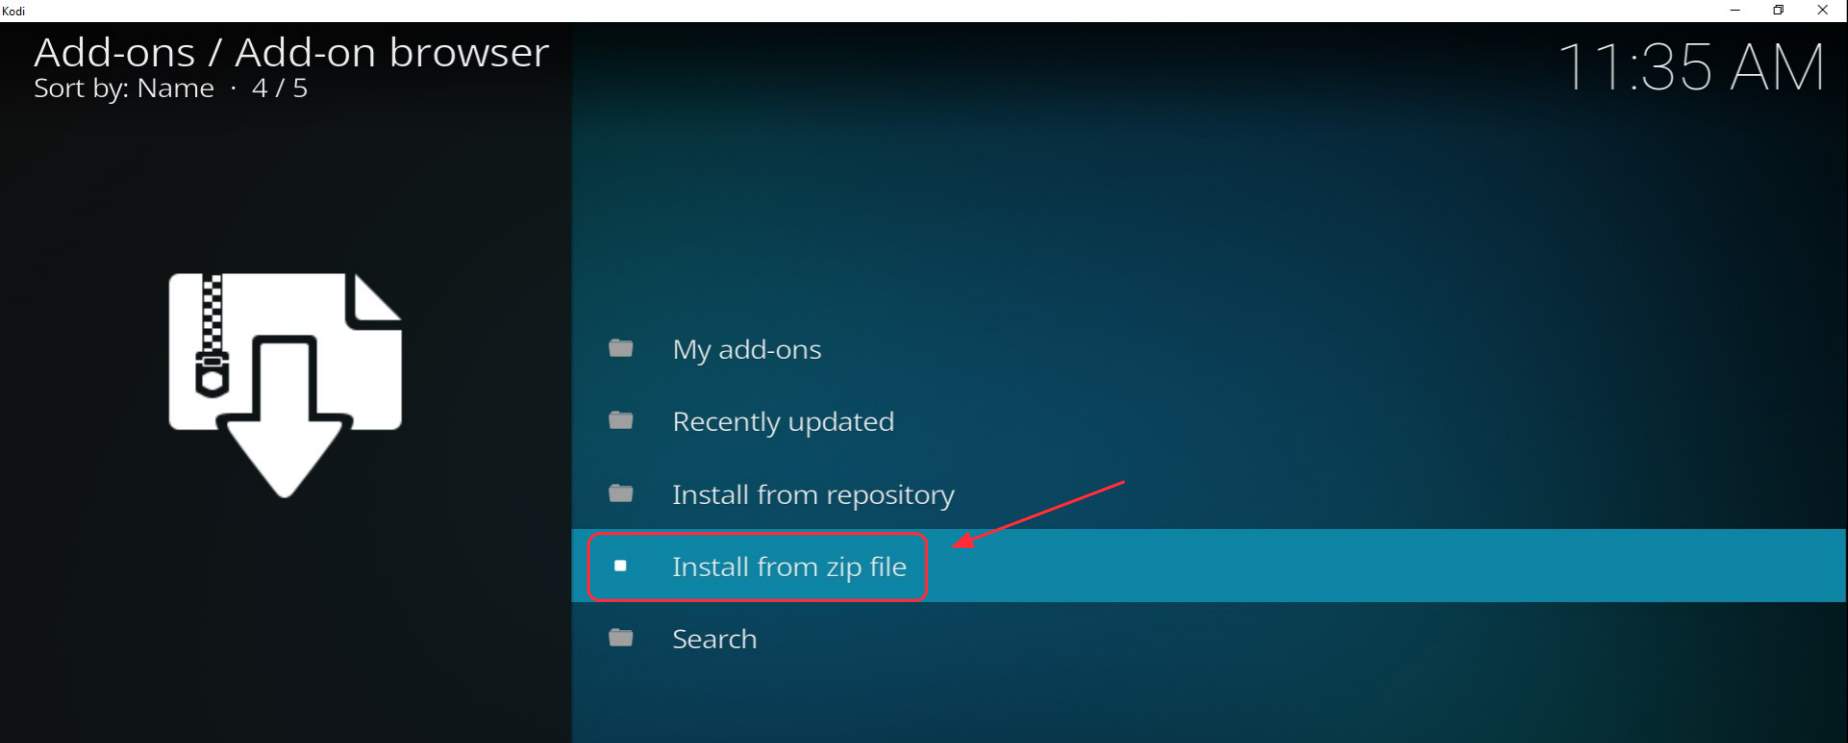
  • On the Kodi home page, click Add-ons and then click Package icon on the upper left
  • click Install from zip file
install from zip
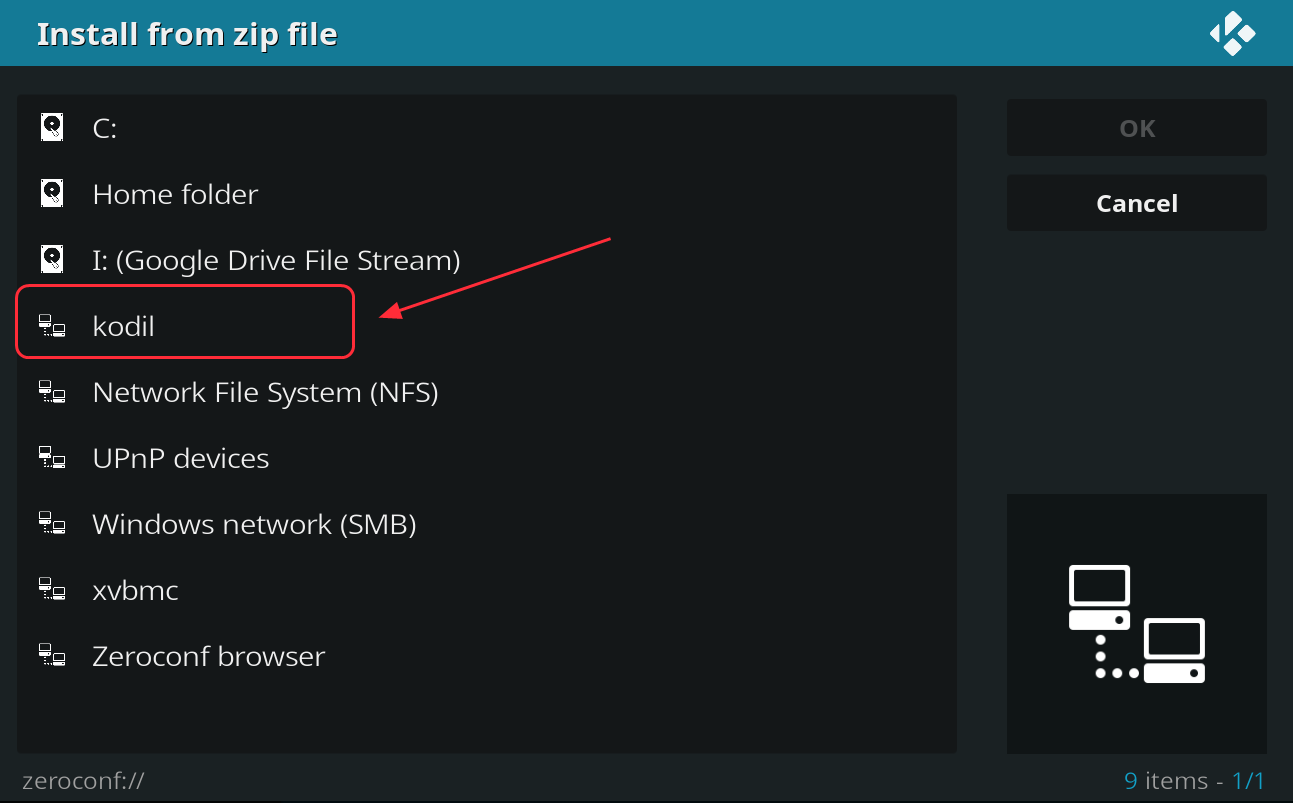
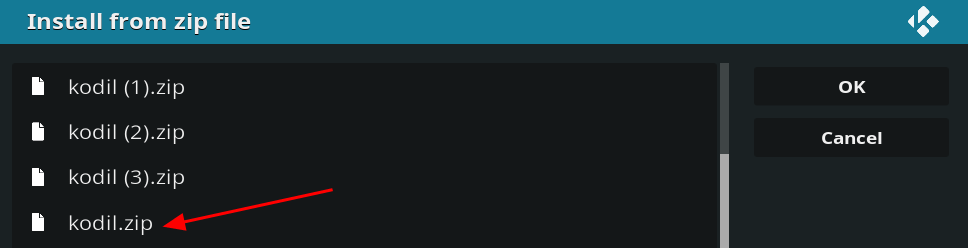
  • Select the source file you just saved, I have selected kodil
  • Click zip
kodil zip
  • Click OK
  • Wait for the add-on enabled notification
  • go to the Add-ons page and click Install from repository
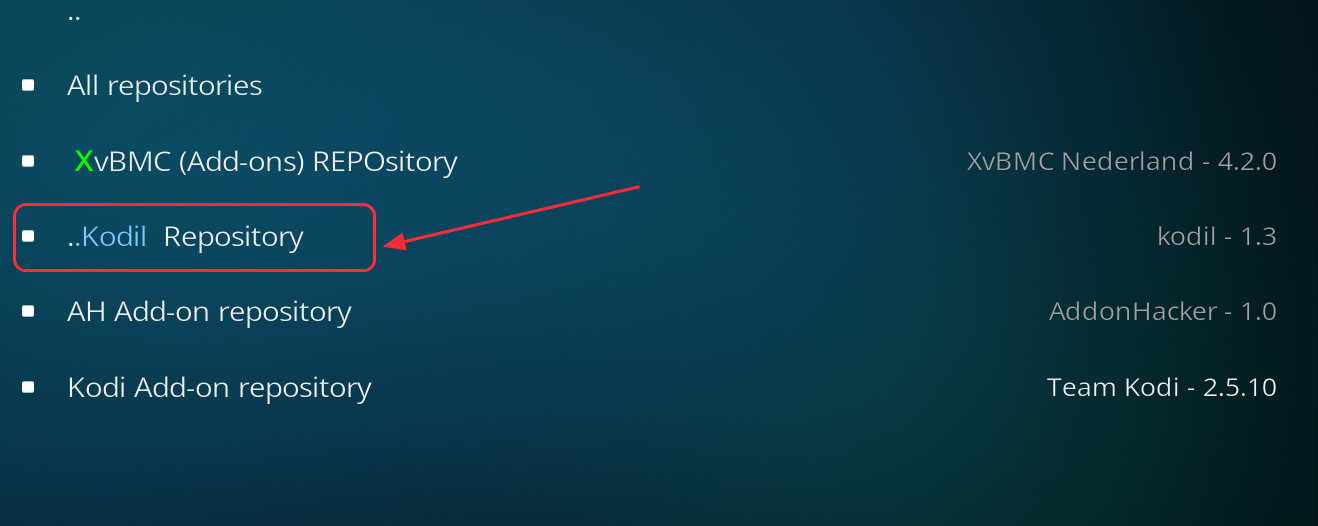
  • Click Kodil Repository
kodil repository
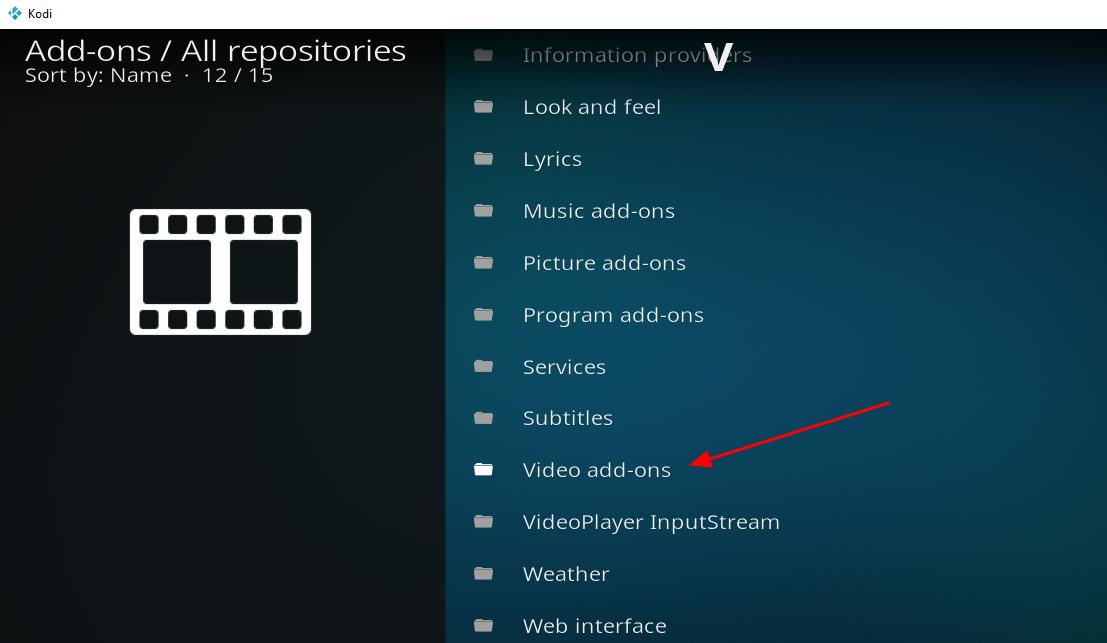
  • Click Video add-ons
video add-ons
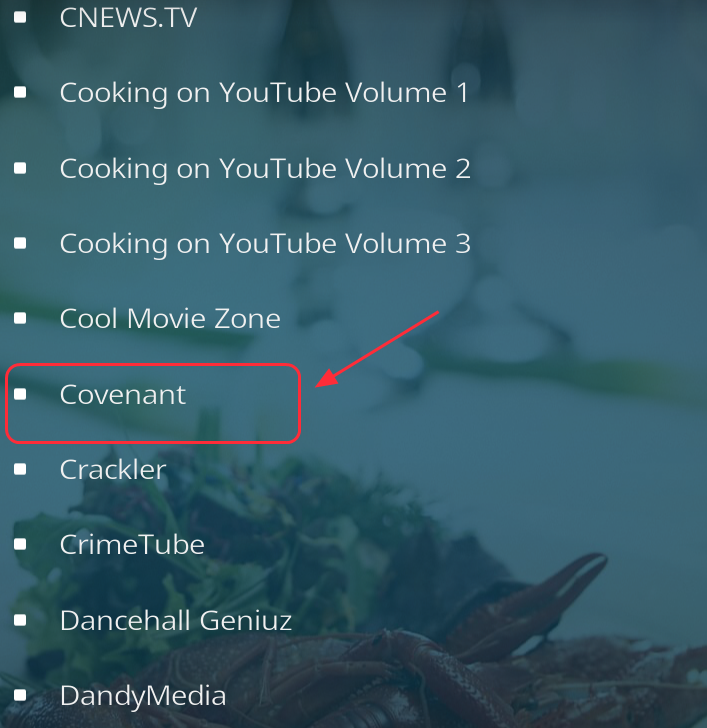
  • Click Covenant from the list
Kodi repo covenant
  • Click Install at the bottom right
  • Wait for the Add-on installed notification. The notification indicates covenant add-on is successfully installed
  • Now go back to Kodi home page and click in the following order to access Covenant add-on library- Add-ons-> Video add-ons -> Covenant

Now that you have installed Covenant add-on, you need to also ensure you update it periodically. Here’s how to do it.

How to update Covenant add-on in Kodi player?

As with other add-ons, you need to update Covenant add-on to access the latest features and updated library. There are two ways to update covenant add-on in Kodi player: manually or automatically.

In this post, we have shown both methods of updating Covenant add-on in Kodi player. Here are the steps to follow.

  • Open Kodi
  • Click Add-ons
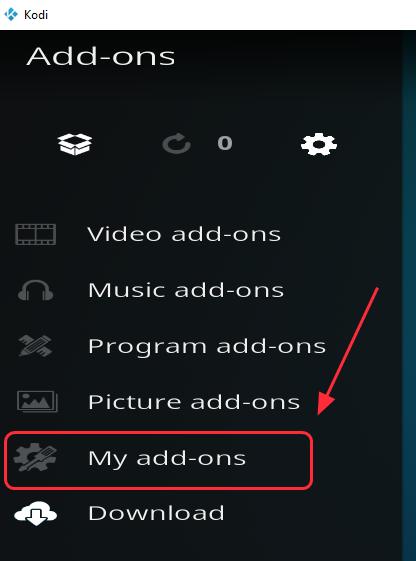
  • Click My add-ons
my add-ons
  • Click Video add-ons
  • Click the Covenant add-on.
select covenant
  • Find the menu list at the bottom.
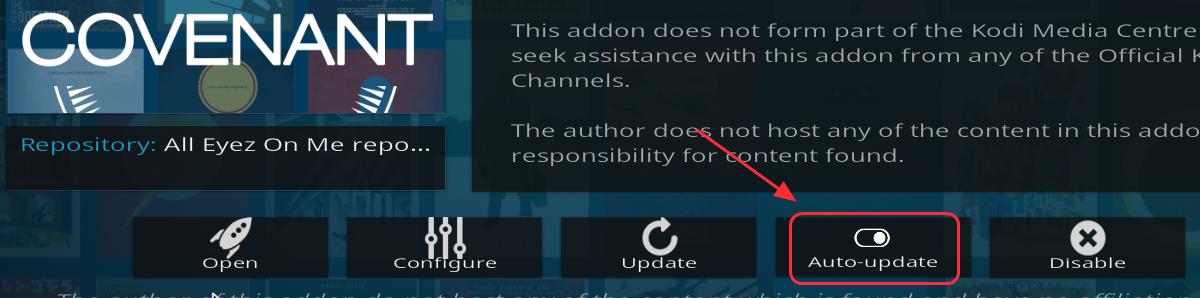
  • To set up the covenant add-on to update automatically, click Auto-update toggle switch to On position
auto-update

Or

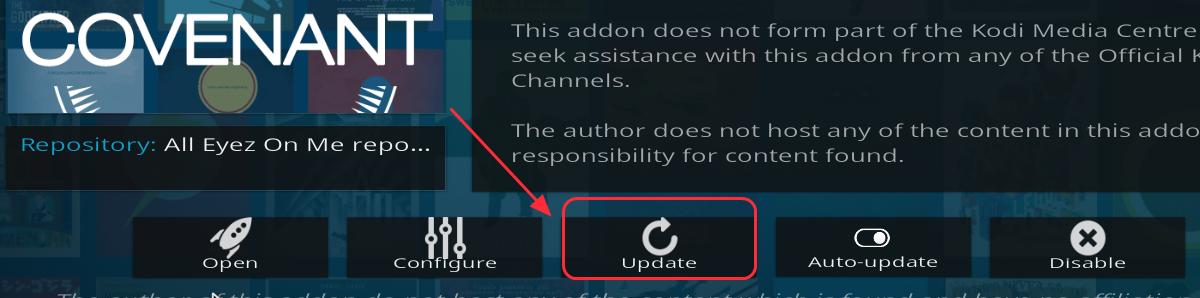
  • To update the covenant add-on manually, click Update
update

If you want to uninstall covenant add-on due to some reason, follow the instructions given below.

How to uninstall Covenant add-on from Kodi player?

  • Open Kodi
  • Click in the following order: Add-ons-> My add-ons -> Video add-ons ->Covenant add-on.
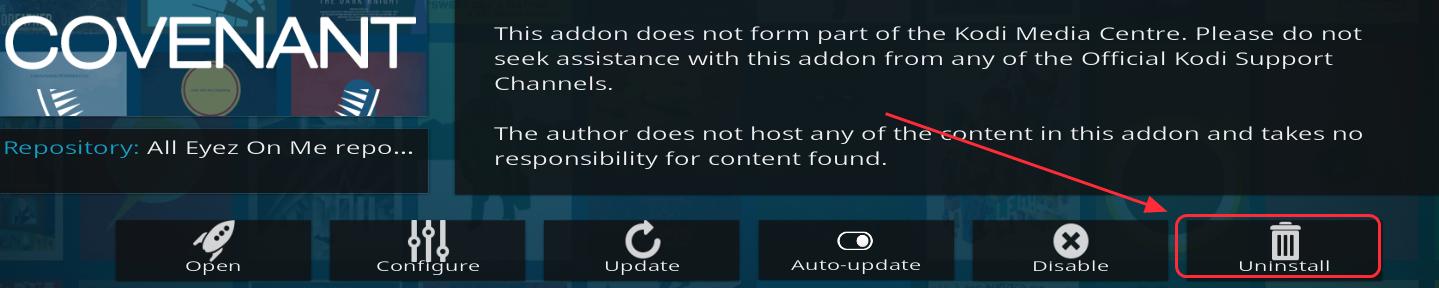
  • Find the menu list at the bottom and click Uninstall
uninstall

Follow the on-screen wizard instructions to remove Covenant add-on from Kodi player

Filed Under: Tech News Tagged With: Install Covenant add-on

How to install Exodus add-on in Kodi?

Kodi is open source media software that allows you to store and share content across devices in your home. This free media player can run on wide range of operating systems and stream content from local storage, internet, and home network.

Since it is open source, you can install a wide range of entertainment add-ons without worrying about licensing issues. Exodus is one of the best KODI add-ons which brings vivid content (movies, videos, music) from the Internet and allows users to view content on any Kodi-compatible device, like you computer or TV.

There are different ways to install the Exodus add-on in Kodi. The following are some of the ways you can include Exodus on your Kodi player.

Before Installation of Exodus on your Kodi player

You will need to tweak the settings in the Kodi player in order to enable it to download third-party add-ons. Here are the steps you need to follow to do this:

kodi add-on
  • Launch Kodi on your device
  • Click Settings followed by System settings
system settings
  • Click Add-ons. Look for the option Unknown sources and click the button beside it
addons unknown sources
  • Click Yes when prompted to confirm your action
  • Now Kodi will allow you to install the Exodus add-on

There are no direct options available in Kodi to install the Exodus add-on and different methods discussed here use different repositories to install Exodus on Kodi.

Software repositories are storage locations on the internet from which you can download software packages and core modules for software and install them on your device or computer.

Method 1- Installing Exodus on Kodi using the Kodil repository

The Kodil repository has several add-ons including Exodus.  Below we will look at the installation steps:

  1. Open Kodi on your device
  2. Click the gear symbol (Settings) that appears on the top left corner of the home screen
  3. Click File Manager
  4. Look for Add source option that appears at bottom and double-click on it
  5. Click the option <None> and then type the address for Kodil repository. The web address for Kodil repository is – http://kdil.co/repo/
  6. At the bottom, you will be required to name the installation. By default, the installation name is Kdil, leave it unchanged and click OK to proceed with the installation

Note – The Kodi app will now try to access the Kodil repository on the Internet and download the software package for the Exodus add-on. Make sure the Internet connection is active and the firewall or anti-virus is not blocking the download.

  1. Navigate back to Kodi Home Screen
  2. Select Add-ons
  3. Choose the option “Install from a Zip file”
  4. Select the file name “kodil” that appears in the list
  5. In the next screen, choose zip
  6. Wait for the installation notification to appear on the screen
  7. When the notification appears, click Install from the repository
  8. Wait until the process completes. You will see an entry Kodil repository in the list, click on it
  9. In the next screen, select the Video add-ons option that appears at the bottom
  10. In the next screen, click Exodus followed by the Install option that appears on the bottom left

Method 2 – Installing Exodus on Kodi using the XvBMC repository

The installation steps for Exodus on Kodi using XvBMC repository are somewhat similar to the first method. The primary difference is the web address of the repository and the steps that come after it. Here are the steps you need to follow.

  1. Launch the Kodi app on your device
  2. Go to Home Screen and click Settings(the gear icon) followed by File Manager
  3. Click Add Source option that appears left on the screen
  4. Select <None> in Add File Source screen
  5. Type the following address in the field – http://archive.org/download/repository.xvbmc/ and click OK
  6. In the text box labeled – Enter a name for this media source, type xvbmc and click OK
  7. Navigate back to Kodi Home Page
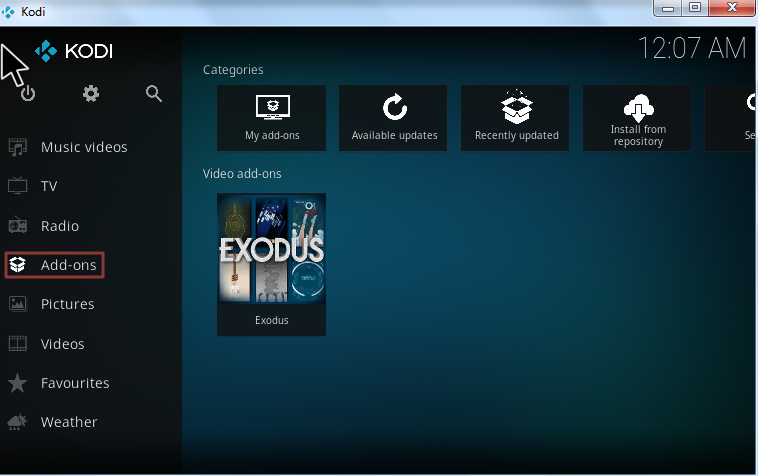
  8. Select Add-ons and then click on package icon that appears in the left corner of the screen
  9. In the next screen, select Install from zip file
  10. Select xvbmc in the list which is the name of the file you saved earlier
  11. Wait until the Add-on enabled notification appears on the screen
  12. In the next screen, select install from repository
  13. Choose (Add-ons) REPOsitory option
  14. In the next installation screen, select Add-on repository and then select tknorris Release Repository
  15. Click Install to start the installation. Wait until you see install notification in the right-hand corner of the screen
  16. In the next screen, choose Video-Add-ons and then Exodus
  17. Select Install that appears at the bottom right corner of the screen
  18. Wait for the installation to complete which takes few seconds. Now you should see notification of Exodus add-on enabled in Kodi
  19. To use Exodus in Kodi, go to Main Menu in Kodi and then click Add-ons
  20. Click Video add-ons and then click Exodus

You can now start enjoying streaming videos using Exodus on Kodi. However, Exodus needs to be updated frequently for better viewing experience and content. Below are the steps to update Exodus on Kodi:

  1. Open the Kodi app on your device
  2. Go to Add-ons and then My add-ons
  3. Select Video add-ons
  4. In the next screen, select Exodus
  5. Click on Update option and follow the instruction to update Exodus.

View our post How to solve Exodus not working issue?

View post Kodi not working issue

View post How to install Covenant add-on in Kodi

Filed Under: Tech News Tagged With: install exodus

Can Android phones get viruses?

android virusUsers frequently ask us if Android phones are susceptible to viruses. There is no definite answer to this question, as the susceptibility of the Android phone greatly depends on actions of the user.

Like every other Operating System, Android has security vulnerabilities for which Google offers security patches as soon as these vulnerabilities are uncovered. To understand the susceptibility factor, you need to first understand how app and the Android ecosystem work.

Apps and the Android ecosystem

Every Android app has its own UID on install. By default, the Android app does not have any rights outside of its home directory. It does not have permission to write on the screen nor does it have permission to execute itself. Android applications are required to request permissions from the user to perform other actions like read the user’s contacts, make a phone call, use Bluetooth stack, camera, or access the network. This means unless you are careless about the permissions, there is limited possibility of viruses affecting your phone. Google always recommends you download apps from trusted sources only. If you follow this very important rule, the chances of getting a virus on your phone are rare.

Android Malware – Fact or Fiction

Though it is very rare that your Android phone may get infected with a virus, the possibility can’t be ruled out completely. Android malware exists and it can affect your mobile if you are careless. There have been cases where developers have been able to get entry for their malicious apps in the Play Store, but Google has always been fast to react to apps that can potentially cause harm to Android devices.

Do you need an antivirus for an Android phone?

There are plenty of antivirus solutions for Android but how necessary are they? Security experts working at Google will say that 99% of Android users don’t need an antivirus solution because the traditional viruses don’t affect the Android platform. When we talk about virus related to Android platform, we mainly speak about malicious apps that the user chooses to download.

How to stay safe and keep your Android free from viruses?

The vast majority of Android malware is focused on stealing information, which is a major security concern for most of us. You can remain safe by always updating the app and also updating the Operating System whenever any update is available. You need to be careful while downloading apps and granting them permissions. Using open WiFi networks also pose a big risk, so it’s better you avoid them and use secure WiFi networks only. Using a VPN is a good idea to secure communication and data traffic from and to the mobile.

Filed Under: Tech News Tagged With: adroid, security, virus

  • 1
  • 2
  • 3
  • …
  • 5
  • Next Page »


  • Recent Posts
  • Popular Posts
        

Read More Posts


Read More Posts

Drivers.com Sites

  • Software Drivers
  • Drivers Ed

About Us

  • Advertise
  • About Drivers
  • Drivers Support
  • Drivers.com Privacy Policy
  • Disclaimer
  • Software Drivers
  • Mac Fixes and Tips
  • PC Fix Tips
  • Security/ Backup
  • Tablets & Smartphones
  • Tech News

© Copyright 2026 PDE Publications Ltd. End User License Agreement (EULA)