Drivers.com

follow us:

facebook twitter
  • Home
  • Download Drivers
  • Drivers Help
  • PC/Mac Resources
  • Software Drivers
  • Mac Fixes and Tips
  • PC Fix Tips
  • Security/ Backup
  • Tablets & Smartphones
  • Tech News
  • Software Drivers
  • Mac Fixes and Tips
  • PC Fix Tips
  • Security/ Backup
  • Tablets & Smartphones
  • Tech News

Resources by Category

Mac Fixes and Tips

Why is my computer running so slow? 9 reasons and fixes

There are many reasons why a computer can feel slow and many of these reasons have a simple fix. Here are the most likely causes of a slow computer and what you can do to help:

1. Too many programs running at once

  • Web browsers with lots of open tabs
    Fix: close tabs as you go and bookmark where necessary to return later
  • Apps running in the background (common culprits are cloud backups and antivirus scans)
    Fix:  check Task Manager (Windows) or Activity Monitor (Mac) and close the apps you don’t need.

2. High CPU, RAM, or disk usage

If one program is hogging resources, your entire system will slow down.
Fix:

  • Windows: go to Task Manager → “Processes”
  • Mac: go to Activity Monitor → “CPU / Memory”

Look for anything at 80–100% and close down those processes

3. Insufficient RAM

This is particularly noticeable if:

  • You use Chrome with many tabs open simoultaneously
  • You run apps which are heavy on RAM (such as games, video editing, etc.)

8 GB is the bare minimum in terms of RAM but 16 GB is optimal.

4. Your storage is nearly full

If your SSD/HDD is above ~85% full, your computer performance  will drop significantly.
Fix: Free up space (temporary or duplicate files) or move files to an external storage device or cloud storage.

5. Hard drive instead of SSD

If your computer still uses an HDD (hard disk drive), things are likely to feel significantly slower than if you use SSD (solid state drive).
Fix: Upgrading to an SSD will boost the speed of your computer, this involves buying and installing a SSD so is not necessarily an easy fix but it will have significant results in terms of speed.

6. Startup programs

Too many apps set to “launch on startup” slows down the boot time for your computer.
Fix: Disable unnecessary startup apps. On a windows machine you do this through settings > apps > startup, on a mac you navigate to this feature via the apple menu > system settings > general > login items

7. Overheating

If your laptop or PC gets too hot, it has a negative impact on performance. You will notice the fans are loud or the device itself feels hot.
Fix: Clean dust and improve ventilation of your device, also keep the machine out of direct sunlight.

8. Malware or unwanted background processes

Malware and unwanted or unnecessary programs can slow down your computer and should be removed
Fix: Run a malware scan and remove any unnecessary programs.

9. Old operating system or drivers

Outdated software can cause conflicts on your system and can also present security issues.
Fix: Update your operating system, graphics drivers, etc.

Click here to download our driver update tool to check your software drivers.
Filed Under: Mac Fixes and Tips, PC Fix Tips Tagged With: pc fix, slow computer, Slow PC

5 DIY Solutions USB Tethering Connection Issues

Tethering is something that all newer iPhones devices support, allowing users to turn their iPhones into instant hotspots. But sometimes iPhone tethering stops working suddenly, causing both frustration and inconvenience.

In this post, we’ll show you how to fix the issue on both Mac computers and Windows.

Step 1: Ensure iPhone is up to date

Every model of the iPhone from iPhone 3GS onwards support tethering. If you have an older model, tethering won’t work.

If your iPhone supports tethering but this feature is not working or has suddenly stopped working, first give these simple steps a try before moving on to the other solutions in the post.

  • Restart your iPhone
  • Ensure the latest iOS update is installed
  • Reset the iPhone Network

If the issue still persists, move on to the next step

Step 2: Ensure the Hotspot is switched on

If the hotspot feature is turned off, tethering won’t work. Follow these steps to ensure this feature is turned on.

Here are the steps to follow:

  • Go to your iPhone’s Settings
  • Choose Settings or Cellular (depending on the version of iPhone you use)
  • Choose Personal Hotspot
  • Now, slide Personal Hotspot slider to turn it on

Step 3: Check the Computer Settings (This is for Mac Users)

It is possible computer settings might be configured improperly to accept new connections. The following steps should fix majority of iPhone USB-related connection issues.

  • Ensure iTunes is up to date
  • Connect your iPhone to Mac using a USB cable (Select trust the device in case you receive a prompt)
  • Open iTunes. Ensure the device is visible (use another cable in case it is not visible)
  • Choose System Preferences
  • Choose Network
  • Choose iPhone USB (in case it isn’t present, add it by selecting the + sign)
  • Click Settings and then Make Service Active
  • Finally, click Apply

Step 4 – Check the Computer Settings (This is for Windows Users)

It is possible computer settings might be configured improperly to accept new connections. By following these steps, you should be able to fix majority of iPhone USB-related connection issues.

  • Ensure iTunes is up to date
  • Connect your iPhone to the Windows computer using a USB cable
  • Open iTunes and ensure the device is visible (use another cable in case it is not visible)
  • In the Start Search box, type settings. Click Settings in the search results
  • Choose Network & Internet
  • You will see a Remote NDIS based Internet Sharing Device. Enable it
  • Now your devices are tethered

In case you still can’t tether the iPhone, then follow these advanced troubleshooting steps:

Launch the Network Troubleshooter

Windows has a built-in troubleshooter that can successfully diagnose most of the common network issues. You can launch this troubleshooter by following these steps:

  • In the Windows Start Search box, type settings and then click Settings in the search results
  • Go to Network and Internet
  • Choose Status
  • Choose Network Troubleshooter
  • Follow on-screen prompts

Deactivate the Firewall temporarily

Occasionally, firewalls can cause tethering problems when they block incoming connections. We recommend you check the firewall’s documentation to turn off the firewall temporarily and then try tethering the iPhone again.

Ensure that you re-enable your firewall with an exemption for the iPhone in case the tethering issue is fixed. Permanently turning off the firewall could pose a security risk, exposing your system to malware attacks.

Step 5 – Update the USB drivers

Sometimes, Window’s Network Troubleshooter fails to identify a network issue. Old USB drivers could at times lead to iPhone tethering issues.

If none of the above solutions have worked for you, we recommend you update your USB drivers. The easiest way to do so is by using a reliable driver update software such as DriverUpdater. With just a few clicks, it can update the USB drivers and other outdated device drivers.

Automatic driver update tools offer many benefits, the most important ones being:

  • You can update device drivers automatically
  • The software scans and updates all outdated or missing drivers at one go
  • The tool picks the right drivers for your device and operating system, so you won’t have to worry about installing an incorrect driver by mistake
  • Automatic driver updates are 100% safe

Driver Updater is one of the best driver update tools out there. Outbyte Driver Updater will give you access to a database of over 1 million drivers. It will regularly scan your PC, suggesting new driver versions to install. Driver Updater contains drivers for a variety of Windows devices. With just one click, you can update drivers in your system.

Step 1
Click here to Install and launch the app

Step 2
Scan all devices

Step 3
Install or update drivers automatically


Start Download


Filed Under: Mac Fixes and Tips Tagged With: iPhone tethering issues

Fix for zoom audio not working

Fix for zoom audio not working

Zoom is one of the more popular video conferencing platforms which enables users to communicate using primarily video and audio but with additional features such as screen-sharing and chat functions.

Zoom has become very popular for personal as well as business users. The software generally works very well and is simple to install and use. You can download the Zoom app or simply link to or create a meeting using a web link.

As with all such software, users can occasionally experience problems with audio when using Zoom. These problems are usually related to the users device but there can also be an issue with the actual Zoom settings.

Fix Zoom audio problems

If you are having problems with Zoom audio not working simply follow the troubleshooting steps set out below:

  1. Check basic audio is working: As with all audio issues, the first thing to do is check if your audio is working with other programs. Try clicking on a music file or going to a YouTube link to see if the audio is working
  2. Rule out software issues: If your audio is working on other programs or files then you know this particular issue relates to your sound in Zoom. Try opening Zoom on another device if possible – if it works on another device then you know the problem is with your computer hardware or software settings
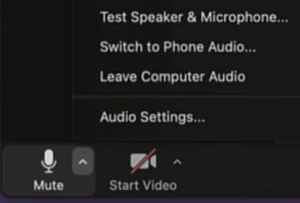
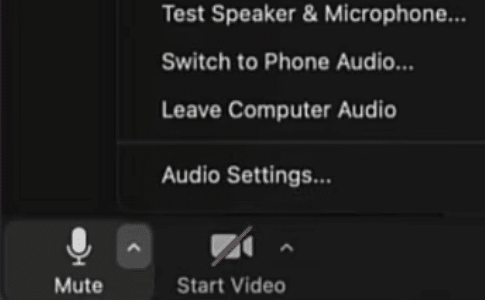
  3. How to check your sound settings in Zoom:  In the lower left corner of the Zoom window click on the arrow next to the microphone icon. Check that the correct microphone and speakers are selected (these are usually the integrated ones on your computer)
    zoom sound settings
  4. Restart the Zoom app or close and reopen the URL used for Zoom: restarting an app can get rid of many glitches so it’s always worth a try!
  5. Restart your computer: As with software, restarting your computer can help fix any glitches in settings so try this solution next
  6. Check for system or software updates: Zoom updates often include both security and big fixes so it is important to keep the software up to date. Your Operating System should also be kept up to date for the same reasons

https://www.drivers.com/update/pc-fix-tips/zoom-error-messages-and-their-solutions/

https://www.drivers.com/update/pc-fix-tips/how-to-fix-common-zoom-video-conferencing-app-problems/

https://www.drivers.com/update/pc-fix-tips/zoom-connection-problems-and-solutions/

Still having problems with Zoom audio?

If your issues with sound on Zoom persist you can search our other articles below or contact Zoom support with specific details of your issue.

Looking for alternatives to Zoom for your videoconferencing requirements? read our post below:

https://www.drivers.com/update/tech-news/top-9-zoom-alternatives-for-video-calling/


Filed Under: Mac Fixes and Tips, PC Fix Tips Tagged With: audio settings, videoconferencing, zoom audio, zoom sound

Can I play my PS4 on a Mac or PC?

Can I play my PS4 on a Mac or PC?

The short answer to this is yes, you can. This will be music to the ears of many PS4 users who have to battle for TV screen use with others in the house!

The second question you are probably thinking of is ‘is this a complicated process that is going to eat into hours of my potential gaming time?’ Happily, the answer to this is no!

With the release of Sony’s Remote Play application, streaming PS4 games to another screen such as a laptop or PC (or even phone if you really want to go there!) is a straight-forward, stress-free experience.

How to stream PlayStation 4 games to your PC or Mac

You can access your PlayStation games using another screen such as a phone or laptop but there are certain requirements, you will need:

  • a strong internet connection (as you will be streaming)
  • enough space on the device you want to stream on to install the required Remote Play application
  • Windows 8.1 or higher and OS X Yosemite or higher (at least 2GB of RAM)

Once you have ensured that the above requirements are met, then follow the steps below and you should be up-and-running on streaming your PS4 games in no time!

1. make sure your PS4 software is updated

Go to Settings > System Software Update > Update

2. Enable Remote Play

Go to Settings > Remote Play Connection Settings > click the check box to Enable Remote Play

3. Set the PS4 as your primary system

Go to Settings > PlayStation Network/Account Management > Select Activate As Your Primary PS4 > click Activate

4. Change the power settings

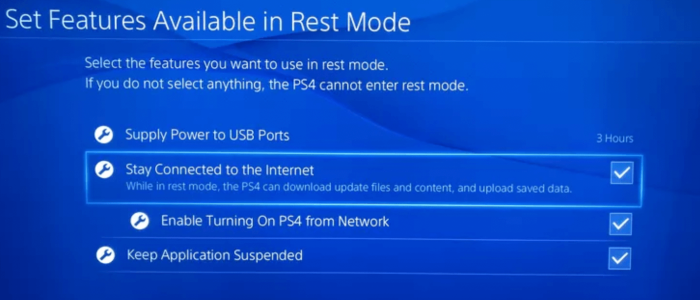
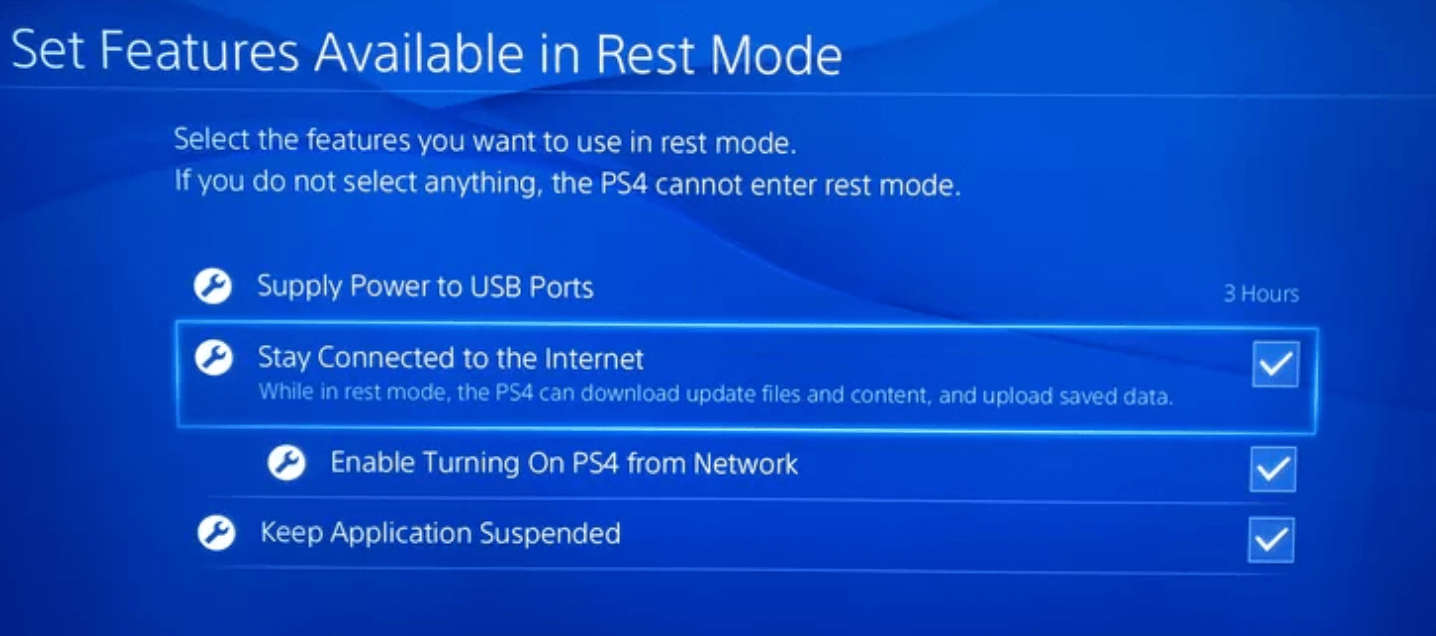
Go to Settings > Power Save Settings > Set Feature Available in Rest Mode

Ensure “Stay Connected to the Internet” is enabled

Ensure “Enable Turning on PS4 from Network” is enabled

ps4 stay connected rest mode

Step 5: Install Remote Play on your PC or Mac

  • Download Remote Play software from the Sony website on to the device you want to use to connect to your PS4
  • Install the Remote Play software and follow the instructions to link it to your PS4 (you will need your PlayStation account login details)

ps4 remoteplay

Step 6: Start streaming your PS4 games from a second device

  • On the device you want to use launch the Remote Play App and select Start
  • Ensure your PlayStation is turned on. In the Remote Play app you will be prompted to sign in to your PlayStation account which will then search for your PS4 via your WiFi connection
  • Connect your controller to your computer and you are ready to go.

You can use wireless controllers and bluetooth and other headsets with this PS4 setup. There are separate posts on these.

Filed Under: Mac Fixes and Tips, PC Fix Tips Tagged With: gaming, playstation, ps4

iPhone disconnects from Wi-Fi problem resolved (8 DIY Solutions)

If your iPhone is not able to maintain a stable connection to the Wi-Fi network, you may feel frustrated. But don’t worry, it’s a problem that can be easily resolved—and in this post, we will show you how to go about it.

Many users have complained of iPhone dropping the Wi-Fi connection or disconnecting from Wi-Fi frequently. If you are experiencing a similar issue with your iPhone, this post is for you. We have listed eight DIY solutions to this problem. Take a look. If your problem is with a black iPhone screen (where device is still switched on) click here.

Solution One – Check your Wi-Fi network status

Wi-Fi network has distance limitations. The closer your iPhone is to the router, the stronger signal it will have. If you move away from the router, the signal gets weak and at some point, the Wi-Fi connection is lost. Check your iPhone for the Wi-Fi signal.

If the Wi-Fi icon shows only one curve line cascading outside, it indicates your iPhone has a weak Wi-Fi signal. A Wi-Fi icon showing three cascading lines outside indicates a strong Wi-Fi signal. If possible take your iPhone closer to the router and see if the iPhone can maintain a stable Wi-Fi connection.

Solution Two – Reboot your iPhone and Router

If the Wi-Fi signal is strong and yet iPhone disconnects from the Wi-Fi network, do the following.

  • Switch off the router and wait for 5-10 seconds.
  • Switch on the router and allow it to establish a connection with the modem
  • Restart your iPhone and try connecting to the Wi-Fi network.

Following the steps above will reset the Wi-Fi connection between your iPhone and router. It will also eliminate any temporary connection problem and resolve the issue. If the steps in the solution did not resolve the issue, move to the next solution.

Solution Three – Enable Auto-Join to Wi-Fi network

Auto Join is a useful feature in iPhone that connects your iPhone automatically to a Wi-Fi network for which it has credentials stored. The process is automatic and you have to do nothing. Whenever the iPhone is in the range of the Wi-Fi network that you have connected to earlier, it will connect to the Wi-Fi network.

If the Auto Join option is disabled on your iPhone it could cause problems like iPhone temporary disconnects from Wi-Fi. In that scenario, you need to check whether that is not true in your case by enabling the Auto Join option. Here are the steps to follow.

  • On your iPhone, open Settings
  • Choose Wi-Fi
  • Tap the information mark next to your Wi-Fi network name
  • Tap the toggle switch to enable Auto Join

If the method works for you, your iPhone will not disconnect from Wi-Fi. If the method does not help, move to the next solution.

Solution Four – Forget the Wi-Fi network and Reconnect

iPhone remembers which Wi-Fi networks you have accessed. Whenever the iPhone is in the Wi-Fi network range, it uses stored login credentials to connect to the Wi-Fi network. Since the computer is not able to establish a stable Wi-Fi connection with your iPhone, you need to erase the Wi-Fi login credentials from your iPhone by choosing the option to forget the wifi network. Here are the steps to follow.

  • Open Settings app on your iPhone
  • Choose Wi-Fi
  • Tap the information mark next to your Wi-Fi network name
  • Tap Forget this network

After following the steps above, you need to reconnect the network. Make sure you are in the Wi-Fi network range before following the steps given below

  • From the home screen, go to Settings-> Wi-Fi
  • Turn on Wi-Fi. Your iPhone will search for available Wi-Fi networks
  • Tap the Wi-Fi network you want to join
  • iPhone will prompt you to enter the password for the Wi-Fi network
  • After you join the Wi-Fi network, you will see a blue tick next to the Wi-Fi network name.

In most cases, the iPhone disconnects from the Wi-Fi issue will be resolved by the above method. If the issue persists, move to the next solution.

Solution Five – Renew Lease

Whenever your iPhone connects to a Wi-Fi network, the router assigns an IP address to the iPhone that helps identify your device on the network. Sometimes there is the same IP address assigned to two different devices on the network that causes IP address conflict forcing one device to drop the connection.

Renew lease option forces the iPhone to release the current IP address and the router assigns a new IP address to your device. Here are the steps to follow.

  • From the home screen, go to Settings -> Wi-Fi
  • Tap the information mark next to your Wi-Fi network name
  • Tap Renew Lease

Check whether the frequent Wi-Fi disconnection problem is resolved. If the problem persists, move to the next solution.

Solution Six – Reset iPhone network settings

There is a possibility the network settings are causing problems due to some misconfiguration. Since you don’t know what is causing the disconnection of the Wi-Fi network, you need to reset the iPhone network settings. Here are the settings to follow.

  • Open Settings on your iPhone
  • Select General
  • Tap the Reset option at the bottom of the screen
  • In the next screen, tap Reset Network Settings
  • iPhone will prompt you to enter Password. Type password to proceed.
  • Wait for the process to complete
  • iPhone will restart to reset network settings
  • After iPhone restarts and apps are loaded, try connecting to the Wi-Fi network

Reset network settings will return all iPhone network settings to default. You have to select a Wi-Fi network and password to connect to the Wi-Fi network. Check whether the frequent disconnection problem is resolved. If the issue persists, move to the next solution.

Solution Seven – Stop your iPhone from using Wi-Fi assist

Wi-Fi assist is a useful feature in iPhone that allows users to stay connected to the Internet. If Wi-Fi assist is active on your iPhone and your Wi-Fi signal or Wi-Fi connection is slow, iPhone will automatically switch to cellular data to ensure the user has stable Internet connectivity. The Wi-Fi Assist feature is On by default.

There is a possibility the Wi-Fi assist is forcing the iPhone to disconnect from the Wi-Fi network. You can resolve this problem by disabling the Wi-Fi assist option. Here are the steps to follow.

  • Go to Settings > Settings
  • Tap Mobile Data.
  • Scroll down the screen and tap the slider Wi-Fi Assist to turn it off

Solution Eight – Run Software Update

Apple provides regular updates for iPhone to fix any bugs. You need to always use the latest version of iOS on your iPhone as the older operating system might have bugs. To check whether your iPhone has the latest version of iOS, follow the steps given below.

  • Open Settings > General
  • Tap Software Update. If any new iteration is available for install
  • Tap Download
  • Wait for the software update to download and install.
  • Like many iPhone a user, the iPhone disconnects from Wi-Fi problems will be resolved after updating iPhone software.


Filed Under: Mac Fixes and Tips Tagged With: iPhone dropping Wi-Fi

iTunes Could Not Connect to iPhone iPad Because an Invalid Response (Fixed)

iTunes Could Not Connect to iPhone iPad Because an Invalid Response (Fixed)

Many people have reported experiencing iTunes sync issue after they have updated to new iOS 10 or a much newer version such as iOS12.

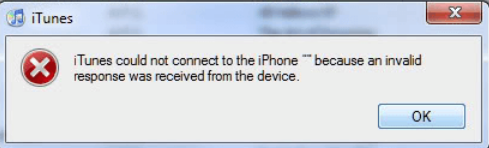
This is the error message that most people receive: iTunes could not connect to the iPhone because an invalid response was received from the device.

Regardless of with which device you are getting this error—iPad or iPhone—this post will show you multiple ways to fix the problem once and for all.

Solution 1 – Update the iPhone to the most recent iOS version

One of the most common causes is an old iOS version. For this reason, we recommend you update the iPhone to the most recent version.

Here are the steps to follow:

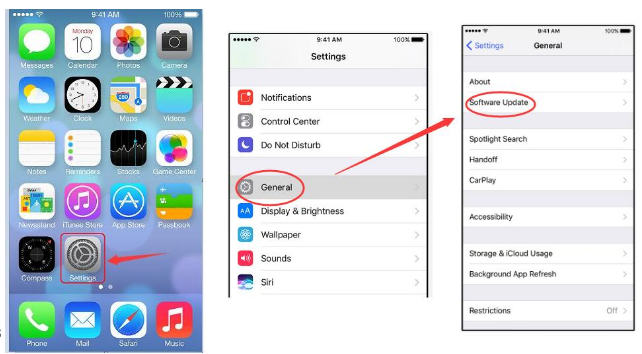
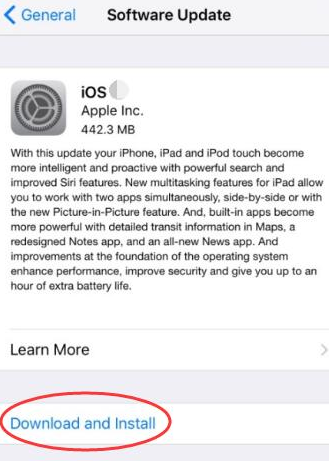
  • Open the iPhone. Tap on Settings, General, and then Software Update
  • Tap Download and Install
  • Now enter the passcode in case you are asked to
  • Then tap Agree twice
  • The system will automatically download the newest iOS
  • Now connect iTunes to the iPhone

Solution 2 – Update the iTunes App

You may also get this error if the version of the iTunes that you are using is old. Therefore, if the previous solution didn’t fix the problem, it’s time to update the iTunes app.

Mind you, if you are already using the latest version of iTunes app, skip this step and move on to the next one.

Here are the steps to follow:

  • Run iTunes on your iPhone or iPad
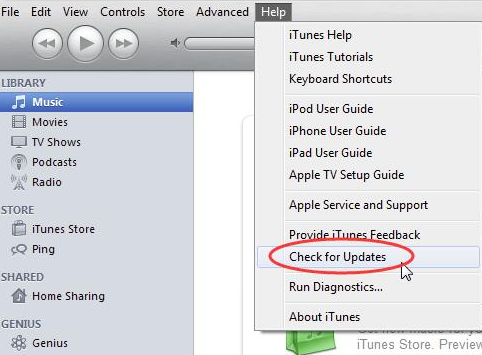
  • Click the Help menu and then click Check for Updates
  • In case a newer iTunes version is available, you will able to download and install it. All you have to do is follow the onscreen prompts
  • Connect the iTunes to your device once again

Solution 3 – Uninstall and re-install iTunes

First completely uninstall iTunes. Here are the steps you need to follow:

  • Go to Applications folder and locate iTunes app
  • Right-click iTunes and choose Get Info
  • Find and click the padlock icon located at the bottom right side of the window. You will be prompted to enter your admin password, so do that
  • Click and expand Sharing & Permissions section. Here tweak the privileges for “everyone” to Read & Write. By doing this you can gain complete control of iTunes app and effectively uninstall it from your Apple device
  • Now close Get Info window. Next, drag iTunes app to Trash (As long as you don’t empty Trash, you can always pull back iTunes if you want)

Once you have completely uninstalled iTunes from your device, visit App Store to download it. You can also download it from Apple’s website. Once you have downloaded iTunes, just follow onscreen instructions to complete the installation process.

Solution 4 – Reset the iPhone Network Settings

In some cases, the cause of the problem was an incorrect network setting on the iPhone. For this reason, if the previous solutions failed to resolve the issue, we recommend you reset the network settings of your device.

Here are the steps to follow to reset the network settings on iPhone:

  • Open the iPhone and tap Settings
  • Tap General, Reset, and then Reset Network Settings

Solution 5 – Reboot the iPhone

If nothing else has worked, there’s no harm in trying the good old restart solution. Many a time a simple restart fixes software issues. So go ahead, reboot the iPhone and your computer and then try connecting the iTunes to the iPhone.

Filed Under: Mac Fixes and Tips Tagged With: iTunes cannot connect

iPhone 7 tips for beginners

iPhone 7 is a great smartphone with several user-friendly features. We have put together a few tips and tricks that will further enhance your iPhone 7 experience.

Help with new iPhone

The Home button provides access to most of the features on an iPhone. However, the iPhone 7 does not have a physical Home button. What you see is actually a part of a capacitive, sensor-driven disc that gives you the feeling of pressing the Home button.  You can change the feeling of the click by following steps set out below:

Go to Settings > General > Home Button

You have three options to customize the feel of the Home button. Select the one you like and tap on “Done” in the right-hand corner.

Force a restart on the iPhone 7

Since the iPhone 7 does not have a Home button, the way to restart the phone also is different.  You need to hold down the Power button on the right side of the phone and the Volume down button on left side of the phone. You need to hold the two buttons simultaneously and continue holding them until you see the Apple logo.

Opening the app switcher

The app switcher can be accessed by a double tap on Home button.  The feature offers access to all apps and you can switch between any app.  However, with the introduction of 3D Touch, you have another way of opening the app switcher.  Just press down the left edge of the screen and swipe towards the center to access the app drawer.

Lift to wake up the phone

The iPhone 7 offers several features that are new to iPhone users. the Touch ID super-fast unlocking can be frustrating at times, especially when you just want to check time. One great tip that will make things easier is enabling the ‘Raise to wake’ feature. iOS 10 has a helpful feature whereby the home screen lights up the moment you pick up the phone. To enable this feature, follow the steps set out below.

Go to Settings > Display and Brightness and look for the Raise to Wake toggle.  Move the slider to the On position to enable the ‘Raise to wake’ feature.

Reading Lyrics as you listen to a song

This feature will be of interest to some and very few are aware of it! You can read the lyrics of a song playing in the Music app itself. To read the lyrics, follow the steps set out below:

  1. Tap the Now Playing section
  2. Tap the three dotted lines in the bottom-right corner of the screen and you should see an option “Lyrics”
  3. Tap the Lyrics option to see the lyrics of the song

There are of course numerous other features of the iPhone 7 but these are just a few quick tips to get you started!

Filed Under: Mac Fixes and Tips Tagged With: iPhone

AirPrint issues on iPad

AirPrint is a convenient mobile printing solution that allows you to print directly from an iPad, iPhone, or any other Mac device. With an AirPrint enabled printer, to print a document from your iPad:

  1. tap the Share button
  2. select Print
  3. select the Printer from the list (if it isn’t selected)
  4. tap on Print

There are few common AirPrint issues on iPad. We have set out the solutions to the main iPad printing issues below:

https://www.drivers.com/update/tablet-smartphones/tips-printing-from-ipad/

Printer is not showing up on iPad

If the printer is not showing up in the list, you cannot print. Here are troubleshooting steps you need to follow:

Ensure the printer is on

Many times users try to print documents from their iPad but forget to switch on the printer. Check to see if the printer is plugged in and turned on.

https://www.drivers.com/update/mac-fix-tips/printers-airprint-support-issues/

Check if the printer is connected to correct WiFi network

AirPrint works over a WiFi connection. This means if your iPad is connected to the internet via 3G/4G you won’t be able to print through your network printer. Not only should your iPad be connected to the internet through WiFi, but your iPad and the network printer should also be connected to same WiFi network.

If your iPad and printer is connected to the same WiFi network and you are still not able to see the Printer, you need to refresh the WiFi connection on the iPad.

Refresh the Wi-Fi connection on iPad

To refresh the WiFi on your iPad, follow the steps given below:

  1. Open iPad settings
  2. On the left-side list, tap on WiFi
  3. Tap on green switch to turn it Off
  4. Wait for few moments and the toggle the WiFi on again and connect to the correct network
  5. Try printing a document from iPad

If the problem is not resolved, you need to reboot your iPad

How do I reboot my iPad?

  1. Hold down the Sleep/Wake button until the iPad prompts you with an option “Slide to Power Off”
  2. After the iPad is switched off, turn it on by pressing the Sleep/Wake button
  3. Switch on the WiFi on the iPad, connect to correct WiFi network and try printing a document

If the issue still persists, you will need to reboot the printer.

How do I reboot my printer?

  1. Switch off the printer and wait for a few minutes
  2. Switch the printer back on and wait until connects to the WiFi network
  3. Try printing a document from your iPad

Hopefully this article will have helped you resolved your AirPrint issues with your iPad. If you are still having problems printing from your iPad, please feel free to post your details in the comments section below and we will do our best to help!

https://www.drivers.com/update/tablet-smartphones/tips-printing-from-ipad/

Filed Under: Mac Fixes and Tips Tagged With: airprint issues, iPad, printer

iPhone User’s Guide for Newbies

iPhone User’s Guide for Newbies

If you have been using an Android or another phone and have recently purchased an iPhone, you will probably find it to be very different from the other phones and difficult to initially get to grips with. You will obviously want to get the most out of your phone as quickly as possible so we have put together an introductory guide to answer most of your questions and help you get started with your iPhone.

Is your iPhone screen black but you still hear notifications coming in?

Knowing your iPhone model

Though iPhone 8 and iPhone X are the latest models, there are several older iPhone models that are still sold by retailers. Below is the list of iPhones that are still being used and supported by Apple.

  • iPhone 5S
  • iPhone 6, 6 Plus, 6S and 6S Plus
  • iPhone 7 and 7 Plus
  • iPhone 8 and 8 Plus
  • iPhone X

The above mentioned iPhone models are still supported and you will find these models running the latest iOS 11.

iPhone Overview

The iPhone display is not a simple touch-screen; it’s a multi-touch display that supports multiple touch point and can also take gestures as input. Some of the simple gestures you can use are – tap, swipe, drag, and stretch/pinch.

The iPhone has few physical buttons, these buttons are Home, Power and Volume buttons that are used to switch on the iPhone navigate through menus, and increase or decrease the volume.  Only the new iPhone X does not have a Home button.

Sleep/Wake button– this button is located on the top-right hand corner of the screen. It is primarily used for locking the phone or waking the screen. Pressing the Wake button will light up the screen and then you can access your iPhone features by entering the unlock code.

Volume Controls– as expected, the volume buttons are used to increase and decrease volume. The volume controls are located on the side of iPhone.

Home button– the home button is the most important button on the iPhone and is located just below the screen. It has multiple functions, such as it takes you to the home screen and also provides some convenient shortcuts. In the iPhone 5S, the fingerprint sensor is located under the Home button which is used to unlock the iPhone.

Ring/Silent Switch – this switch is located on the left-hand side of the iPhone, the Ring/Silent switch allows you to toggle between Silent and Ringer mode.

Setting up your iPhone

Apple ID- you will need an Apple ID to use every Apple service. For example, to store content in iCloud, buying movies, TV shows, and songs from the iTunes store, and even purchasing apps from the App Store. Below are the steps to create an Apple ID on your iPhone:

  1. Open the Settings app
  2. Tap iCloud
  3. Tap Create a new Apple ID
  4. Enter your date of birth
  5. Tap Next
  6. Enter your First and Last name
  7. Tap Next
  8. Select current email address
  9. Enter your email address
  10. Create a password
  11. Type the password again to verify the password
  12. Select a security question
  13. Type in answer
  14. Repeat two more times
  15. Tap on Agree to the Terms and Conditions
  16. Tap Merge or Don’t merge to sync data to iCloud
  17. Tap OK to confirm Find my iPhone is turned on

Now that you have created an Apple ID, you can use the same to log in to the iTunes store or to iCloud.

Managing music and videos manually on iPhone

You have a dedicated Music app and Videos app which can be accessed from the Home screen. Here are the steps to listen to Music on your iPhone.

  1. Tap on the Music app
  2. Select the view type dropdown from the middle of the screen
  3. At the bottom of the pop-up, switch Show Music Available Offline to ON

Here are the steps to view videos on your iPhone

  1. Tap on the Videos app
  2. A screen opens with a search box
  3. Tap the search box
  4. Enter the name of the video you want to watch
  5. Tap Go
  6. Tap the video you want to watch
  7. Tap Done after you have finished watching the video

Syncing your content with iTunes

Unlike Android and other smartphones, you cannot add music and videos directly to the phone memory or SD card. In fact, iPhone does not support flash memory, so make sure you buy an iPhone with sufficiently large internal storage. If you have music and videos stored on your PC, you can transfer the music to your iPhone using iTunes. Below are the steps to follow in order to do this:

  1. Open iTunes on your PC or Mac. Make sure you have the latest version
  2. Connect your iPhone to PC with the USB cable
  3. Your connected iPhone appears as an icon in the upper-left corner of the iTunes window
  4. Click on the device icon
  5. Under the Settings, look for the list of content type that you can sync
  6. Click the content type you want to sync
  7. In the main iTunes window, check the box near the Sync and check the box which mentions the content type you wish to sync
  8. Repeat the above two steps for each content type- Music, videos, Photos, TV shows
  9. Click the Apply button to start syncing and save the sync settings

 Using iCloud on the iPhone

When you sign up for iCloud, you immediately get 5GB of free storage space. If you need additional storage space you can upgrade to a larger storage plan such as 50GB, 200GB, or 2TB. Here are steps to backup your iPhone with iCloud.

  1. Connect your iPhone to Wi-Fi network
  2. Tap on Settings > your name– > iCloud
  3. Tap iCloud Backup
  4. Tap Backup Now
  5. Wait until the process completes

Your iCloud backup includes App data, Photos, and videos on your iPhone, shared photos, device settings, call history, home screen, and app organization, purchase history of Apple services, ringtones, messages, and health data.

Since a lot of data is backed up on iCloud, you can quickly run out of space. Therefore it is important to check how much iCloud storage you have.  You can delete old backups on iCloud to free up space. Here are the steps to manage iCloud storage:

  1. Connect your iPhone to Wi-Fi network
  2. Tap on Settings > your name > iCloud
  3. Tap iCloud storage or Manage Storage
  4. Tap the name of your device
  5. Tap Delete backup
  6. Turn Off and Delete

You can also delete photos and videos on iCloud to free some space. Here’s how to do this:

  1. Open the Photos App
  2. Tap Photos at the bottom of the screen
  3. Tap Select
  4. Choose one or more photos that you want to delete
  5. Tap the Recycle bin icon
  6. Tap Delete Photo

You can also delete files from iCloud. Here are the steps to do it:

  1. Open the Files App
  2. Tap Browse
  3. Under locations, tap iCloud Drive > Select
  4. Select the files you want to delete
  5. Tap the Recycle bin icon
  6. Go to Locations > Recently Deleted > Select
  7. Select the files that you want to delete
  8. Tap Delete

If you have questions about using an iphone, please feel free to post below.

Filed Under: Mac Fixes and Tips Tagged With: iPhone

How to Reset a Mac Printer?

Mac features an advanced printing system and you can easily install scanners and printers with a few clicks. Despite the advanced printing system, from time to time you may encounter some issues while printing, such as the printer does not show up in the Print dialog box, nor does it appear in the Printers & Scanners preference pane, or it appears offline and no matter what you do the printing issue does not seem to resolve.

If you are facing a problem with printing it can be due to two reasons:

There is some problem with your printer or the root cause of the problem is Mac’s printing system. Though Mac’s printing system is quite advanced and robust, sometimes it might not function as it should. In such cases, resetting your Mac’s printing system can be the best solution.

Before we move ahead to reset Mac’s printing system, try the basic troubleshooting steps listed below:

  1. Check the Printer ink/toner and paper
  2. Turn your printer On and Off few times (including disconnecting from the power source for a few minutes)
  3. If the printer is connected through USB, disconnect and reconnect the USB cable
  4. Check for any printer updates (drivers or software) in the App Store by following steps in the next section
  5. Delete and reinstall the printer in the Printers and Scanners Preference pane by following steps given below:

Steps to check for any printer updates in the App Store

  1. Select Apple Menu > App Store
  2. Click Updates
  3. Look for any printer updates in the list and install them
  4. If there is no software update in the list, visit your printer manufacturer website and check for printer updates and install them from there

Steps to delete and reinstall printer in Printers and Scanners Preference pane

To Remove Printer

  1. Select Apple Menu > System Preferences
  2. Click Printers and Scanners
  3. Select Printer in the list and then Remove

To add USB Printer

You need to just connect your printer, and the Mac computer will automatically detect the printer and download and install the required drivers and software.

To add a network or WiFi printer

  1. Connect your printer to the WiFi network
  2. Select Apple Menu > System Preferences
  3. Click Printers and Scanners
  4. If you don’t see your printer in the list, click the Add+ that appears at the bottom of the list
  5. You will see a list of printers on your network. Select your printer when it appears in the list and click Add

If you are still having printing problems, you can try resetting the Mac printing system. It should be the last troubleshooting solution you consider, as it deletes printer system components, preferences, files, caches and other things.

The steps to reset the Mac printing system are different for different iOS versions. Select the reset method that is applicable to the iOS version in your Mac.

Reset Printing System in OS X Mavericks (10.9.x) or Later

  1. Choose Apple Menu and launch System Preferences
  2. Select the Printers and Scanners preference pane
  3. In the Printers and Scanners preference pane, go to the printer list sidebar and place your mouse cursor in an empty area
  4. Right-click and select Reset Printing System from the pop-up menu
  5. The operating system will prompt for confirmation to reset the printing system. Click the Reset button to confirm your action
  6. You will be asked to provide the administrator password. Type the administrator password and click OK

Reset Printing System in OS X Lion and OS X Mountain Lion

  1. Choose Apple Menu and launch System Preferences
  2. Select the Print and Scan preference pane
  3. In the Printers and Scanners preference pane, go to the printer list sidebar and place your mouse cursor in an empty area
  4. Right-click and select Reset Printing System in the pop-up menu
  5. The operating system will prompt for confirmation to reset the printing system. Click the Reset button to continue with the reset of printing system
  6. You will be asked to provide the administrator password. Type the administrator password and click OK

Reset Printing System in OS X Snow Leopard

  1. Choose Apple Menu and launch System Preferences
  2. Select the Print and Fax preference pane
  3. Right-click in the Printer list. The Printer list is on the left-most sidebar,
  4. Right-click and select Reset Printing System from the pop-up menu
  5. The operating system will ask you whether you want to reset the printing system. Click the Reset button to confirm the reset of the printing system
  6. You will be asked to provide the administrator password. Type the administrator password and click OK

What to do after resetting the Printing system?

You need to add printers to the printing system again. The methods of adding a printer vary slightly in different iOS versions, but the basic steps include clicking on the Add+ button in printer preference pane.

Add printer steps for OS X.

  1. Go to the Apple Menu
  2. Select System Preferences
  3. Click Print & Scan
  4. In the next pane, click the + that appears at the bottom of the empty printer list on the left side and follow the on-screen instructions

Filed Under: Mac Fixes and Tips Tagged With: mac, printer

  • 1
  • 2
  • 3
  • 4
  • Next Page »


  • Recent Posts
  • Popular Posts
        

Read More Posts


Read More Posts

Drivers.com Sites

  • Software Drivers
  • Drivers Ed

About Us

  • Advertise
  • About Drivers
  • Drivers Support
  • Drivers.com Privacy Policy
  • Disclaimer
  • Software Drivers
  • Mac Fixes and Tips
  • PC Fix Tips
  • Security/ Backup
  • Tablets & Smartphones
  • Tech News

© Copyright 2026 PDE Publications Ltd. End User License Agreement (EULA)