Drivers.com

follow us:

facebook twitter
  • Home
  • Download Drivers
  • Drivers Help
  • PC/Mac Resources
  • Software Drivers
  • Mac Fixes and Tips
  • PC Fix Tips
  • Security/ Backup
  • Tablets & Smartphones
  • Tech News
  • Software Drivers
  • Mac Fixes and Tips
  • PC Fix Tips
  • Security/ Backup
  • Tablets & Smartphones
  • Tech News

Resources by Category

Software Drivers

How to Fix Operating System Not Found (7 DIY Solutions)

How to Fix Operating System Not Found (7 DIY Solutions)

We all have been there. You sit at your system to start a new day, but it refuses to boot and instead shows a black screen with an ugly message that reads “Operating System Not Found”.

You start to panic. What will happen to your documents. Will you be able to recover them?

Scary as the situation looks, you’ll be probably okay. There’s every reason to believe your files are not gone and things will soon (or sometimes a little later than ‘soon’) return to normal.

Continue reading to find out how to troubleshoot ‘Operating System Not Found’ error.

How to fix Operating System Not Found Error?

Try the solutions listed below in the order they appear. We’ll start with a couple of simple things before moving on to the solutions that are a little complex.

Solution #1 – Reboot your system

At the risk of sounding cliche, restarting the computer frequently fix temporary glitches. Power off your computer and power it on to check if you’re now able to boot.

Didn’t help? Give the next solution a try.

Solution #2 – Remove unnecessary flashy drives

If you’ve a flashy drive connected to your system or there’s a disc in your disc drive, remove them. There’s a chance your system might be looking for a suitable operating system on those devices and returning the titled error on not finding one.

Solution #3 – Test your hard drive

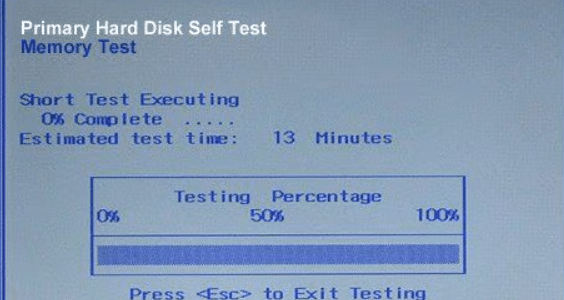
The next step is to test the hard drive. The BIOS include a Hard Disk Self Test for verifying the hard drive’s integrity.

Here’s what to do:

  • Restart your computer by repeatedly pressing Del, F2, F10, or Esc or the indicated key in your computer’s manual
  • Go to the Diagnostic tab and choose Primary Hard Drive Self Test option and then hit Enter
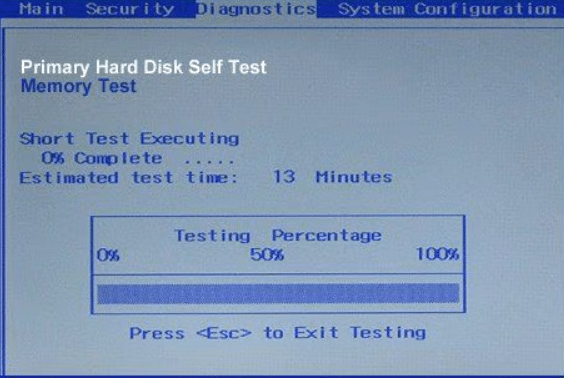
  • Windows will run a thorough inspection that may take a little while and provide a detailed report of its findings

If everything is fine with your hard drive, it’s time to reset the BIOS.

Solution #4 – Reset the BIOS

Here’s what to do:

  • Remove each and every external device that’s connected to your computer
  • Open the BIOS setting and choose the Exit tab
  • Now enable Load Optimal Default (It’s possible the option is named differently on your PC. Common alternatives include Get Default Value and Load Setup defaults
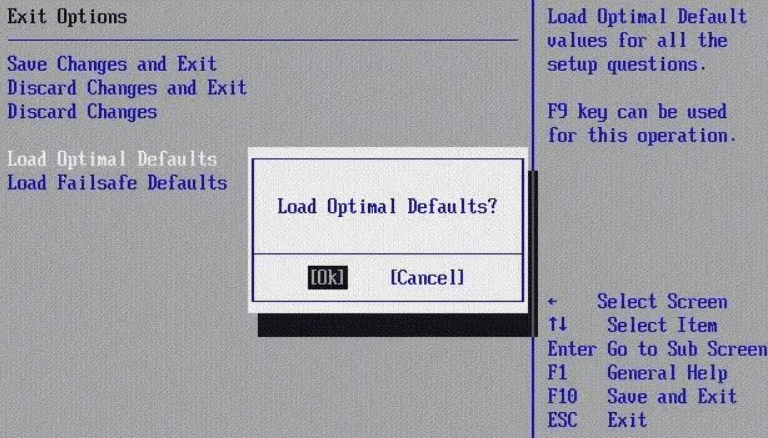
  • Select Save Changes and then the Exit option after the default settings have loaded properly

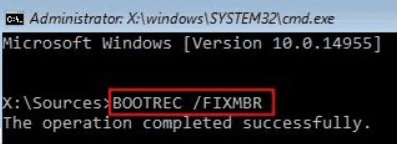
Solution #5 – Repair MBR using the installation CD or DVD

Virus infections can badly damage MBR, preventing your Windows from booting. Here’s how to repair MBR with the installation CD or DVD.

  • Insert the installation disc to enter Boot Mode
  • Go to Windows Setup and kickstart the repair process by typing the following command:
Solution #6 – Disable or Enable UEFI Secure Boot

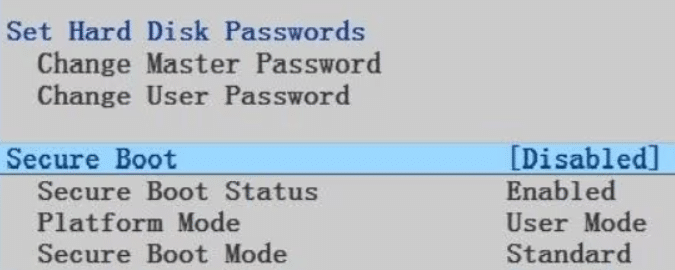
Every computer has Secure Boot enabled or comes with UEFI firmware. However, at times the firmware may fail to work properly, leading to a black screen of death error.

Try enabling or disabling it to check if that fixes the issue:

  • Enter BIOS by rebooting Windows and repeatedly pressing the Del, F2, F10, F12, Esc or the indicated key listed in your computer’s manual
  • Go to the Security tab
  • Locate the option called ‘Secure Boot’ (You’ll have to use the arrow keys on the keyboard to navigate menu options) and select Disabled
Solution #7 – Activate Windows Partition

If Windows partition has become disabled, your system won’t boot. Use the diskpart command to activate Windows partition.

Here’s what to do:

  • With the help of diskpart command you can activate the partition on which Windows is installed
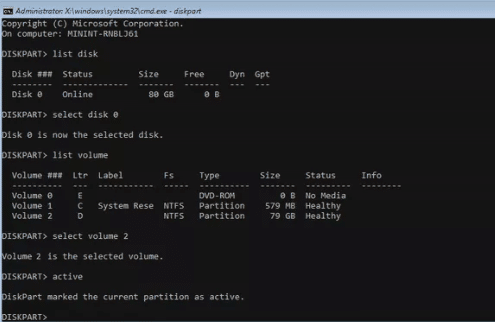
  • Once you have accessed command prompt from your installation CD, enter the following command

  • Next, type the following command

  • Select the disk on which the Windows system is installed using the following command (in most cases, the list contains only one disk)

  • Select the partition of the selected disk on which Windows is installed using the command listed below

  • Use this command to make the volume active

Windows should now start normally. But if it doesn’t, contacting your local computer repair technician might be a good idea.

Keep in mind Windows errors can occur at any time and the best strategy to deal with them is to take concrete steps to prevent them from arising in the first place. One such action is updating your device drivers on a regular basis. While you can do this manually, the procedure is time-consuming. A better option is to use a reliable third-party tool, such as Driver Updater.

Automatic driver update tools offer many benefits, the most important ones being:

  • You can update device drivers automatically
  • The software scans and updates all outdated or missing drivers at one go
  • The tool picks the right drivers for your device and operating system, so you won’t have to worry about installing an incorrect driver by mistake
  • Automatic driver updates are 100% safe

Driver Updater is one of the best driver update tools out there. Outbyte Driver Updater will give you access to a database of over 1 million drivers. It will regularly scan your PC, suggesting new driver versions to install. Driver Updater contains drivers for a variety of Windows devices. With just one click, you can update drivers in your system.

Step 1
Click here to Install and launch the app

Step 2
Scan all devices

Step 3
Install or update drivers automatically
 

Start Download


Filed Under: Software Drivers Tagged With: operating system not found

How to Find Your Windows 11 Product Key

Finding your Windows 11 product key is not difficult at all. There are different ways to find it—all of which are discussed below—so you can choose the one you find the simplest.

Method #1 – Product key command

Most people find this the easiest, including those who have never seen a Command Prompt window before.

Here’s what you need to do:

  • Type command prompt in the Search bar in the taskbar and hit Enter
  • In the Command Prompt window, paste the following command and then press Enter

wmic path SoftwareLicensingService get OA3xOriginalProductKey

  • The product key will be displayed

Method #2 – Use a PowerShell Command

You can also use PowerShell to find the product key.

Here’s what to do:

  • Right-click the Start menu and select Terminal
  • Ensure PowerShell is open. If you see the Command Prompt window, click the down arrow and select Windows PowerShell. If you see the Windows PowerShell window in the first instance, move on to the next step
  • Paste the following command in PowerShell and hit Enter

(Get-WmiObject -query “select * from SoftwareLicensingService”).OA3xOriginalProductKey

  • The product key will be displayed

Method #3 – Windows Registry

Windows Registry is another place where you can find the product key. However, we don’t recommend this method to users who have never accessed Windows Registry before. Windows registry is a crucial database and even a small misstep could have serious consequences.

Even though the steps to find the product key are rather simple and not likely to cause any problems, it might be better to use one of the other steps discussed here. But if you do decide to use Windows Registry for finding your product key, we strongly recommend making a registry backup. It can be a lifesaver if something goes wrong, allowing you to restore the registry to its previous state.

  • Press Win + R to open the Run dialog box
  • Type regedit and hit Enter
  • Click Yes if the User Access Control window pops up
  • Navigate to Computer\HKEY_LOCAL_MACHINE\SOFTWARE\Microsoft\Windows NT\CurrentVersion\SoftwareProtectionPlatform 
  • Look for the BackupProductKeyDefault entry. You’ll find the product key there

Frequently Asked Questions

  • Is Windows 11 product key necessary?

Generally, a product key is needed to activate Windows 11 and access all the features. You can get Windows 11 for free if your computer supports it, but all the features will not be available. If you upgraded from Windows 11, the product key should already be activated.

  • Can I buy a Windows 11 product key online?

Yes, you can. In fact, many users prefer purchasing the key from an online retailer instead of the Microsoft Store, since it is cheaper online. If you decide to buy the key online, just ensure you buy it from a genuine source.

  • How can I activate Windows 11 with a product key?

To activate Windows 11 with a product key, perform the following steps:

  • Type settings in the Search bar and hit Enter to open the Settings app
  • Click System in the left-hand pane
  • Scroll down and click Activation in the right-side pane
  • Select Change product key and enter your product key (it will be of 25 characters)


  • How can I keep Windows 11 in top shape?

To keep your computer in tip-top shape, make sure you install all the important updates, remove unnecessary apps and services, use a robust antivirus tool, and regularly update device drivers. If you’re wondering what’s the easiest way to update drivers, the answer is by using an advanced third-party tool. While there are many such tools on the market, none can match the speed and accuracy of Driver Updater. We strongly recommend you to give it a try. 

Automatic driver update tools offer many benefits, the most important ones being:

  • You can update device drivers automatically
  • The software scans and updates all outdated or missing drivers at one go
  • The tool picks the right drivers for your device and operating system, so you won’t have to worry about installing an incorrect driver by mistake
  • Automatic driver updates are 100% safe

Driver Updater is one of the best driver update tools out there. Outbyte Driver Updater will give you access to a database of over 1 million drivers. It will regularly scan your PC, suggesting new driver versions to install. Driver Updater contains drivers for a variety of Windows devices. With just one click, you can update drivers in your system.

Step 1
Click here to Install and launch the app

Step 2
Scan all devices

Step 3
Install or update drivers automatically


Start Download


Filed Under: Software Drivers Tagged With: Windows 11 product key

How to Turn on Keyboard Backlight on Your HP Laptop?

Not all HP laptops come with a keyboard that has a backlight option, but some do. If you have such a laptop and want to turn on the keyboard backlight, this post is just for you. This article shows you how to turn on the keyboard backlighting on an HP laptop.

Solution

The process of turning on keyboard backlighting on HP laptops is fairly easy and can be completed by pressing a single key. You can use the same key to enable or disable the keyboard lighting.

Here’s what to do:

  • Turn on your HP laptop
  • Locate the light key on your keyboard. You’re likely to find in in the row that has Function keys. This row is located at the top of the keyboard. The light key usually has a keyboard icon with a glowing effect
  • Press this key to enable keyboard backlighting (The same key can be used to toggle off backlighting)
Note: Some HP models may require you to press the light key and Fn key simultaneously. You can find the Fn key in the bottom row. It is usually located between the left Ctrl key and Windows key.

Here’s how you can control backlight’s brightness?

You can control keyboard backlight’s brightness through the luminance keys. You can find them in the top row of the keyboard, where Functions keys are located. There are two luminance keys. One is for increasing the brightness, denoted by a larger flashing light symbol. The other one is for decreasing the brightness and has a smaller flashing light icon.

My keyboard’s backlight is not turning on. What should I do?

If you have followed the above-mentioned steps and your laptop’s backlight doesn’t turn on or turns on for a small period only before switching off again, try the fixes mentioned below.

Turn on Actions keys

If your laptop’s backlight doesn’t turn on, turn on Action keys in BIOS.

Here’s what to do:

  • Restart your HP computer or turn it on if it’s already off
  • Wait for the “entering setup” message to appear. This message may vary from one computer to another, but it always include the specific key you need to press to access BIOS. Usually it is one of the function keys, generally the F10 or F2 key, or the Del key
  • Press the specified key when the “entering setup” message appears to enter the BIOS
  • Once you’re in BIOS, go to the Advanced tab
  • Look for Function key behavior. The action keys mode can have a different name in your computer, such as Hot Keys Mode or Media Keys Mode. If this setting is disabled, then to enable the action keys change the setting from Function Key to Media Key
  • When you’re done, hit the F10 key to save the settings and exit BIOS

Change Backlit Timeout Settings

If the backlight switches on for only a small period and then switches off again, tweaking keyboard timeout settings can help.

Here’s what you need to do:

  • Access the BIOS (Refer to the steps above)
  • Go to Advanced tab and then Built-in Device Options. You’ll see the Backlight keyboard timeout setting. Set it to however long you want to enable your keyboard’s backlighting

Is the backlighting feature available in all HP laptops?

No, keyboard backlighting is not something that all HP models have.

What can I do to minimize the chances of system errors and performance-related issues?

Keep your device drivers up-to-date all the time! Outdated device drivers can cause various errors and issues, so keeping them up-to-date will save you from much trouble. The easiest (and the fastest) way to update device drivers is by using a reliable third-party tool such as Driver Updater.

Automatic driver update tools offer many benefits, the most important ones being:

  • You can update device drivers automatically
  • The software scans and updates all outdated or missing drivers at one go
  • The tool picks the right drivers for your device and operating system, so you won’t have to worry about installing an incorrect driver by mistake
  • Automatic driver updates are 100% safe

Driver Updater is one of the best driver update tools out there. Outbyte Driver Updater will give you access to a database of over 1 million drivers. It will regularly scan your PC, suggesting new driver versions to install. Driver Updater contains drivers for a variety of Windows devices. With just one click, you can update drivers in your system.

Step 1
Click here to Install and launch the app

Step 2
Scan all devices

Step 3
Install or update drivers automatically


Start Download


Filed Under: Software Drivers Tagged With: HP Keyboard backlight

How to Fix Critical Process Died Error in Windows 11

How to Fix Critical Process Died Error in Windows 11

The “Critical Process Died” error is a blue screen error which shows up when a critical process required to run Windows ends abruptly. In this post, we’ll discuss 8 DIY solutions to fix the error quickly and relatively effortlessly.

So, let’s dig right in.

What’s the Critical Process Died STOP Code?

The Critical Process Died STOP is one of the many error messages that appear on the Blue Screen of Death (BSOD), whose actual name is STOP Error message screen.

The whole display gets filled with the Blue screen of Death and is typically accompanied by the following error message:

Your PC ran into a problem and needs to restart. We’re just collecting some error info, and then we’ll restart for you.

Note: You cannot close the BSOD or STOP error message screen like a typical Windows error message. You must wait until its process completes and Windows restart automatically.

Critical Processes Died errors are mostly caused by:

  • A data conflict
  • New software or hardware
  • Malware and viruses
  • Lack of sufficient free memory
  • Outdated drivers

How to Fix Critical Process Died Error in Windows 11?

1. Prepare your computer for Safe Mode

When you launch Windows in Safe Mode, only essential files and drivers get loaded, which allows you to fix issues with minimal interference.

First, shut down Windows, unplug peripheral devices (except your keyboard and mouse), and then restart Windows. It’s important that you remove all peripheral devices except two since USB devices could cause the blue screen of death.

In case Windows start normally, follow these steps to enter Safe Mode.

  • Press the Windows key
  • Type msconfig and press Enter

  • Click the Boot tab
  • Select Safe Mode and then select Minimal
  • Click Apply and then OK

In case you get the BSOD when you restart Windows, perform the following steps to enter Safe Mode

  • Restart Windows and in the sign-in screen, press the Shift key while you press Power and Restart
  • Once Windows restarts, choose Troubleshoot | Advanced Options | Startup Settings | Restart
  • Select Enable Safe Mode

2. Uninstall recently installed programs

Sometimes, you receive the Critical Process Died STOP error after you’ve installed a program. If this is the case, uninstall that program after entering into Safe Mode.

Follow these steps to uninstall a program on Windows 11:

  • Press the Windows key
  • Type Settings and press Enter
  • Click Apps
  • Click Installed Apps

  • Locate the recently-installed software, right-click it, and then select Uninstall

3. Install the latest Windows Update

Windows updates include security patches, driver updates, and bug fixes that often help fix computer errors, including the Critical Process Died STOP error.

To make sure, your Windows system is up to date, follow these steps:

  • Press the Windows key
  • Click Settings
  • Click Windows Update

  • Follow on-screen instructions to check if any new updates are available

4. Scan your PC for malware

Often malware and viruses can trigger various errors. It’s possible that the same is true in your case. If the previous solutions have not worked for you, we recommend you run a deep scan of your system to ensure there are no viruses and malware hiding.

5. Run an SFC scan

Windows come with an in-built utility, called Windows SFC or System File Checker, that can check for system files that have become corrupt and repair them. Because corrupt system files are one of the main causes behind Blue Screen of Death, running an SFC scan can help.

Here are the steps to follow:

  • Press the Windows key
  • Type Command Prompt and right-click the first result, and choose Run as administrator

  • In the Command Prompt window, type SFC /Scannow and press Enter

  • Once the scan is complete, restart Windows

6. Scan the hard drive

If the file system on the hard drive is corrupt, you can encounter various errors. Your system may also crash frequently. A CHKDSK scan allows you to check the complete hard drive, identify errors, and resolve them, improving your computer’s performance and frequent errors, such Blue Screen of Death.

Follow these steps to scan the hard drive:

  • Press the Windows key
  • Type Command Prompt, right-click the first result, and choose Run as administrator
  • In the Command Prompt window, type chkdsk /f /r and then press Enter

7. Check the RAM

An issue with the RAM can cause the Critical Process Died error. Windows include a diagnostic tool to check the RAM’s status. The diagnostic tool cannot actually repair the damaged RAM sectors, but it can identify them and prevent the computer from using them during operation.

Follow these steps to use this diagnostic tool:

  • Press the Windows key
  • Type Windows Memory Diagnostic and press Enter
  • Select Restart now and check for problems (recommended)

  • When Windows restarts, it will show the diagnostic results

In case the RAM is severely damaged, it would be best to upgrade it.

8. Update device drivers

If nothing else has worked, try updating device drivers. Outdated drivers can cause a number of errors. Since it is cumbersome to manually check every driver if it requires an update or not, we recommend you give DriverUpdater a try. It scans your computer to check for old drivers and updates them.

Automatic driver update tools offer many benefits, the most important ones being:

  • You can update device drivers automatically
  • The software scans and updates all outdated or missing drivers at one go
  • The tool picks the right drivers for your device and operating system, so you won’t have to worry about installing an incorrect driver by mistake
  • Automatic driver updates are 100% safe

Driver Updater is one of the best driver update tools out there. Outbyte Driver Updater will give you access to a database of over 1 million drivers. It will regularly scan your PC, suggesting new driver versions to install. Driver Updater contains drivers for a variety of Windows devices. With just one click, you can update drivers in your system.

Step 1
Click here to Install and launch the app

Step 2
Scan all devices

Step 3
Install or update drivers automatically


Start Download


Filed Under: Software Drivers Tagged With: bsod

NVIDIA Driver Won’t Install Windows 11? 3 DIY Fixes

NVIDIA Driver Won’t Install Windows 11? 3 DIY Fixes

Trying to install NVIDIA drivers on Windows 11, but are unable to do so?

You’re not alone. This issue has been reported by many users.

Fortunately, you can fix the issue on your own — and this blog post will show you how to do that.

NVIDIA Driver Won’t Install Win 11

NVIDIA Graphics GPU require NVIDIA drivers to work properly. But in some cases, certain drivers won’t install in Windows 11. On the screen, an error message appears. Common error messages include:

  • NVIDIA Installer failed
  • NVIDIA Installer cannot continue
  • This NVIDIA graphics driver isn’t compatible with this version of Windows

Error messages may vary, but the following solutions work in most instance. We recommend you give them a try in the order they appear below.

Solution 1 – Ensure You’ve the Right Version of NVIDIA Driver

When installing a NVIDIA driver, make sure it is compatible with your version of Windows. For example, if you are using 32-bit Windows, the driver should be for 32-bit Windows, not 64-bit (and vice-versa). In addition, the driver should be compatible with your version of Windows. For instance, some times the old NVIDIA drivers won’t get installed on Windows 11.

Here’s how you can install an appropriate NVIDIA driver version directly from the NVIDIA website.

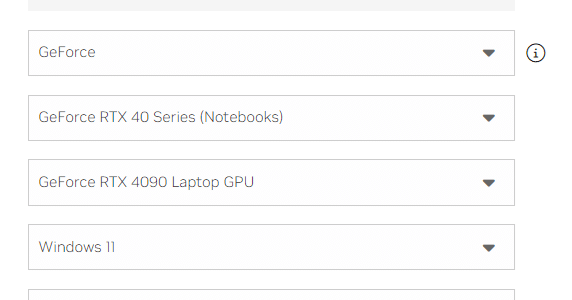
  • Open your web browser, navigate to NVIDIA drivers web page, select the appropriate product and operating system and click the Find button

  • You’ll now see a list of drivers based on the search criteria selected by you. Each driver will have a View button next to it. Click the View button of the driver you want to install

  • On the next page, click the Download button

  • Locate the downloaded driver file, double-click it to launch the installation wizard, follow the on-screen instructions, click Next to proceed through the installation until you get the message that the installation is complete

If an error message pops up during the installation process, go to the next solution. 

Solution 2 – Remove all NVIDIA Programs and Install the Driver Manually

Delete all NVIDIA programs and then let Windows install the correct driver.

Uninstall NVIDIA programs

  • Type devmgmt.msc in the Search bar (located at the center of the desktop Taskbar) and press Enter

  • In the Device Manager window, expand Display adapters, right-click the NVIDIA graphics card, and select Uninstall device

  • Wait till Windows uninstall the device and then restart the computer
  • Now type run in the Search bar and press Enter

  • In the Run dialog box, type appwiz.cpl and then click OK

  • Right-click the first program related to NVIDIA that you see in the Programs and Features window and select Uninstall. Repeat this step for the remaining NVIDIA related programs
  • Restart Windows after you uninstalled all NVIDIA related programs

Install NVIDIA driver

  • Type devmgmt.msc in the Search bar and press Enter
  • Expand Display adapters, right the NVIDIA graphics card, and select Update driver

  • Select Search automatically for updated driver Software

  • Windows will locate the latest driver version and install it

If you still are are unable to install the NVIDIA driver, move on to the next solution.

Solution 3 – Disable Antivirus Temporarily

In rare instances, an antivirus program may block the installation of NVIDIA drivers. Therefore, temporarily disable your antivirus program and follow the steps listed in the Solution 2 section. You should be able to install the NVIDIA driver now. Once the installation is complete, enable the antivirus program.

The steps required for disabling antivirus may vary slightly depending on the antivirus program you are using. However, usually the process involves the following steps:

  • Click the antivirus icon in the System Tray (located to the right of the desktop Taskbar)

  • You will be able to find the Disable option in the app’s interface window (For example, to disable Avast from its interface, click Menu > Settings > Protection > Core Shields and then toggle the Core Shields off)

To enable your antivirus program, simply follow the steps listed above and select the Enable option.

Before we sign off for the day, it’s important to mention that you should keep your device drivers up to date. This will not only ensure software compatibility but also enhance performance. Using a reliable driver update software is an easy (and safe) way to update drivers. We recommend using DriverUpdater. It updates outdated device drivers in a jiffy with just a few mouse clicks.

Automatic driver update tools offer many benefits, the most important ones being:

  • You can update device drivers automatically
  • The software scans and updates all outdated or missing drivers at one go
  • The tool picks the right drivers for your device and operating system, so you won’t have to worry about installing an incorrect driver by mistake
  • Automatic driver updates are 100% safe

Driver Updater is one of the best driver update tools out there. Outbyte Driver Updater will give you access to a database of over 1 million drivers. It will regularly scan your PC, suggesting new driver versions to install. Driver Updater contains drivers for a variety of Windows devices. With just one click, you can update drivers in your system.

Step 1
Click here to Install and launch the app

Step 2
Scan all devices

Step 3
Install or update drivers automatically


Start Download


Filed Under: Software Drivers Tagged With: NVIDIA Driver

How to Fix Mouse Cursor Disappears on Windows 11

How to Fix Mouse Cursor Disappears on Windows 11

Mouse cursor doing the vanishing act on you is no fun. Thankfully, getting it back on the screen doesn’t take much effort. Just a few tweaks and the truant will be back to behaving right.

This post is for those who find themselves grappling with the “mouse cursor disappears on Windows 11” issue. (Oh, by the way, the solutions given here work perfectly well on Windows 10 too)

So, let’s get going…

A Quick Fix

The following method has worked for some. Because it’s very simple and easy to apply, giving it a go before trying other methods makes sense.

  • Press Ctrl + Alt + Del
  • Navigate to the Lock option (use the up & down arrows) and then press Enter
  • Now press Ctrl + Alt + Del once more
  • Log in to your system
  • Check whether you can see the mouse cursor on your screen again

If this doesn’t work, try this:

  • Press Ctrl + Alt + Del
  • Browse to the Power option and then press Enter
  • Restart Windows

If you are using a USB mouse, see if the issue is fixed when you plug the device in another port.

Those who are using a wireless mouse should try changing the batteries.

If none of the above solutions work, it’s time to roll up your sleeves. We’ve got some serious work ahead of us.

Solution #1 – Enable Touchpad/Mouse with Functions Key

Most keyboards (if not all) have function keys. They provide users quick access to commonly used programs and are numbered F1, F2, F3, and so on. Press these keys one by one to see if one of them enables or disables the touchpad or mouse. Usually, it’s the F7 or F9 key that turns on or off the mouse. However, different laptops may have different keys for controlling the mouse or touchpad. For example, in Acer laptops, the F6 key usually does the trick.

Solution #2 – Enable Touchpad in Mouse Settings

On certain laptops, the mouse cursor may not be visible when the touchpad is disabled. Therefore, please enable the touchpad.

Note: Because you cannot click or navigate as the mouse pointer is missing, connect another mouse first. Otherwise, use the Tab key for jumping between different categories and press Enter when you are on the preferred option. Pressing the Spacebar allows you to check boxes whereas the Down arrow key helps you select the next option.

  • Press Win + R
  • Type control mouse

  • Press Enter
  • Repeatedly press the Tab key until the Buttons tab is highlighted. Next, using the right arrow key on the keypad (or keyboard) navigate to Click Pad Settings or Device Settings in the Mouse Properties dialog box
  • Highlight the Enable button (on some laptops, it will be ClickPad Enable) and then press Enter

Solution #3 – Enable Touchpad in Windows 11 Settings

If the issue persists, see if enabling touchpad in Settings does the job.

  • Press Win + S
  • Type mouse and press Enter
  • Using the Tab and Down arrow key, browse to Touchpad and then press Enter
  • Navigate to the Touchpad switch and then press Space to turn the Touchpad on

Solution #4 – Disable Touchscreen

Sometimes, this occurs when there’s a problem with the touchscreen. In that case, disabling it could help get things back on the track.

  • Type device manager in the Search bar on the taskbar
  • Select Device Manager in the search results and press Enter
  • In the Device Manager window, locate Human Interface Devices
  • Expand this entry (by pressing the right arrow key)
  • Browse to HID-compliant touch screen using Down arrow key. Next, press Shift + F10. This will give you access to the menu options
  • Highlight Disable device and then press Enter. If you are asked to confirm your action, select Yes

Solution #5 – Enable or disable hardware acceleration in Chrome

According to some Windows users, the mouse cursor becomes invisible when they enable Hardware acceleration in Google Chrome web browser. On the other hand, some users claim that the cursor disappears when Hardware acceleration is turned off. Therefore, you should try both options, meaning if Hardware acceleration is enabled, then try disabling it and vice-versa.

  • Open Google Chrome
  • Click the three dots menu and then select Settings

  • Click System in the left side of the Settings window
  • Now turn off the Use hardware acceleration switch. If it is turned off, then turn it on

  • Click Relaunch
  • Now click the blue button to disable Hardware acceleration and Relaunch it

Solution #6 – Download and install new updates

The mouse cursor may disappear when the device is not updated fully. Installing new updates (if available) may fix the problem.

  • Type run in the Search bar in the taskbar
  • In the run dialog box, type control /name Microsoft.WindowsUpdate and press Enter

  • Select Check for Updates by pressing the Tab key and then press Enter
  • Windows will search for new updates. If new updates are available, select Download and Install and then press Enter

Solution #7 – Update mouse driver

Updating the mouse driver may also help resolve the issue once and for all. There are two ways to update the mouse driver: you can do so manually or you can update the mouse driver automatically.

  • Press Win + X, select Device Manager using the down arrow key, and hit Enter
  • Now press Tab and choose Mice and other pointing devices

  • You can see all the installed devices by pressing the Right arrow key
  • Choose the touchpad/mouse device and hit Enter
  • Press Tab to open the Driver Properties dialog box and then browse to Details using the Right arrow key
  • Click the Update Driver button

  • Select the first option (Search automatically for drivers)
  • Follow onscreen instructions
  • Restart Windows

If Windows is unable to find a new driver, it could mean that you already have the latest driver. In this instance, try to roll back the driver to the previous version. Go to the Driver Properties box and select Roll Back Driver option (instead of the Update Driver) and follow the onscreen prompts. Restart windows and check if this fixes the issue.

Updating drivers manually is not always a walk in the park, especially when you have to navigate using arrow keys. Using a driver update tool could be a better option. We recommend you give DriverUpdater a try. It will update your mouse (and other drivers) in a jiffy.

Automatic driver update tools offer many benefits, the most important ones being:

  • You can update device drivers automatically
  • The software scans and updates all outdated or missing drivers at one go
  • The tool picks the right drivers for your device and operating system, so you won’t have to worry about installing an incorrect driver by mistake
  • Automatic driver updates are 100% safe

Driver Updater is one of the best driver update tools out there. Outbyte Driver Updater will give you access to a database of over 1 million drivers. It will regularly scan your PC, suggesting new driver versions to install. Driver Updater contains drivers for a variety of Windows devices. With just one click, you can update drivers in your system.

Step 1
Click here to Install and launch the app

Step 2
Scan all devices

Step 3
Install or update drivers automatically


Start Download


Filed Under: Software Drivers Tagged With: mouse cursor disappears

My Dell USB ports stopped working

My Dell USB ports stopped working

We rely on our USB ports for connecting to various external devices such as phones, printers, hard drives etc. When the USB ports on your Dell computer stop working this can stop us from using or accessing these devices. There are several steps you can try to resolve the USB issue on your Dell laptop or desktop.

dell usb problem

Restart Your Computer

Quite often simply restart your Dell device can reset the USB controller and resolve temporary issues. It is always worth trying this solution before anything else.

Check for Power Issues

Rule out problems with power in your Dell USB ports by checking devices (and USB cables) that you know are working on another port. If devices and cables are working on another USB port and not the one in question, then you know the problem is with the USB port itself.

Update USB Drivers

https://www.drivers.com/update_dell_drivers_main/

  1. Open the Device Manager
  2. Press `Windows + X` and select ‘Device Manager’
  3. Expand the ‘Universal Serial Bus controllers’ section
  4. Right-click on each USB Root Hub or Host Controller and select ‘Update Driver’
  5. Select the option to search automatically for updated drivers
  6. You can also visit Dell’s official website to download and install the latest drivers for your system

Disable USB Selective Suspend Setting

Open the Control Panel
Go to ‘Hardware and Sound’ > ‘Power Options’
Click ‘Change plan settings’ next to your current power plan
Click ‘Change advanced power settings’
Expand ‘USB settings’ and set ‘USB selective suspend setting’ to ‘Disabled’

Uninstall and Reinstall USB Drivers

This can fix Dell USB Drivers that have become corrupt or are simply out-of-date.

  1. In ‘Device Manager’ right-click on each USB device under ‘Universal Serial Bus controllers’ and choose ‘Uninstall device’
  2. After uninstalling all USB controllers, restart your computer. Windows will automatically reinstall the drivers.

Check for Windows Updates

Running Windows Updates will often resolve issues with devices and is worth doing as good security practice whether you are having issues or not.

  1. Go to ‘Settings’ > ‘Update & Security’ and check if there are any pending updates
  2. Install any available updates, as they may contain fixes for USB issues.

Do a Power Reset (for laptops)

  1. Shut down your laptop, unplug the charger, and remove the battery (if possible). This allows the system to fully reset
  2. Hold down the power button for 30 seconds to drain residual power
  3. Reinsert the battery, plug the charger in, and turn on the laptop to check if the USB ports now work

Check for Physical Damage

Check the USB ports for any visible damage or build-up of anything within the port itself. If the USB port is physically damaged then you will need to look at a professional repair or replacement.

If none of the above steps fix the issue with your USB port, the USB controller hardware may have failed, and you might need professional repair or replacement of the motherboard.

https://www.drivers.com/fix_usb_drivers_problems/

Filed Under: Software Drivers Tagged With: dell, usb

Common Issues with Canon TS3500 Wireless Setup

Common Issues with Canon TS3500 Wireless Setup

Canon TS3500 Series Color Inkjet All-in-One Printer

Canon TS3500 series printers support WiFi direct printing as well as USB and HDMI cable connection.

Wireless printing can be very convenient but as with anything, problems can occasionally arise. Below are the most common Canon TS3500 printer connection errors and how to fix these printer errors.

Canon TS3500 printer not detecting Wi-Fi network

This is a very common issue which thankfully is often very easy to fix.

The first thing to do is to make sure that your Wi-Fi network is actually working. Can you connect other devices to it? If so, move on to the next step. If not, you will need to firstly fix your Wi-Fi or wireless connection problems.

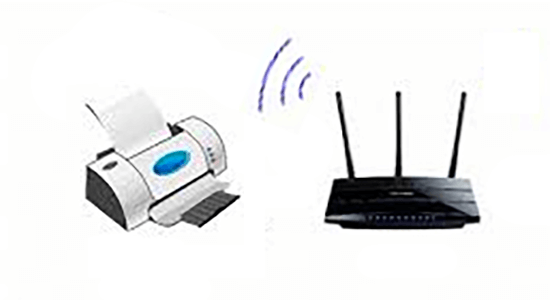
Next you should ensure that your printer is within close range of your router with no major obstructions (such as thick walls) in the way. This may solve the problem immediately so always test after each troubleshooting step.

printer and router wifi range

If your router-printer distance was not the issue, the next step is to restart both devices. It is important to note that unplugging devices for a few minutes is important in order to fully restart the device, simply using the off switch is not enough. This should refresh all the settings and may solve the wireless connectivity issues with your Canon TS3500 printer.

Canon TS3500 printer showing offline

If your Canon TS3500 printer is showing offline during wireless setup make sure that the printer is fully powered on and no errors are showing.

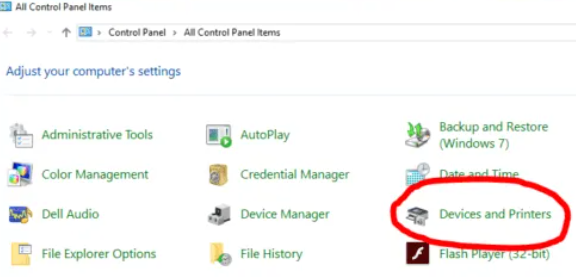
Make sure your printer is connected to your wireless network, double-check the network name and password. You can do this through printer settings. Again, restarting both devices can often clear any errors and refresh the settings.

click devices and printers

Canon TS3500 printer not printing wirelessly

Even after successfully connecting your Canon TS3500 wirelessly you may experience issues when trying to send files to print.

The first thing to do in this case is to make sure you have up-to-date printer drivers for your Canon TS3500 printer. You can get the latest Drivers on Canon’s official website or you can use a Driver Update Tool to automate the process for you.

Automatic driver update tools offer many benefits, the most important ones being:

  • You can update device drivers automatically
  • The software scans and updates all outdated or missing drivers at one go
  • The tool picks the right drivers for your device and operating system, so you won’t have to worry about installing an incorrect driver by mistake
  • Automatic driver updates are 100% safe

Driver Updater is one of the best driver update tools out there. Outbyte Driver Updater will give you access to a database of over 1 million drivers. It will regularly scan your PC, suggesting new driver versions to install. Driver Updater contains drivers for a variety of Windows devices. With just one click, you can update drivers in your system.

Step 1
Click here to Install and launch the app

Step 2
Scan all devices

Step 3
Install or update drivers automatically


Start Download


https://www.drivers.com/update_canon_drivers_main/
https://www.drivers.com/update-canon-printer-drivers/

Filed Under: Software Drivers Tagged With: canon, printer, TS3500, wifi, wireless

HP DeskJet 2130 All-in-One Printer

HP DeskJet 2130 All-in-One Printer

HP deskjet 2130 printer errors

hp deskjet 2130

If you are having problems with your HP deskjet 2130 then follow our instructions below to troubleshoot your printing issues.

The first thing to do with any printer error on any Operating System is to turn off the printer and unplug for a few minutes, then restart the printer. This can help to reset any simple problems and also confirms you have all the cables plugged in correctly.


HP deskjet 2130 error printing windows 10

If you are running Windows 10 you may have seen the error “driver is unavailable” when trying to print to your HP deskjet 2130 printer. If this is the case it is likely you need to update your printer drivers. You can do this automatically or manually. If you are confident with downloading and running files you can attempt to manually update the drivers. This will only update these specific drivers whereby a Driver Update Tool will keep all your device drivers up-to-date.

Manually update HP Deskjet 2130 drivers

To manually update your printer drivers you would need to do the following:

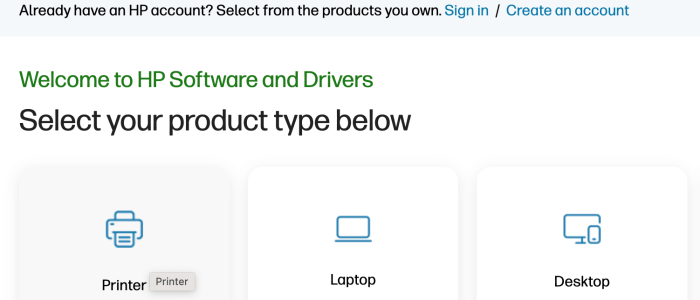
  1. go to the HP website software drivers section

    hp support website

  2. Select printer and then type in your printer details as below
    hp support printer details
    download hp printer driver
  3. Once you have downloaded the printer driver, follow the onscreen instructions to install it.
  4. Restart your computer

Automatically update HP Deskjet 2130 drivers

If you would prefer to automatically update your printer drivers, you can use a Driver Update Tool to automate the process for you.

Automatic driver update tools offer many benefits, the most important ones being:

  • You can update device drivers automatically
  • The software scans and updates all outdated or missing drivers at one go
  • The tool picks the right drivers for your device and operating system, so you won’t have to worry about installing an incorrect driver by mistake
  • Automatic driver updates are 100% safe

Driver Updater is one of the best driver update tools out there. Outbyte Driver Updater will give you access to a database of over 1 million drivers. It will regularly scan your PC, suggesting new driver versions to install. Driver Updater contains drivers for a variety of Windows devices. With just one click, you can update drivers in your system.

Step 1
Click here to Install and launch the app

Step 2
Scan all devices

Step 3
Install or update drivers automatically


Start Download


Filed Under: Software Drivers Tagged With: HP deskjet 2130, printer

ScanSnap iX500 driver

ScanSnap iX500 driver

Has your ScanSnap iX500 scanner stopped working on Windows 10 or Windows 11?

ScanSnap iX500 is a popular scanner model by Ricoh – formerly Fujitsu. All devices require software updates and if you are having issues with your scanner it may be the result of a Driver issue. In recent Operating Systems Fujitsu updated their software and ScanSnap home has ScanSnap Manager instead of the previous ScanSnap Home.

Download ScanSnap software

You can download the updated software driver directly from the Ricoh website. To do so follow the steps set out below.

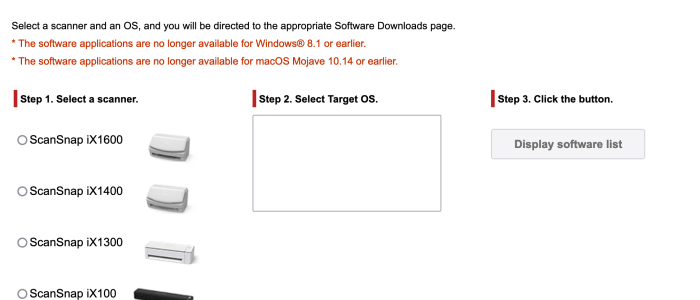
  1. Go to the Ricoh software downloads page 
  2. download ricoh scanner driversScroll down to ‘Discontinued Scanners’ and select ScanSnap iX500
  3. download ricoh scanner driverNext, select your Windows Operating System in the dropdown list and then click the Display software list button
  4. Under Setup Programs, click the Download link next to the SnapScan Home Download Installer 2.22.0
  5. rich scansnap ix500 fixSelect the location to download the software update to and then click the Download Installer
  6. Once downloaded locate the file and double-click on it to launch it
  7. Follow the on-screen instructions to install the ScanSnap Home software.
  8. Restart your computer when finished and your install should be complete!

Install Ricoh ScanSnap iX500 driver

Once you have installed ScanSnap Home you can then install the ScanSnap iX500 driver.

  1. Open ScanSnap Home software.
  2. Select the iX500 model and click Start setup
  3. Ensure the iX500 scanner is connected to your computer and the device is powered on
  4. When the device is installed click Finish

Automatically update Ricoh Scanner Drivers

If you prefer an easier and faster automatic driver update option, then click on the link below to download a Driver Update Tool which will take care of all driver updates for you.

Automatic driver update tools offer many benefits, the most important ones being:

  • You can update device drivers automatically
  • The software scans and updates all outdated or missing drivers at one go
  • The tool picks the right drivers for your device and operating system, so you won’t have to worry about installing an incorrect driver by mistake
  • Automatic driver updates are 100% safe

Driver Updater is one of the best driver update tools out there. Outbyte Driver Updater will give you access to a database of over 1 million drivers. It will regularly scan your PC, suggesting new driver versions to install. Driver Updater contains drivers for a variety of Windows devices. With just one click, you can update drivers in your system.

Step 1
Click here to Install and launch the app

Step 2
Scan all devices

Step 3
Install or update drivers automatically


Start Download


https://www.drivers.com/update_scanner_drivers_main/

Filed Under: Software Drivers Tagged With: ricoh, scanner

  • 1
  • 2
  • 3
  • …
  • 17
  • Next Page »


  • Recent Posts
  • Popular Posts
        

Read More Posts


Read More Posts

Drivers.com Sites

  • Software Drivers
  • Drivers Ed

About Us

  • Advertise
  • About Drivers
  • Drivers Support
  • Drivers.com Privacy Policy
  • Disclaimer
  • Software Drivers
  • Mac Fixes and Tips
  • PC Fix Tips
  • Security/ Backup
  • Tablets & Smartphones
  • Tech News

© Copyright 2026 PDE Publications Ltd. End User License Agreement (EULA)