
Drivers.com

follow us:

facebook twitter
  • Home
  • Download Drivers
  • Drivers Help
  • PC/Mac Resources
  • Software Drivers
  • Mac Fixes and Tips
  • PC Fix Tips
  • Security/ Backup
  • Tablets & Smartphones
  • Tech News
  • Software Drivers
  • Mac Fixes and Tips
  • PC Fix Tips
  • Security/ Backup
  • Tablets & Smartphones
  • Tech News

12 best ‘page not found’ error pages!

By Lisa Keegan on March 1, 2017

I was browsing through the NASA website recently (as you do!) and hit a link which resulted in a 404 or ‘page not found’ error. This is usually a source of annoyance on a website and can often lead to people just abandoning their original search and leaving the website. Not so with Nasa – they decided to boldly go where no website had gone before and have a bit of fun with the old 404!

Or so I thought! After a little bit of research I found some great examples of 404 error pages that would defy even the grumpiest and most impatient of visitors to leave the website in frustration.

It turns out the NASA 404 was just the tip of the iceberg – there are oodles of hilarious error pages out there just waiting to be discovered! I just had to put together a list of the best 404 pages I could find and hope you enjoy them. If you find other good ones let us know in the comments below!

Drivers.com best 404 ‘page not found’ pages 2017

To replicate the page not found error, click on the link and then insert a character at the end of the URL.

1. NASA

nasa error page

What we like: ties in with the subject of the website in a quirky manner

2. Bloomberg

bloomberg error page

What we like: the animation on this is a bit fun – can get a bit annoying though as it is on a loop!

3. Mashable

http://mashable.com

mashable error page

What we like: great pic and the search box is a useful feature – stops people from just closing the webpage

4. Imgur

http://imgur.com

imgur error page

What we like: love this one! Quirky and entertaining!

5. Lonely Planet

lonely planet error page

What we like: cute baby animals on the internet – need we say more!

6. Air BnB

air bnb error page

What we like: a dropped ice-cream sums it all up! Links are very useful too

7. Lego

lego error page

What we like: uses the opportunity of even an error page to reinforce branding instead of alienating visitors

8. GitHub

github error page

What we like: a little bit of animation in this one too – effective and good search box

9. Magnt

http://www.magnt.com/

magnt error page

What we like: fun and creative!

10. eHarmony

http://www.eharmony.com

eharmony error page

What we like: reinforces the brand and uses the opportunity to get visitors to sign up

11. Pixar

http://www.pixar.com

pixar error page

What we like: those cute eyes – he really does look sorry!

12. CloudSigma

cloudsigma error page

What we like: always blame the junior developer – funny but true!

Use the comments below to pick your favourite 404 error page or tell us about a new one!

Filed Under: Tech News Tagged With: 404, error, funny

3 ways your iPhone can change your life

By Lisa Keegan on February 19, 2017

(Or at least make it a lot easier!)

1. Make friends with Siri

The best advice I can give here is, whatever your misconceptions or preconceptions, just start using Siri now. As Siri comes to recognise and understand your voice you may have a few frustrating moments but stick with it! If you invest a little bit of time getting used to Siri and vice versa – it will all be worthwhile.

Whatever you have thought of Siri in past, it opens up a world of possibilities that can be tailored to your precise needs. It’s not quite a voice-activated personal assistant, but it’s about as close as you are going to get!

Siri is still perhaps one of the most under-used and under-appreciated features of the iPhone. Most users are put off by past experiences of repeating ‘call home’ dozens of times to the unchanging and increasingly-frustrating response ‘I cannot find hum in your contacts …’! Siri has come a long way from that and the more you use it, the more it comes to know and understand your voice.

Siri was introduced as a feature on the iPhone 4s back in 2011 and has been fine tuned with each iteration since. Siri is most useful when trying to access data on the go (such as ‘read my most recent emails‘) or quick reminders you many not have time to manually type in (such as ‘remind me to put dry cleaning in car when I get home’), the latter will use Location Services in conjunction with your Reminders to issue an alert to you when you reach home (assuming Siri knows your home address, otherwise you will need to specify this).

Allow ‘Hey Siri’

Allowing ‘hey Siri’ enables true voice-activation so that, when plugged in, simply saying ‘hey Siri’ will activate Siri. Previously you had to hold down the home button for a couple of seconds.

To enable the ‘Hey Siri’ feature, go to

Settings > Siri > toggle Allow ‘Hey Siri‘ to ‘on‘

allow hey siri

You will need to take a couple of minutes to train Siri to your voice by repeating a few simple commands. This doesn’t take long and is well worth setting up to allow you to use this feature.

You can then test this by plugging in your phone and saying ‘hey Siri, remind me to feed the dog at 6pm’. Sir should then confirm that this is being added to your reminders.

I seem to spend half my life typing these days so am happy to try anything that will help with repetitive tasks like typing texts and reminders.

‘Hey Siri’ or just plain old Siri if you don’t have this feature enabled,  is great for sending off a quick text.

How to use Siri to save time

The example below will demonstrate how you can save 5-10 minutes of opening and closing different apps and adding text, with three simple voice commands. Look at the example below:

“text Peter to say I will get the groceries on the way home”

“add milk to my grocery shopping list”

“remind me to get groceries when I leave work”

If you are not using Siri already, start now and be patient – there can be a few hiccups in the begging but it will all be worthwhile!

2. Sleep like a babybedtime clock ios10

iOS 10 introduced a new Bedtime feature which enables users to customise alarms for both going to sleep and waking up. These alarms are configured in Settings > Clock > Bedtime. A very useful aspect of this new feature is the visual representation of your sleep/ wake pattern  (assuming you are obeying your iphone alarms and going to bed and waking when told!)

Create your own lullaby playlist and use a combination of the Equalizer (EQ) function and the Clock Timer to control the levels and duration of the music you are listening to while you gently drift off to sleep. The Equalizer Function has a Late Night mode that controls the audio output of songs, essentially ‘toning down’ louder sections of music thus making it more soothing for night-time listening. This feature can be accessed by going to Settings > Music > EQ > Late Night.

If you want to set a time to turn off your music after a certain length of time, then use the Timer feature found under Clock > Timer, set the time to say 15 minutes and then scroll down and select ‘stop playing’. This will stop the music after the specified duration, by which time you will hopefully have been gently delivered to the land of nod!

This can also be a very useful feature with babies or small children, using either music or audiobooks.

3. Make your phone YOUR phone: personalize and customize

Most people use there phones for pretty much the same tasks every day, calling, texting or emailing usually the same 4 or 5 people every time, taking photos, accessing music and creating/ checking calendar events. The iPhone is a very customisable phone but very few people choose to make the few changes required to make their day-to-day life so much easier.

For example, wouldn’t everyone love a personal assistant who fields our calls and only alerts us if the call is from someone we deem important enough to interrupt our well-earned lunch-break? The ‘Do not disturb’ feature allows you to do just that. You can set it to block call alerts between say 1pm and 2pm unless the call is from someone on your ‘favorites’ list. This feature can be customised to your needs and is something everyone should use at least once in a while! To access this feature go to Settings > Do Not Disturb.

You also probably send the same text or email a number of times a week saying something like (or at least containing the phrase) ‘on my way’, ‘where are you?’ or ‘will call you later’. You can add a ‘shorthand’ to these and any phrase you choose using the Keyboard Shortcuts feature.  To use this feature you simply define the phrase and the shortcut to that phrase so that when you type for example, ‘wcul’, the auto-correct feature will show ‘will call you later’ allowing you to insert the text without all the laborious typing. Another few minutes saved! To access this feature go to Settings > General > Keyboard > Add New Shortcut.

customize iphone home screenSomething everyone should do is to customise their home screen. Most iphones are a clutter of app icons spanning 3, 4 or 5 screens. Why not move your most used apps to the first home screen so you don’t have to swipe every time you want to use said app. To move apps around, do the following:
  1. browse to the app icon you wish to move
  2. hold your finger down on the icon for a couple of seconds (all the apps will start to wiggle and show an ‘x’ in the upper left corner)
  3. drag the icon around on the screen or over to the side if you want to move it to the next screen
  4. release the app wherever you want its new location to be
  5. click the home button to confirm the move (and stop the wiggling!)

You should do this with all the apps you wish to order, cusomtising your home screen like this should make it much easier to find the apps you need, when you need them.

In many ways we have become slaves to technology but we can take back some of that control by using our iPhones more effectively and making technology work better for us. If you have any tips for making better use of your iphone, please post them below.

Filed Under: Mac Fixes and Tips Tagged With: iPhone

Fix USB Device Not Recognized Issue

By Lisa Keegan on February 10, 2017

This is an error encountered by users when trying to access a USB device such as a mouse, hard drive or other USB-connected device. There are a number of possible causes and we will start with the simplest solution first (and it often works!) –

turn your computer off and back on again!

Restart your PC

While it seems like an overly-simplistic solution, turning your computer off (and unplugging it to cut all power to motherboard) can help to reset the motherboard which links to all devices including the USB ports. So turn off your computer, unplug all devices (particularly USB devices) unplug the computer, have a cup of coffee and start it all up again. Hopefully this will solve your USB device error. If not, make yourself another cup and read on.

Restart USB device

As well as restarting your PC, you need to restart your USB device that is causing the error. If you have already restarted your PC with the USB device unplugged, then just plug the device back in to see if the error still occurs. If you are still seeing the error, try another USB port. If another USB port works then you can assume the problem is with the original USB port and not your device.

If you are seeing the same error with other USB ports then you will need to read on to troubleshoot further (rule out the problem being with the device itself or the USB cable by testing a different USB device/ cable in the same USB port)

Update Drivers

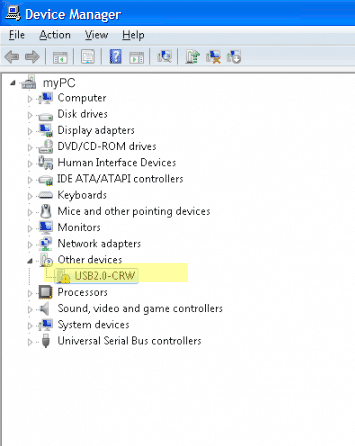
The Drivers for your USB device or motherboard may need to be updated. Go to the device manager for your USB Drivers and for Motherboard Drivers go to the manufacturers website to see if they provide the latest download, if not you can download our Driver Update Tool and run a drivers scan to check the name of the drivers and then either search the web for the Drivers, or register the software to let the program do this for you.

Change USB root hub settings

usb device manager driver update

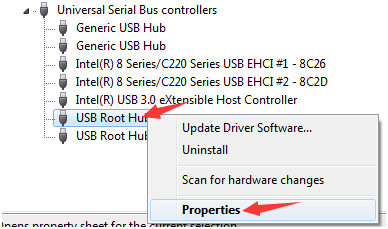
To change the USB root hub settings you will go into Device Manager and under Universal Serial Bus Controllers, select USB root hub. Right-click on this and view properties. Go to the Power Management tab and uncheck the option allow the computer to turn off this device to save power.

usb properties

Microsoft have a useful article in relation to USB hubs causing instability with regard to this power management feature.

If none of the above solutions helped fix your USB device not recognized error, the get in touch via the comments section below and we will do our best to help you.

Filed Under: Software Drivers Tagged With: driver, usb

  • « Previous Page
  • 1
  • 2
  • 3
  • 4
  • 5
  • …
  • 9
  • Next Page »


  • Recent Posts
  • Popular Posts
        

Read More Posts


Read More Posts

Drivers.com Sites

  • Software Drivers
  • Drivers Ed

About Us

  • Advertise
  • About Drivers
  • Drivers Support
  • Drivers.com Privacy Policy
  • Disclaimer
  • Software Drivers
  • Mac Fixes and Tips
  • PC Fix Tips
  • Security/ Backup
  • Tablets & Smartphones
  • Tech News

© Copyright 2026 PDE Publications Ltd. End User License Agreement (EULA)