
Drivers.com

follow us:

facebook twitter
  • Home
  • Download Drivers
  • Drivers Help
  • PC/Mac Resources
  • Software Drivers
  • Mac Fixes and Tips
  • PC Fix Tips
  • Security/ Backup
  • Tablets & Smartphones
  • Tech News
  • Software Drivers
  • Mac Fixes and Tips
  • PC Fix Tips
  • Security/ Backup
  • Tablets & Smartphones
  • Tech News

My iPhone screen is black but it still works

By Lisa Keegan on March 4, 2023

My iPhone screen is black but it still works

Is your iPhone charged and on (you can hear notifications coming in) but the screen is black? If you screen is black but it the phone still works this might seem like a serious issue but there is usually a very simple solution. This post will help you fix this problem with various iPhone models such as iPhone 7, 8 and above.

If your iPhone screen is black but still works do the following:

Plug in your iPhone (to ensure the problem is not a dead battery) and use the power button to make sure it is turned on. You should hear notifications coming in and just not see them as the screen is black. If you want to test this ask someone to call your number.

The problem with your iPhone screen is going to be either software or hardware. If it is software then a forced restart may fix the issue, hardware issues may require a visit to your apple repair specialist.

Force restart of iPhone

For iPhone 8 or later do the following to force a restart of your phone:

press volume up button, then volume down button, then press and hold the power button

iphone 8 force restart fix


For iPhone 7 or iPhone 7 plus do the following to force a restart of your phone:

press and hold the side button and the volume down button until you see the apple logo appear on screen, then release

iphone 7 force restart fix


For iPhone 6 or earlier models do the following to force a restart of your phone:

press and hold the home button and the side/ top button (depending on model) until the Apple logo appears on screen

To familiarise yourself with your iPhone model and the relevant buttons, check out our iPhone user guide for new users.

This forced restart will hopefully have fixed your black screen issue. If you are still having problems you may have a hardware issue with your screen. However, if the iPhone is restarting but just getting stuck during the restart, then follow the instructions below.

iPhone is stuck during startup

Is your Apple iPhone going through the startup process, but freezing on either a red or blue screen or the Apple logo? If so then complete the following steps to try to fix this issue.

  1. Connect your iPhone to your computer. Depending on the Operating System of the computer, you will access the iPhone through either Finder or iTunes
  2. Select your iPhone through either of the above programs
    • On iPhone 8 or later models, press and release the volume up button, then press and release the volume down button, then press and hold the side power button (see image below)iphone 8 force restart fix connected to computer
    • With the iPhone 7 or 7 plus models do the following:iphone 7 force restart fix connected to computer
    • For the iPhone 6 or earlier models press and hold the home button and the side button at the same timeClick here if you are a Windows 10 user and having problems connecting your iPhone.
  3. keep these buttons held down until you see the recovery mode screen appear.iphone recovery screen
  4. A popup window will prompt you to update or restore, choose the update option
  5. You computer will then download the software and should solve you iPhone issue

If the solutions above don’t resolve your iPhone screen issue, try contacting Apple support
 

Filed Under: Tablets & Smartphones Tagged With: black screen, force restart, iPhone, iphone 12, iphone 7, iphone 8, restart, restore

Keyboard not working in Windows 10 – what to do?

By Lisa Keegan on April 23, 2021

Sometimes Windows updates can cause knock-on problems with other programs or peripheral devices such as the keyboard. This usually, but not always, happens after users have updated Windows 10. Click here if you are having problems connecting a wireless keyboard.

It’s always best to start with the simplest solution first as this may save you a lot of time and effort. We have listed a number of solutions to the Keyboard problem in Windows 10 so work your way through them from the start and your issue should be resolved. If not, feel free to put the details in the comments section and someone may be able to help you.

Check USB port

Assuming your keyboard is plugged into a USB port, it is important to first check that this port is working. The best way to do this is to plug a device into it that you know is working, such as a phone charger. If the phone charger doesn’t work when plugged into the USB port (and you have ensure that it worked on another port/ plug), then the USB port is the problem.

A USB port that was working fine before may start to experience problems after a Windows update so always check this option first.

Keyboard accessibility settings

There is a Filter Keys setting (mostly used for accessibility) which can cause problems when you update to Windows 10. There is an easy fix for this and even if you are not sure if this is the problem, there is no harm in working your way through the steps below:

– Select the Action Center icon in the bottom right-hand corner > select all settings

– Select Ease of Access > select Keyboard

– Make sure that Filter Keys is set to OFF

Problems with USB Keyboard Drivers

If you have problems with your USB Keyboard in Windows 10 and you think it may be your USB Keyboard Drivers, do the following:

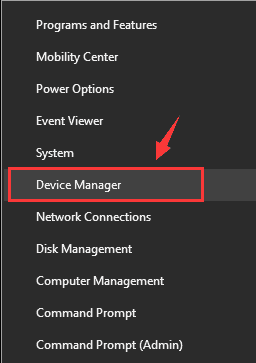
device-manager

– Start > Device Manager

– click next to Keyboards to expand the menu and right-click Standard PS/2 Keyboard > select Uninstall > click OK

– Restart your computer

Updating Drivers Automatically

Automatic driver update tools offer many benefits, the most important ones being:

  • You can update device drivers automatically
  • The software scans and updates all outdated or missing drivers at one go
  • The tool picks the right drivers for your device and operating system, so you won’t have to worry about installing an incorrect driver by mistake
  • Automatic driver updates are 100% safe

Driver Updater is one of the best driver update tools out there. Outbyte Driver Updater will give you access to a database of over 1 million drivers. It will regularly scan your PC, suggesting new driver versions to install. Driver Updater contains drivers for a variety of Windows devices. With just one click, you can update drivers in your system.

Step 1
Click here to Install and launch the app

Step 2
Scan all devices

Step 3
Install or update drivers automatically


Start Download


Filed Under: PC Fix Tips, Software Drivers Tagged With: keyboard, keyboard drivers, usb drivers, Windows 10

How to Start Windows 10 in Safe Mode

By Lisa Keegan on September 19, 2017

There are times when you are having issues with your computer and will need to start Windows in Safe Mode. Unfortunately accessing Safe Mode in Windows 10 is not as straightforward as it was in previous Operating Systems.

It is inevitable that your Windows computer will encounter an issue at some time. Because Windows loads only the most essential files and drivers in this stripped-down mode, booting in Safe Mode is an effective method to remove many variables, enabling you to get to the source of the problem.

In previous Windows versions accessing Safe Mode was very straightforward. Pressing the F8 key as Windows loads would let you enter into Safe Mode. However, this method rarely, if ever, works on Windows 10 PCs.

How to boot Windows 10 in Safe Mode:

  1. Click Start button
  2. Click the Power button and press the Shift key as you choose Restart
  3. Now select Troubleshoot > Advanced options > Startup Settings in the next screen
  4. This will take you to the Startup Settings screen. Here you need to click the Restart button to reboot your Windows 10 PC. This will take you a Startup Settings Screen
  5. Here, using the arrow keys, choose Enable Safe Mode. You can also select Enable Safe Mode with Networking.

However, what do you do in the event that you can’t successfully start your Windows 10 operating system?

Even in the case where you are unable to start your Operating System, you should first attempt to start booting Windows 10. If you can get as far as the login screen, you will be able to use the aforementioned steps by clicking on the Power icon.

But what can you do in the event that you can’t even reach the point where you see the Power icon? In such a scenario it is very likely that your Windows 10 is experiencing more serious problems and will not start in Safe Mode. Nevertheless, you should try the following which may work:

This solution requires Windows 10 Recovery Drive. If you had made one, proceed with the steps set out below:

  1. Boot your Recovery Drive and choose a keyboard layout
  2. Select Troubleshoot, then Advanced, and then Command Prompt
  3. Type the following lines in the Command Prompt (don’t forget to press Enter after typing each of these lines)
    • c:
    • bcdedit /set (default) bootmenupolicy legacy
    • exit
  4. Choose Turn off your computer
  5. Start your Windows 10 PC and press F8 repeatedly until your screen shows Advanced Boot Options. Now you can select Safe Mode. Alternatively, you can choose Safe Mode with Networking.

Please feel free to use the comments below if your issue is not covered here.

Filed Under: PC Fix Tips Tagged With: safe mode, Windows 10

  • 1
  • 2
  • 3
  • …
  • 9
  • Next Page »


  • Recent Posts
  • Popular Posts
        

Read More Posts


Read More Posts

Drivers.com Sites

  • Software Drivers
  • Drivers Ed

About Us

  • Advertise
  • About Drivers
  • Drivers Support
  • Drivers.com Privacy Policy
  • Disclaimer
  • Software Drivers
  • Mac Fixes and Tips
  • PC Fix Tips
  • Security/ Backup
  • Tablets & Smartphones
  • Tech News

© Copyright 2026 PDE Publications Ltd. End User License Agreement (EULA)