

This post sets out a number of sound errors and scenarios and how to fix them. Loss of sound can be so annoying and time-consuming to fix if you don’t know what you are looking for. This is where we can help!
At Drivers.com we have written numerous articles on sound issues over the years, aimed at helping users solve sound issues with Windows 10, 8, 7, XP and Vista. However, we found it was time to write a more comprehensive, updated guide on how to fix sounds problems on your PC.
No sound on Laptop or no sound on computer
This article will address issues of ‘no sound’ on both desktop and laptop computers as well as Mac computers. No Sound means that you are not hearing anything, if you are having issues with the quality of sound, please read our article on other sound/ audio problems.
No sound fix: check the obvious!
Whether you are trying to watch a move, play an audio file, use a program such as Skype or any other function that requires audio, you are likely to become frustrated if your audio does not work straight away as expected.
This can often result in users overlooking the more obvious potential causes outlined below. Before considering other options, check through all the items listed, they may seem obvious but more often than not, the problem is something very simple and very easily overlooked.
If you are using headphones and having ‘no sound’ issue:
Audio plug headphones – Firstly, ensure that your wired headphones are plugged into the correct audio jack. Some devices will have a combined headphone and microphone jack but many devices will have two separate audio jacks. The one for the headphones should show a small picture of a pair of headphones. You need to ensure that your headphones are plugged into the correct audio jack and plugged in properly. If you are not hearing any sound at all, test either with another pair of headphones or without headphones to see if there is any audio output.
USB Headphones – with USB headphones the same would apply as above. You first need to check you are plugged into the correct place but more importantly, check that the audio is working without the headphones as this will either identify or eliminate the headphones as the source of the problem.
Wireless/ bluetooth headphones – when using wireless headphones there are more potential problems than with standard wired headphones. Test the audio on your computer without the headphones and if there is no problem, then you know the problem is likely with your headphones themselves or the audio jack/ sound card. Next try the headphones on another device (one which you know has working audio), if there is still no sound then you know you have a problem with the headphones or sound card. If you do indeed have sound then the bluetooth pairing with the original PC is likely to be the issue. Try pairing again and see if this helps. You can also test the bluetooth of the PC by trying to pair another device with it.
In summary, if you are using headphones check first of all that the headphones are working well by plugging them into another audio device. If they are working well on another device ensure they are plugged into the correct audio jack if wired, or ensure there is not an issue with the network/ bluetooth connection if wireless.
If you are using external speakers and experiencing ‘no sound’ issue:
Powered speakers – Some speakers draw power from the PC or laptop while others are powered separately and need to be plugged in. If your speakers have a power cord make sure that it is plugged in and that the speakers are plugged into the back of the computer.
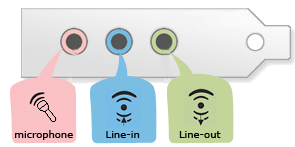
Connect wired speakers to the correct audio port – on a laptop, particularly newer laptops, there may not be a separate sound port for speakers. In this case use the headphones port. The line out port is usually light green (see image above).
Wireless/ bluetooth speakers – again, there are more potential problems with wireless speakers than wired ones. You will need to ensure:
- the speaker is charged or plugged into a power source
- the speaker(s) are turned on
- the speaker(s) are paired with the computer/ audio source
If you have made all the obvious checks and the speakers are still not working, test the audio without the speakers/ headphones. If there is still no audio output then the problem is likely with your computer or Sound Card.
You can test if your Sound Card Drivers are up-to-date by running a free Drivers Scan of your PC
If there is audio output without the headphones/ speakers, then the problem is likely with the headphones or speakers or the actual Sound Card. You can double check all the above and then check your headphones/ speakers on another device. If they are still not working then the audio device itself may be damaged and need to be replaced.
For troubleshooting your sound issues it is best to unplug any audio peripherals such as microphones, headphones and speakers. When you have done this, test the audio on your computer by using the links on audiocheck.net. It is important to do this check before going any further as often people will be experiencing issues with a particular program such as Skype and the problem may be specific to that program. Running the audio test will rule this out.
Troubleshooting sound problems
Questions to ask when experiencing problems with audio on your computer:
- have you checked volume control in the Taskbar?
- has the sound suddenly stopped working?
- is the sound problem specific to a particular program? (use the test at audiocheck.net to check general sound)
- has anything been updated/ installed since your sound last worked?
1. “My Volume is not muted but there is still no sound”
There can be more than one playback device on your computer so it is important to check that all playback devices have the correct settings. In Windows right-click the speaker icon in the Taskbar (sometimes referred to as the System Tray) and check each playback device to ensure it is not muted and the volume level is sufficient. Mac users can access the audio settings via Apple menu > System Preferences > Sound > Output.
2. “Sound on my laptop suddenly stopped working”
If the sound has suddenly stopped working and you have checked all volume controls then the next step would be to re-start your computer. This sounds rudimentary but can often help resolve unexplained glitches! If your Sound is still not working you should check your Sound Drivers. You can do this via the Device Manager or you can use a Driver Update Tool to run a free Drivers Scan.
Manufacturers regularly release Sound Driver updates and it is important that you keep your Sound Drivers updated accordingly. You can do this manually using the free Drivers Scan above to check for the missing or outdated Drivers and then searching for, downloading and installing the Drivers yourself. If you want to automate this task you can register your Driver Update Tool and let the software automate all your Driver updates (works for all Drivers – printers, modem, sound etc.)
3. “I can hear audio on YouTube or other websites but cannot get audio to work in Skype or cannot hear audio when playing a DVD”
If you are faced with a scenario such as this then the most likely problem is that the volume controls in the particular program are muted or turned down too low. You need to go into the program (Skype, the DVD program or whatever you are experiencing the issues with), check the volume settings (in Skype go to Tools > Options > Audio settings) and adjust the volume accordingly.
4. “No sound after installing Windows 10”
If you are one of those people experiencing no sound on Windows 10 directly after an upgrade, then the problem is likely down to Microsoft deleting incompatible Drivers during the upgrade to Windows 10.
If Sound Drivers are not compatible then they will automatically be deleted during the upgrade to Windows 10. Even if Drivers are compatible they may be accidentally damaged during the upgrade. Either way, the result is that you are left with corrupt or missing Sound Drivers and therefore no sound.
To fix this sound issue you will need to find the relevant Sound Drivers and reinstall them. If you know the exact Driver you need then you can simply search for it on the manufacturers website, download, and then install it. If you are unsure of the exact Driver required, click here to download a Driver Update Tool and run a a free Drivers scan of your PC. You can then use the information in the Drivers report to search for the Drivers yourself. Alternatively, if you wish to automate this process for all your Sound and other Device Drivers, you can register the driver update software and let the tool update the Drivers for you.
5. “No sound after Windows 8 upgrade”
The above issue can also apply to upgrading to Windows 8 as any Operating System upgrade can cause problems with compatibility of Sound Drivers. Before assuming the problem is with the Device Drivers, you can go to the Audio Troubleshooter, follow the steps set out below:
- from the desktop screen, mouseover the bottom right corner of the screen
- select Settings > Control Panel
- in the Control Panel window click Find and fix problems under System and Security
- in the Troubleshooting window, go to Hardware and Sound > Troubleshoot audio playback
- on the Playing Audio window click Next to troubleshoot
- when the scanning is complete you can apply any suggested fixes (if there are no fixes suggested then the troubleshooter did not find a problem)
If the above fix does not help, you can try running a free scan of your Sound Drivers to check if Drivers were damaged or need to be updated after your Windows 8 upgrade. Click here to download a Driver Update Tool and run a free Drivers scan.
6. “Sound not working after Windows 7 upgrade”
To troubleshoot audio problems after a Windows 7 upgrade you can use the Playing Audio troubleshooter. To do this:
- click start button > control panel
- in the search box type in ‘troubleshooter’ > click troubleshooting
- in Hardware and Sound select ‘troubleshoot audio playback’
If the troubleshooter does not resolve the issues then you may need to try running a free Drivers Scan of your PC, you can then search for the required Drivers yourself or register to receive automatic Driver Updates.
7. No sound after installing new software
If you experience sound problems after installing new software, the simplest test is probably to uninstall the software and then test your sound again. If your sound returns then the problem is likely a conflict with the new software or a problem when it was installed. You can try installing again (make sure you follow all instructions to close other programs during install) and see if the sound is now working.
Possible Hardware causes of audio problems
Below we have listed the main audio hardware devices and some possible issues that you can check for. You can test your audio output device on another computer to confirm if the issue is a hardware one.
Speakers: the most obvious issue to check for on speakers is damaged wiring or a loose input cable.
Headphones: similar to speakers, the wiring on headphones is probably the most vulnerable part, particularly near the earpiece.
Sound Card: sound cards can also suffer wear and tear over time. If you can remove your sound card you can look for some more obvious signs of damage.
In summary, any audio problems you experience on your PC or Mac are going be related to either hardware or software. The simpler hardware tests are checking connections, plugs and physical volume settings.
Software checks range from checking the volume settings within your programs and the default computer volume controls to updating software Drivers for your PC.
If you have an audio issue that is not covered in this article, feel free to post any questions below and we will do our best to try to find a solution for you.