Are you troubled by high CPU usage by the Windows Modules Installer Worker process?
Does your task manager shows you a picture like the one below?
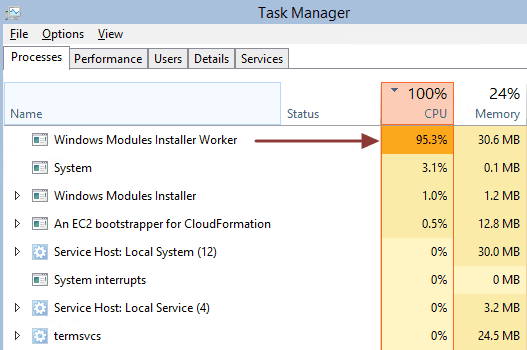
If yes, it means your PC performance has been compromised by the Windows Modules Installer Worker process. It is notorious for hogging CPU power leaving very little CPU processing power for other Windows components and critical services.
Many Windows 10 users have complained about this issue. Thankfully there are some easy fixes available to resolve the issue.
In this post, we will show you two ways to solve the Windows Modules Installer Worker high CPU usage issue.
Information about Windows Modules Installer Worker
Also known as Tiworker.exe, Windows Modules Installer Worker is not a malware or virus as thought by many users. In fact, it is an important Windows update service that looks for new updates and installs them in your Windows 10 system.
If you have been checking for updates, it is more likely you will see the Windows Modules Installer Worker in the processes column in Task Manager. The process is related to Windows update process and it is started automatically.
How to fix the Windows Modules Installer Worker high CPU usage issue?
Here, we have provided you with two solutions. You need not try both of them. You can start with the Solution One and if it doesn’t work, go ahead and perform the steps in Solution Two.
Solution One – Change Windows update process to manual mode
This solution has worked for many users and it might also work for you. In most cases, Windows 10 is set to update automatically and this results in activation of the Windows Modules Installer Worker service.
By changing the windows update process to manual mode, you prevent activation of the Windows Modules Installer Worker service and the high CPU usage issue is fixed. Here are the steps to follow.
- Press Windows key and R on the keyboard at the same time to bring up the Run command
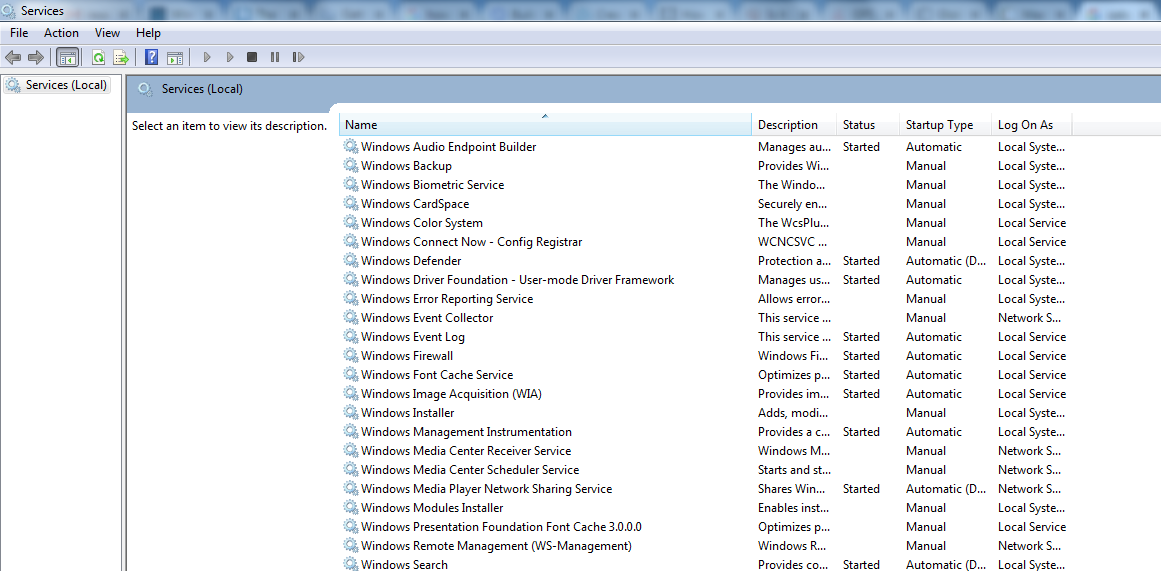
- In the Run command box, type services.msc and click OK

- In Services window, look for windows modular installer service and double-click on it
- In the windows modular installer properties window, go to Startup Type section and select Manual from the drop-down list
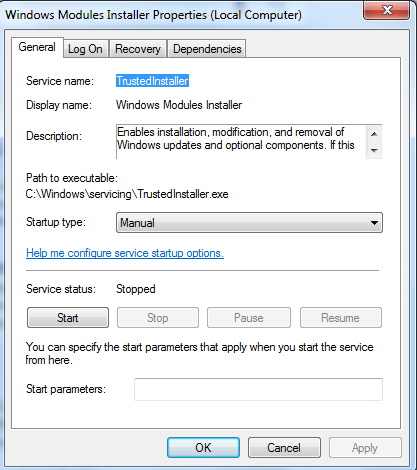
- Click Apply followed by OK
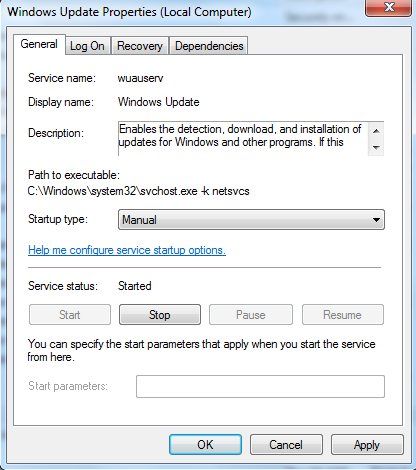
- Go to the Services window again and this time double-click windows update
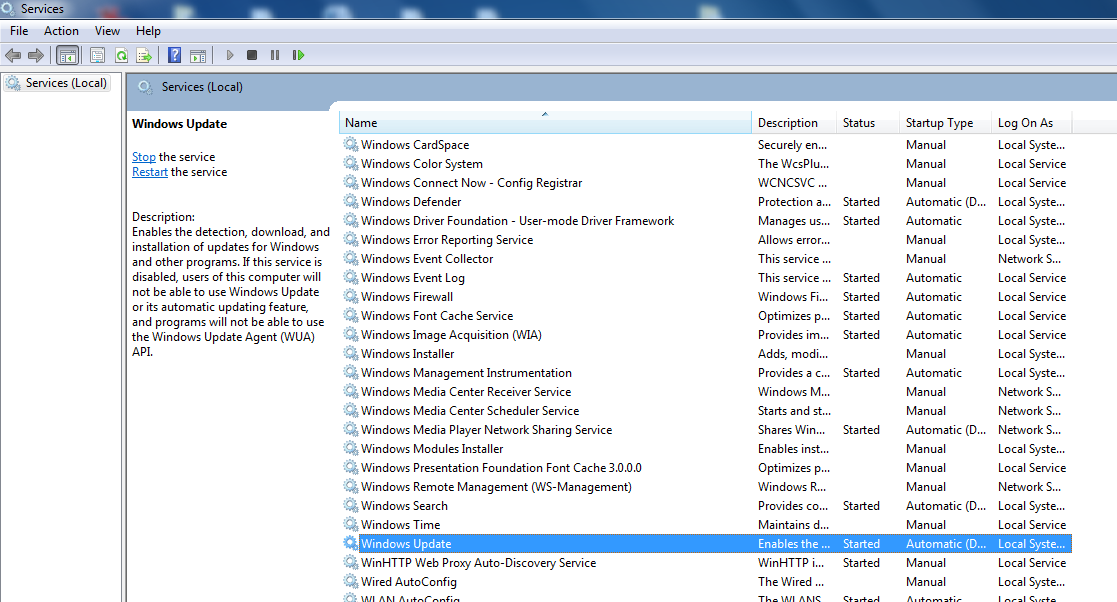
- In the windows update properties window, go to Startup Type section and select Manual from drop-down list
Now open Task Manager and go to the Processes tab, you should see the CPU usage return to normal now. If you still see high CPU usage in the Processes window, you need to try Solution Two.
If you see the CPU usage is normal, it indicates high CPU usage of windows modules installer worker has been resolved. But to prevent Windows 10 to download updates automatically, you need to perform some additional steps.
Case 1 -Using Wi-Fi
If you are using Wi-Fi, perform the steps given below
- Click Start and click Settings
- In Settings window, click Network & Internet
- In the Network & Internet window, click Wi-Fi -> Advanced Options

- Click Set as metered connection toggle switch to On position

Case 2 – Using Ethernet connection
If you are using Ethernet (cable) connection, perform the steps given below
- Press Windows key and R on the keyboard together to bring up the Run command
- In the Run command box, type regedit and click OK
- In user account control pop-up, click Yes
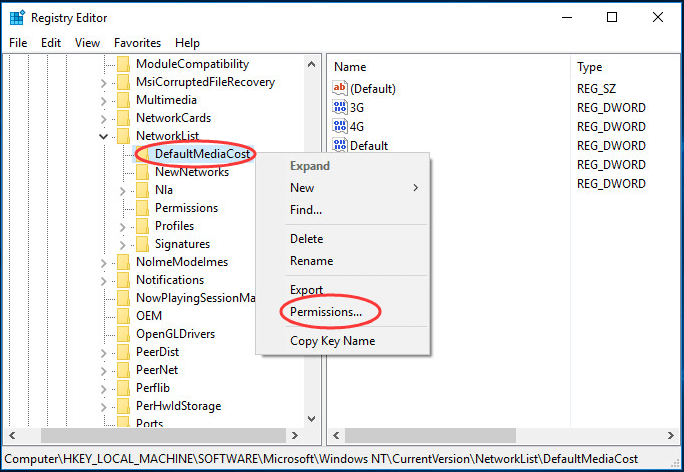
- In the registry editor window navigate to the following path
- HKEY_LOCAL_MACHINE > SOFTWARE > Microsoft > Windows NT > CurrentVersion > NetworkList > DefaultMediaCost
- In the left-hand pane, right-click DefaultMediaCost and select Permissions
- Click Add
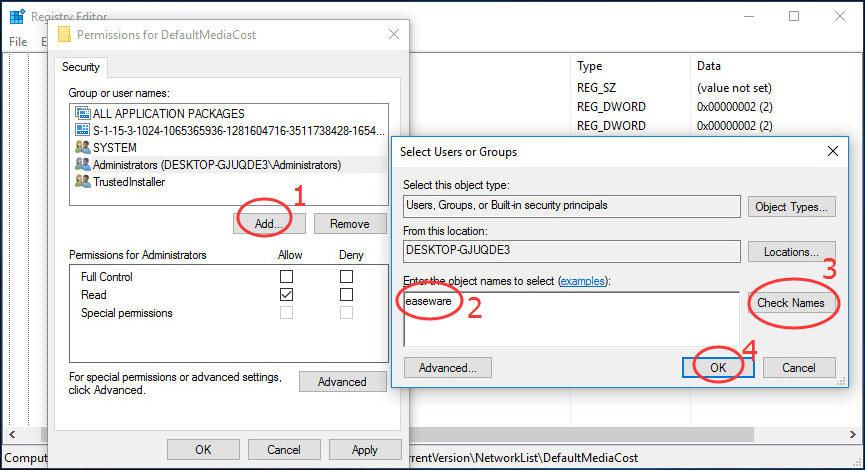
- Type your username in Enter the object names box
- Click Check names
- Click OK
- In the Group or user names, select the username you just added
- In the Permissions for < username>, tick the box Allow for Full control
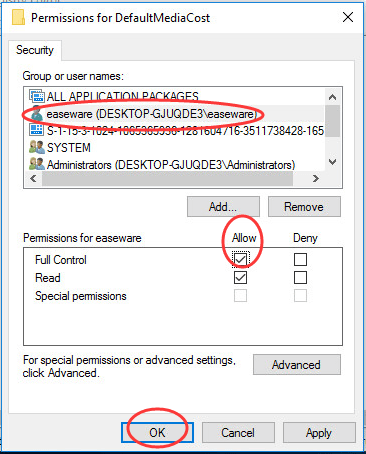
- Click Apply and then click OK
- Now double-click Ethernet in the right-hand pane
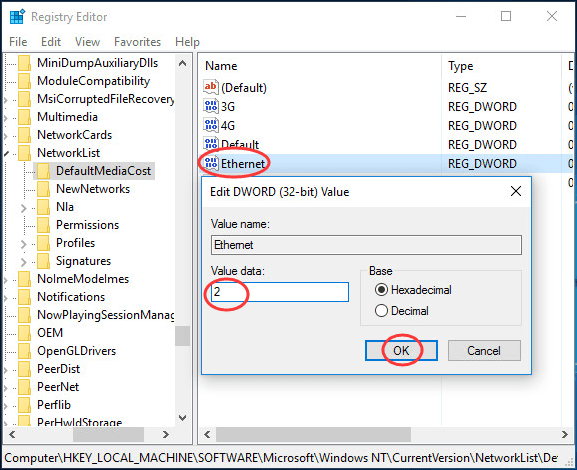
- Change the data value to 2
- Click Ok
- Reboot computer
Now Windows 10 would not download updates automatically which will ensure the Windows Modules installer worker does not hog CPU power and degrade the performance of your system.
Solution Two – Update Drivers
Most of the Windows 10 problems are related to incompatible or corrupt drivers. To keep the windows system optimized for performance, you need to update all drivers for your Windows system. You can update drivers manually or automatically.
Manually updating drivers requires some technical knowledge. To update the driver manually, you need to visit device or hardware manufacturer website to download drivers. You also need to have information about the Windows version and the architecture (32-bit or 64-bit). In manual drivers update, there is always a hidden risk of downloading wrong drivers that might cause problems with your computer.
Automatic driver update tools offer many benefits, the most important ones being:
- You can update device drivers automatically
- The software scans and updates all outdated or missing drivers at one go
- The tool picks the right drivers for your device and operating system, so you won’t have to worry about installing an incorrect driver by mistake
- Automatic driver updates are 100% safe
Driver Updater is one of the best driver update tools out there. Outbyte Driver Updater will give you access to a database of over 1 million drivers. It will regularly scan your PC, suggesting new driver versions to install. Driver Updater contains drivers for a variety of Windows devices. With just one click, you can update drivers in your system.
Step 1
Click here to Install and launch the app
Step 2
Scan all devices
Step 3
Install or update drivers automatically
Leave a Reply