Every Windows user knows Microsoft is pushy about Windows updates and there is nothing wrong in it.
Even in Windows 10, the default setting is to install updates automatically. Though this is good for your Windows PC, it does cause inconvenience many times.
One bad thing about Windows updates is there is no guarantee the Windows update that gets installed will improve performance of your Computer. There are several instances when the updates have not worked well and Microsoft had to recall those updates.
Also, the windows updates are automatically installed in the background and some updates require a system reboot.
There is so much time wasted in installing and configuring updates which irks many users especially when they have some urgent work to do.
Disabling Windows update is a good way to get some respite from the inconvenience caused by automatic installation of updates.
Different ways to disable windows update
There are four ways to disable windows update
- Making your internet connection a metered one to disable Windows update
- Changing Group Policy to disable Windows update
- Disabling Windows update service to disable Windows update
- Make Changes to the Device installation settings to disable Windows update
Uninstall Windows Update Assistant
Windows Update Assistant is a native update management tool that is designed to upgrade your Windows 10 to latest version. The Windows update assistant is automatically deployed to Windows PCs that do not have latest Windows updates.
According to experts, the different ways to disable Windows update won’t work if you have Windows Update Assistant installed on your PC.
Hence, before proceeding to any method given below, you need to uninstall Windows Update Assistant completely.
Steps to uninstall Windows Update Assistant
- Click start
- Click settings
- In the settings window, click apps
- In the left pane, click apps & features
- Look for windows update assistant program in the right pane and click on it
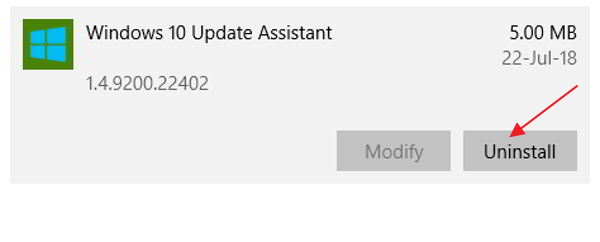
- Click Uninstall
After you have uninstalled Windows update assistant, you are also required to delete folders related to Windows update. Here are the steps to follow.
- Go to Desktop
- Double-click This PC
- In Windows Explorer window, double-click C Drive
- Navigate to Windows folder and then go to Windows10Upgrade folder
- Delete the Windows10Upgrade folder
If you have migrated to Windows 10 from lower Windows version, you need to delete some additional folders too that are related to Windows Update Assistant. Here are the steps to follow.
- Go to Desktop
- Double-click This PC
- In the Windows Explorer- double-click C Drive
- Navigate to Windows folder
- Delete the following folders -UpdateAssistant. UpdateAssistantV2, and Windows10Upgrade
Windows users who don’t want to remove Windows Update Assistant can disable it and then proceed to any methods of disabling Windows update. Here are the steps to follow.
- Click Start
- Type task scheduler in Cortana search box
- Select Task Scheduler from the list of results
- In the Task Scheduler window, click Task Scheduler Library
- Next click Microsoft > Windows > UpdateOrchestrator
- In the right pane find Update Assistant
- Go to Triggers tab
- Disable each trigger in the list
After you have uninstalled or disabled Windows Update Assistant, you can go ahead and follow any method to disable Windows Update.
Method One – Using the metered connection trick
As you know Windows downloads updates automatically when the computer is having a working Internet connection. You can disable the Windows update by fooling the operating system. This trick only worked with Wi-Fi connection, earlier but from version 1703, even Ethernet connection can be set as a metered connection.
A metered connection refers to an Internet connection where you can download limited number of bit per month without increasing the monthly internet bill.
When you set the Internet connection as metered one, Windows will not download updates automatically to ensure your monthly ISP bill does not increase.
In Windows 10, Internet connections are set non-metered by default and you need to make the Internet connection you use as metered one to disable windows update.
However, if you connect to Internet through different Internet connection, this trick will not work, unless you make other Internet connection too as metered one.
Here are the steps to make you Internet connection a metered one.
- Click Start -> Settings
- In the Settings window, click Network & Internet
- If you are using Wi-Fi, click on Wi-Fi in the left pane
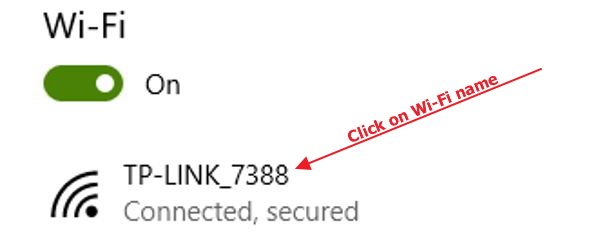
- Now, click on the name of your Wi-Fi connection and click the grey toggle switch to turn metered connection on (the toggle switch color changes to blue which indicates the connection is set as metered
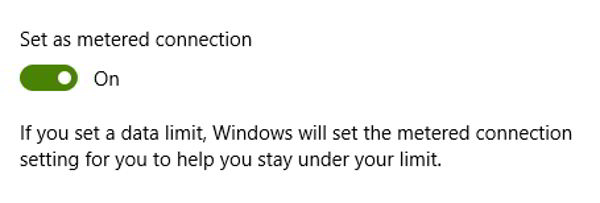
- If you are using Ethernet, click on Ethernet in the left pane
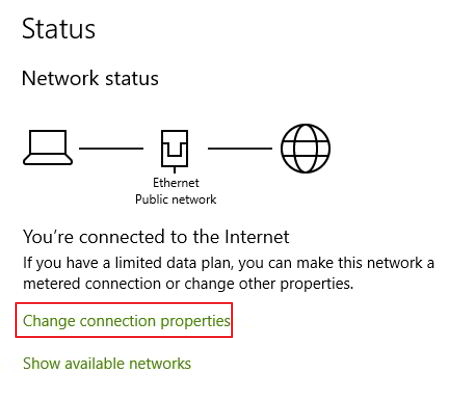
- Now, click Change connection properties. Now click the grey toggle switch to turn metered connection on.
When you set the Internet connection as metered one, Windows 10 will assume you have a limited data plan and will not download updates automatically.
Also, Windows will not search for any updates until your computer uses an Internet connection that is not set as a metered one.
Method Two – Change Group Policy settings to disable Windows update
Group Policy is an important feature in Windows which allows the administrator to control the working environment of user accounts and computer account.
The Group Policy is available in top editions of Windows 10 like the Windows 10 Pro, Windows 10 Enterprise. It is not available in Windows 10 Home edition. Hence, this method would not work for Windows 10 Home users.
We can use this Group Policy feature to disable Windows update. Here are the steps to follow.
- Press Windows logo and R keys simultaneously on the keyboard to invoke Run command console
- In the run command box, type gpedit.msc
- Hit Enter on the keyboard
- In the Local Group Policy editor window, click Computer Configuration and then click Administrative Templates
- Now click Windows Components
- Next, click Windows Update.
- Double-click Windows update and click Configure automatic updates
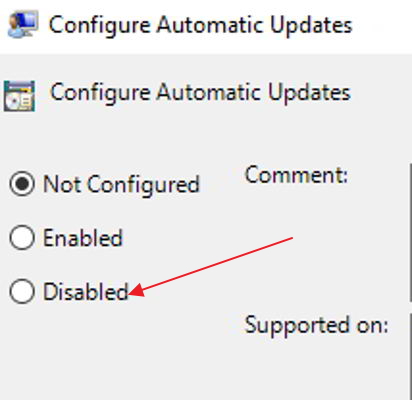
- In the left pane, click Disabled
- click Apply and then click OK
Note – When you perform the steps given above Windows will not check nor install Windows updates. This can prevent you from having newer version of Windows 10 that might have some new exciting features. If you want to upgrade to newer version of Windows 10, just follow the steps above and in the 2nd last step you just have to click Enabled instead of Disabled and your Windows update will start working again.
Method Three – Disabling Windows update service to disable Windows Update
Windows update is managed by Windows update service which runs in background. By default, the Windows update service start automatically every time you boot your PC.
The Windows update service connects to the Windows update server every day to check for updates. If its finds any updates, it downloads Windows updates automatically.
You may never know how many Windows updates have been downloaded and installed unless you are prompted to restart to apply Windows update or unless you check the update history in Windows 10.
The idea behind this method is to disable Windows update service that will disable Windows 10 update. Here are the steps to disable Windows update service
- Press Windows logo and R keys simultaneously on the keyboard to bring up Run command box
- In the run command box, type services.msc
- Click OK
- In the Services window, double-click Windows update

- In the Windows update properties box, go to the General tab and set the Startup type to Disabled by selecting the option from the drop-down list
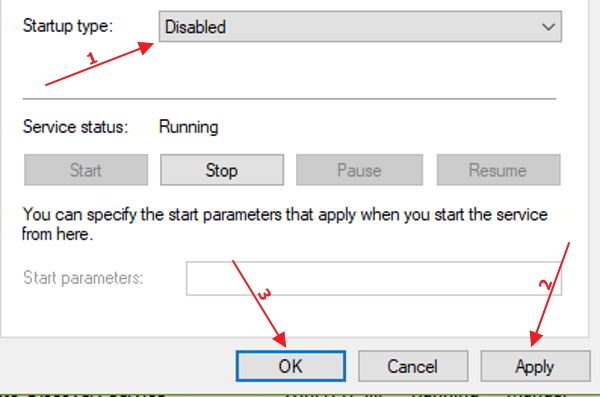
- Now click Apply and then click OK
- If you are disabling Windows update service for the first time, you need to perform one more step to stop Windows update.
- Go back Windows Update Properties dialog and go to Recovery tab
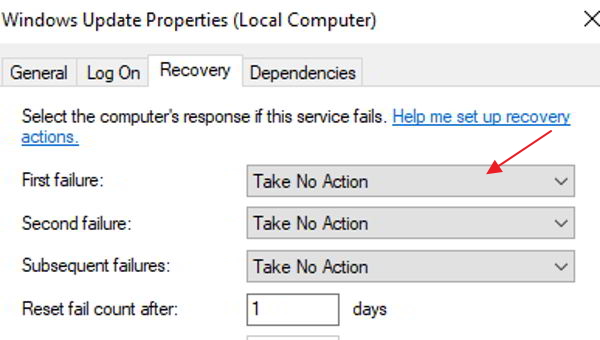
- Now click the drop-down list adjacent to the First failure and choose Take No Action
- Click Apply->OK
- Close all windows
- Restart your computer to apply changes
Method Four – Modify Device Installation settings
Windows 10 updates are not all about bug fixes or improving system performance. A large number of driver updates are also provided through Windows updates. Windows 10 also download driver’s updates automatically. If you do not want to this happen, you need to make changes to device installation settings.
- Click Start
- In the Cortana search box, type control
- Click Control Panel from the list of results
- In the Control Panel window, click System
- In the Systems window, click Advanced system settings
- In the System properties window, click Hardware tab
- Click Device Installation settings
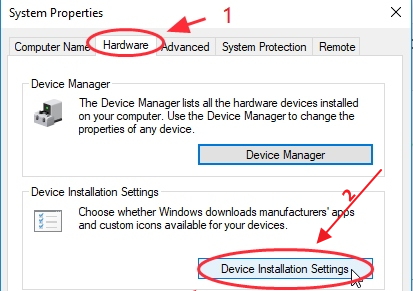
- In the Device Installation settings window, choose the option No(your device might not work as expected)
- Click Save Changes
- Close all windows and restart your computer.
After performing these steps Windows will not download driver updates. Now that you have disabled Windows update, you need to find an alternative way to update drivers for optimal performance of Windows 10. Without right drivers, you are more likely to face different problems in form of errors and your Windows will be less responsive.
Also over the time some drivers get corrupt or become outdated. In that case, updating drivers become critical for Windows stability and overcome performance issues. We suggest you use a driver update tool to update drivers automatically.
Automatic driver update tools offer many benefits, the most important ones being:
- You can update device drivers automatically
- The software scans and updates all outdated or missing drivers at one go
- The tool picks the right drivers for your device and operating system, so you won’t have to worry about installing an incorrect driver by mistake
- Automatic driver updates are 100% safe
Driver Updater is one of the best driver update tools out there. Outbyte Driver Updater will give you access to a database of over 1 million drivers. It will regularly scan your PC, suggesting new driver versions to install. Driver Updater contains drivers for a variety of Windows devices. With just one click, you can update drivers in your system.
Step 1
Click here to Install and launch the app
Step 2
Scan all devices
Step 3
Install or update drivers automatically

Leave a Reply