Are you getting an error “The DNS server isn’t responding”?
Do you frequently get an error message which says “your computer appears to be correctly configured, but the device or resource (DNS server) is not responding”?
We know it can be difficult when you get such errors because they prevent you from accessing the Internet.
But don’t worry; we offer some easy solutions to solve such errors.
However, let’s first learn more about this issue and its impact.
Why DNS server not responding error doesn’t let you from accessing the Internet?
The username and password provided by ISP to connect to the Internet are only part of the process of Internet connectivity.
There are a host of other things working in the backdrop that make internet connectivity possible, and DNS server is one of the more important part of the whole process.
DNS stands for Domain Name Server. The DNS server translates the web address you type in the browser to IP address and help your browser to connect to that website.
For example, when you type drivers.com in your Chrome address bar, the DNS server translates it to the public IP address of 192.XXX.XXX.18 and connects your browser to drivers.com website.
So, if the DNS server is not functioning properly, you won’t be able to visit sites like you normally do.
In this post, we have provided you with four solutions to fix this error.
How to fix DNS server not responding issue?
The solutions given below are based on different causes that lead to DNS server not responding issue.
Unless you know the exact cause, it would be hard to predict which solution would work for you. Hence we suggest you try the first solution and then the next and so on until the DNS server issue is resolved.
Solution One – Select right settings for DNS server address
One of the reasons behind the DNS server not responding could be wrong DNS server address.
The simplest solution to this problem is to select right settings for DNS server addresses.
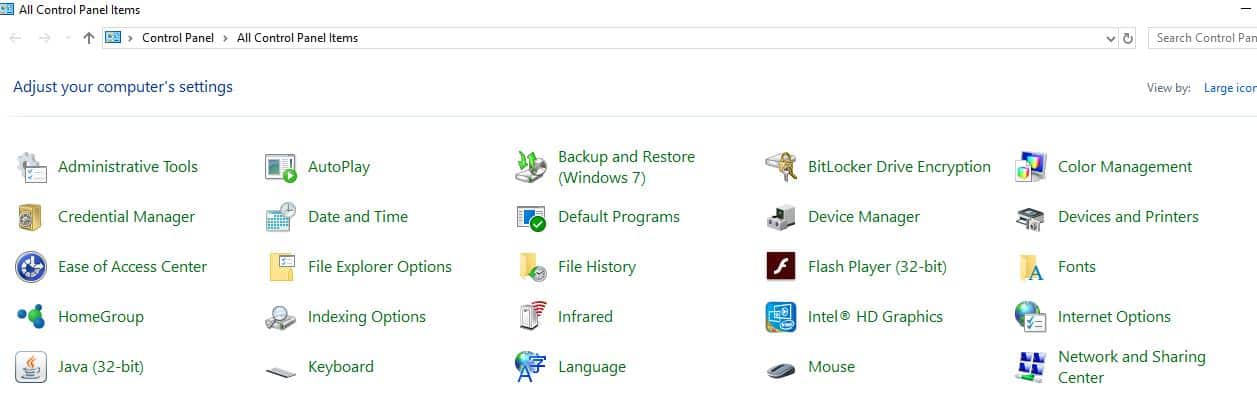
- Press Windows key and R simultaneously on the keyboard to invoke Run command
- Type control in the Run command box and hit Enter
- Set the View by Large Icons and select Network and Sharing center
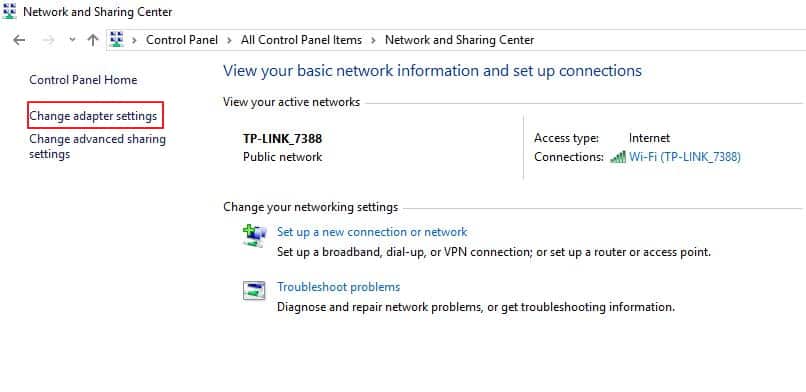
- In the left-hand pane, click Change adapter settings
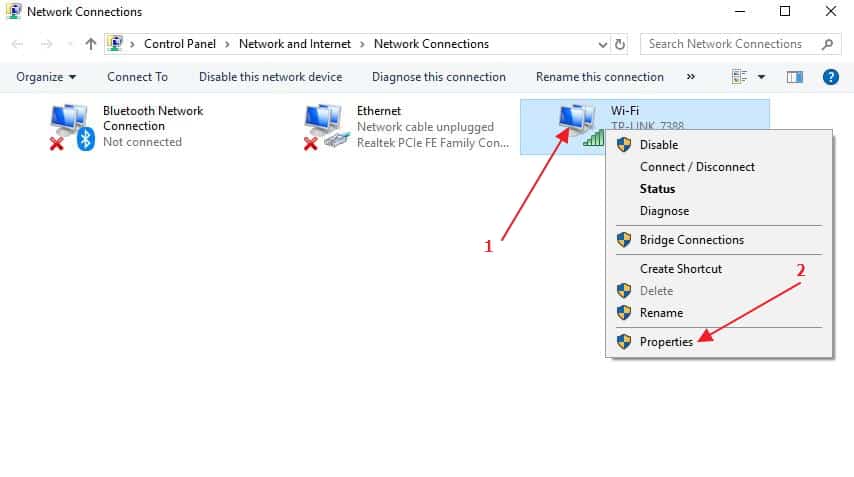
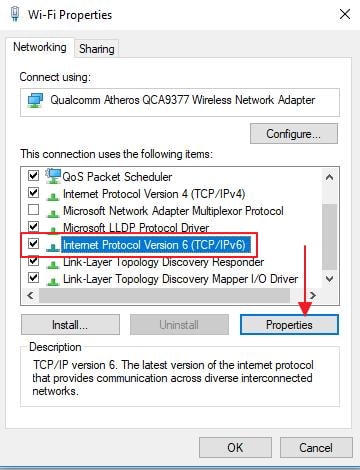
- Right-click on Wi-Fi or Ethernet as per your Internet connection and click Properties
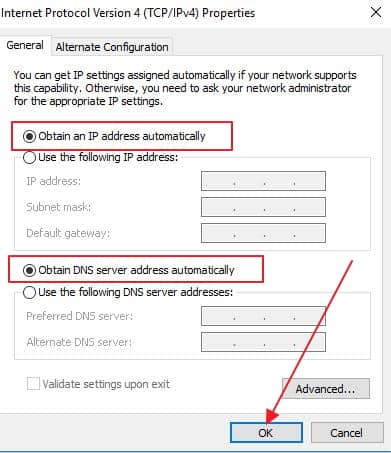
- In the Wi-Fi properties window, select Internet Protocol Version 4(TCP/IPv4)
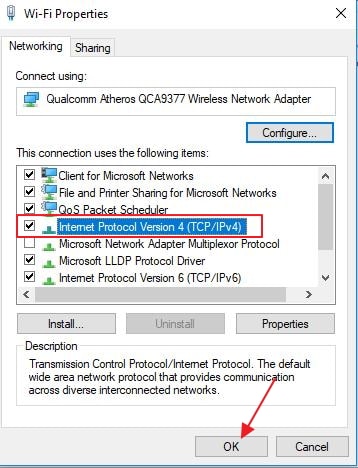
- Select Obtain an IP address automatically and Obtain DNS server address automatically options
- Click OK
- Now go to Wi-Fi properties window again, select Internet Protocol Version 6(TCP/IPv6) this time and click Properties
- Select Obtain an IP address automatically and Obtain DNS server address automatically options
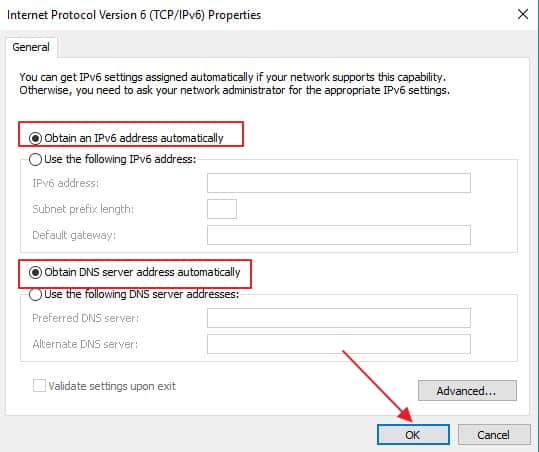
- Click OK
- Close all windows
- Try accessing some websites and see if the DNS server not responding issue is resolved.
Solution Two – Clear DNS Cache and Reset IP
By default, Windows stores DNS cache for 1 day for all websites you visit. It also includes negative DNS responses which are stored for around 5 minutes.
Clearing DNS cache forces the Windows to retrieve fresh IP addresses for websites you want to visit.
Here are the steps to clear DNS cache.
- Go to Desktop
- Type cmd in the search box
- In the list of results, right-click Command Prompt and select Run as administrator
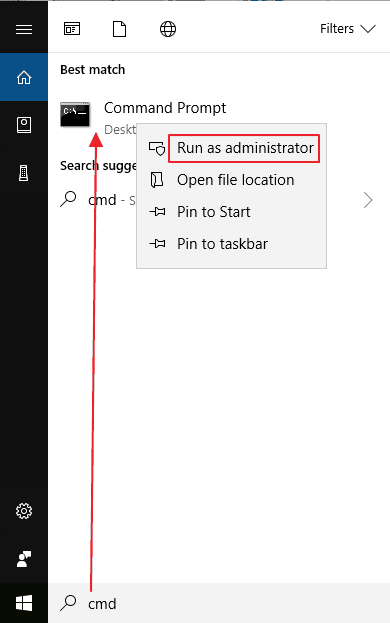
- In the User Account Control window, click Yes
- In the command prompt window, type the following command and press Enter on the keyboard after every command
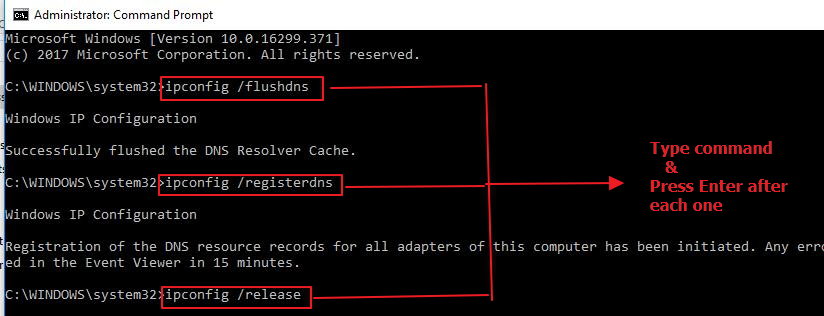
- ipconfig /flushdns
- ipconfig /registerdns
- ipconfig /release
- ipconfig /renew

- Close the command prompt window
- Try to access some websites and see if the DNS server not responding issue is resolved
Solution Three – Update Drivers
Many times corrupt or incompatible network drivers trigger networking problems in Windows 10. In such cases, updating network drivers is the only remedy.
The easiest way to update drivers is to use a fast, efficient driver update tool.
Automatic driver update tools offer many benefits, the most important ones being:
- You can update device drivers automatically
- The software scans and updates all outdated or missing drivers at one go
- The tool picks the right drivers for your device and operating system, so you won’t have to worry about installing an incorrect driver by mistake
- Automatic driver updates are 100% safe
Driver Updater is one of the best driver update tools out there. Outbyte Driver Updater will give you access to a database of over 1 million drivers. It will regularly scan your PC, suggesting new driver versions to install. Driver Updater contains drivers for a variety of Windows devices. With just one click, you can update drivers in your system.
Step 1
Click here to Install and launch the app
Step 2
Scan all devices
Step 3
Install or update drivers automatically
Solution Four – Restart your modem and router
Since router and modem are running all the time, they may sometime cause connectivity issues which in turn can lead to DNS Server not responding error.
Restarting the modem and router will force these devices to establish a fresh connection with ISP that may resolve the DNS server not responding issue.
Here are steps to restart modem and router
- Press the power button on Router and modem to switch off the devices
- Press the power button on Router and modem to switch On the devices
- Wait for some time until the modem and router establishes a stable Internet connection
- Try accessing some websites and see DNS Server not responding error is resolved.
Leave a Reply