You’ve an important business video meeting that’s just about to start when you suddenly find to your horror that the Lenovo camera isn’t working. Thankfully, your smartphone was able to save the day, but zoom meetings on a smartphone’s small screen are just not the same as on a laptop with a great mic.
Lest your Lenovo camera doesn’t leave you high and dry (when you need it most), we’ve prepared a guide to troubleshoot the “Lenovo camera not working” issue. So, without further ado, let’s jump right into the solutions.
Fix #1 – Ensure the camera is turned on
Lenovo models from 2008 onwards include a switch right next to the camera covers. If it’s turned off, all you’ll get is a blank image in Zoom (and other such apps).
Fix #2 – Review your app’s settings
Make sure the app you’re using is set to use the laptop’s camera. Generally, video communications apps pick the system’s camera by default. But it won’t hurt to ensure that your Lenovo’s camera is set as the default camera for Zoom or any other app you’re using.
Fix #3 – Check the camera’s privacy settings
Type camera privacy settings in the Search bar located in the middle of your taskbar. In the Settings app, make sure Camera access and Let apps access your camera are turned on (both are located in the right pane).
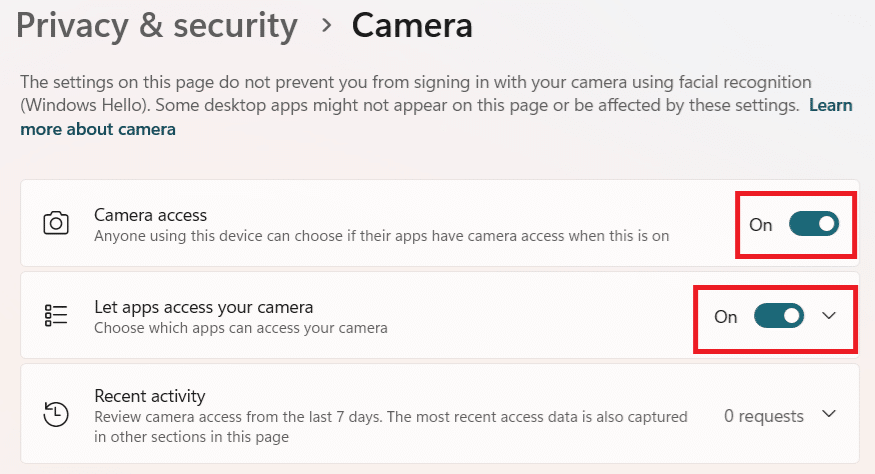
Next, expand the drop-down menu in Let apps access your camera field (it is an arrow that’s pointing downward) and ensure the desired program is in this apps list.

Fix #4 – Restart the laptop
Maybe your laptop’s camera is not working due to a temporary glitch with the background software using it or some other program. If that’s the case, restarting the system may fix the issue.
Fix #5 – Fix software conflicts
If the problem still persists, check whether the camera’s in-use light is turned on. If that’s the case, you can safely assume another program is using the system’s camera. The camera can be used by only one app at a time. Close the other program that’s using the laptop’s camera before turning on Zoom.
If that program is stuck, you can force quit it by following these steps:
- Press Ctrl + Shift + Esc to open the Task Manager
- Locate the program in the Apps or Background processes list in the left-hand side
- Right-click the program and select End Task
Note: In case the laptop’s camera is being shown as in use, but you can’t locate any app that’s using it, it is possible that a malicious program is using it. We recommend running a deep virus scan using a reliable antivirus software.
You can use Microsoft Defender (which is built into Windows for real-time malware protection), if it is turned on. Alternately, you can download and install a third-party antivirus software. Make sure you run a deep virus and not a quick scan. The former is more comprehensive, checking both running and idle processes, as well as dormant threats residing in each and every nook and corner.
A comprehensive virus scan thoroughly checks your computer’s memory, system locations, and storage devices to locate and remove malware, including, but not limited to, ransomware, spyware, virus, and worms.
Fix #6 – Check for and install any pending updates
Type “windows updates” in the Search bar in the taskbar and hit enter. In the Windows Update window if you see any important update pending, install it. You may have to restart the laptop after the update.
Fix #7 – Manually reinstall the camera
Here’s what to do:
- Type “device manager” in the Search bar and hit Enter
- Look for and expand the Cameras section
- Right-click Integrated Camera (or Integrated Webcam) and select Uninstall Device
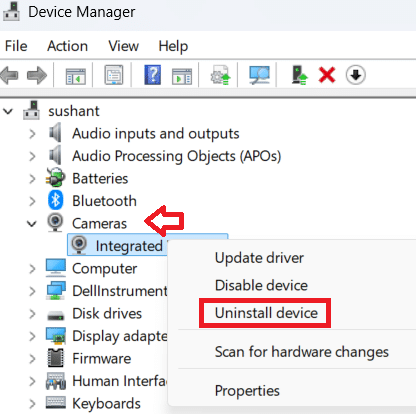
- Next, check the Delete Driver Software
- Now in the Action menu (located at the top), choose Scan for Hardware Changes
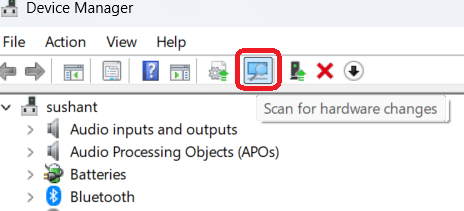
You should be able to see the integrated camera entry again. Now check if the problem is fixed.
Fix #8 – Install the latest drivers
You can do this manually by visiting Lenovo’s support page. Go to PC support category and then choose Detect Product. This will download Lenovo Support Bridge. Once you have installed and launched the software, it will scan for new driver updates. If new updates are found, install them.
The other (and perhaps much easier) way to install the latest drivers is by using an advanced third-party tool such as Driver Updater.
Automatic driver update tools offer many benefits, the most important ones being:
- You can update device drivers automatically
- The software scans and updates all outdated or missing drivers at one go
- The tool picks the right drivers for your device and operating system, so you won’t have to worry about installing an incorrect driver by mistake
- Automatic driver updates are 100% safe
Driver Updater is one of the best driver update tools out there. Outbyte Driver Updater will give you access to a database of over 1 million drivers. It will regularly scan your PC, suggesting new driver versions to install. Driver Updater contains drivers for a variety of Windows devices. With just one click, you can update drivers in your system.
Step 1
Click here to Install and launch the app
Step 2
Scan all devices
Step 3
Install or update drivers automatically
Leave a Reply