We all have been there. You sit at your system to start a new day, but it refuses to boot and instead shows a black screen with an ugly message that reads “Operating System Not Found”.
You start to panic. What will happen to your documents. Will you be able to recover them?
Scary as the situation looks, you’ll be probably okay. There’s every reason to believe your files are not gone and things will soon (or sometimes a little later than ‘soon’) return to normal.
Continue reading to find out how to troubleshoot ‘Operating System Not Found’ error.
How to fix Operating System Not Found Error?
Try the solutions listed below in the order they appear. We’ll start with a couple of simple things before moving on to the solutions that are a little complex.
Solution #1 – Reboot your system
At the risk of sounding cliche, restarting the computer frequently fix temporary glitches. Power off your computer and power it on to check if you’re now able to boot.
Didn’t help? Give the next solution a try.
Solution #2 – Remove unnecessary flashy drives
If you’ve a flashy drive connected to your system or there’s a disc in your disc drive, remove them. There’s a chance your system might be looking for a suitable operating system on those devices and returning the titled error on not finding one.
Solution #3 – Test your hard drive
The next step is to test the hard drive. The BIOS include a Hard Disk Self Test for verifying the hard drive’s integrity.
Here’s what to do:
- Restart your computer by repeatedly pressing Del, F2, F10, or Esc or the indicated key in your computer’s manual
- Go to the Diagnostic tab and choose Primary Hard Drive Self Test option and then hit Enter
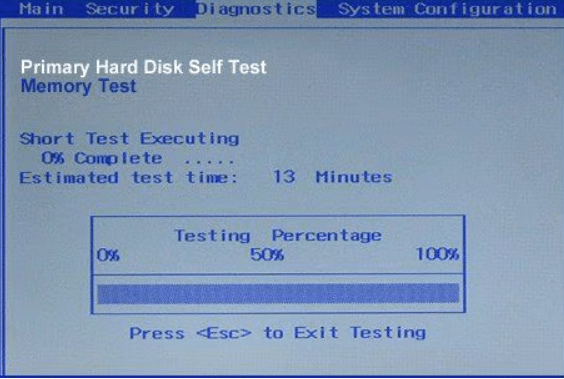
- Windows will run a thorough inspection that may take a little while and provide a detailed report of its findings
If everything is fine with your hard drive, it’s time to reset the BIOS.
Solution #4 – Reset the BIOS
Here’s what to do:
- Remove each and every external device that’s connected to your computer
- Open the BIOS setting and choose the Exit tab
- Now enable Load Optimal Default (It’s possible the option is named differently on your PC. Common alternatives include Get Default Value and Load Setup defaults
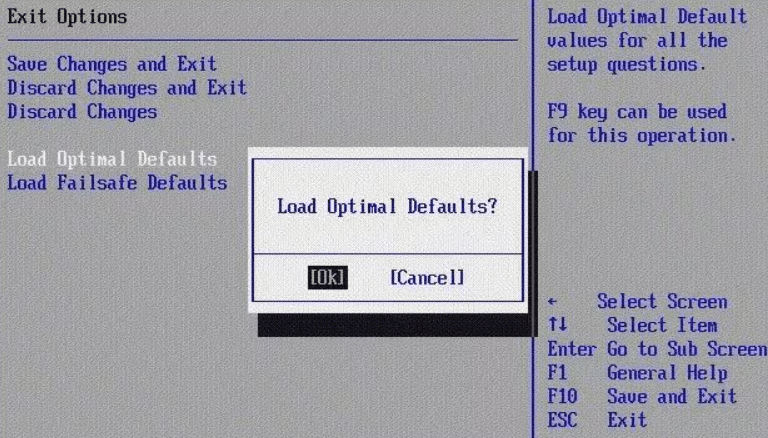
- Select Save Changes and then the Exit option after the default settings have loaded properly
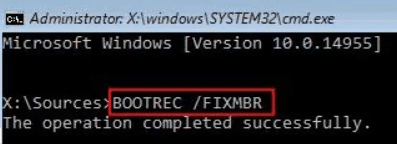
Solution #5 – Repair MBR using the installation CD or DVD
Virus infections can badly damage MBR, preventing your Windows from booting. Here’s how to repair MBR with the installation CD or DVD.
- Insert the installation disc to enter Boot Mode
- Go to Windows Setup and kickstart the repair process by typing the following command:
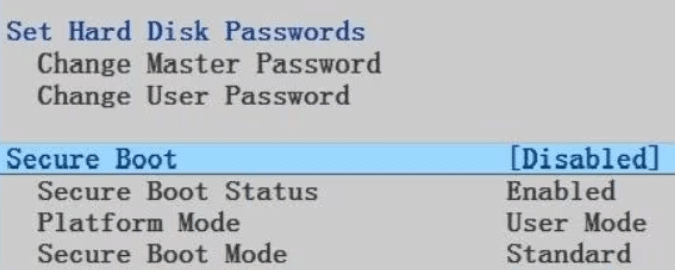
Solution #6 – Disable or Enable UEFI Secure Boot
Every computer has Secure Boot enabled or comes with UEFI firmware. However, at times the firmware may fail to work properly, leading to a black screen of death error.
Try enabling or disabling it to check if that fixes the issue:
- Enter BIOS by rebooting Windows and repeatedly pressing the Del, F2, F10, F12, Esc or the indicated key listed in your computer’s manual
- Go to the Security tab
- Locate the option called ‘Secure Boot’ (You’ll have to use the arrow keys on the keyboard to navigate menu options) and select Disabled
Solution #7 – Activate Windows Partition
If Windows partition has become disabled, your system won’t boot. Use the diskpart command to activate Windows partition.
Here’s what to do:
- With the help of diskpart command you can activate the partition on which Windows is installed
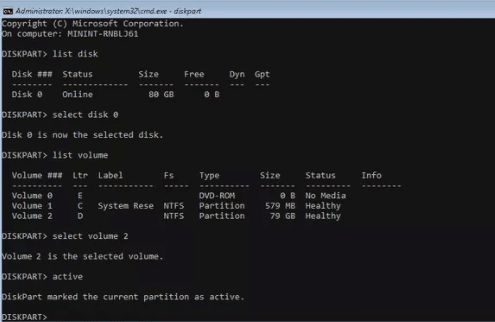
- Once you have accessed command prompt from your installation CD, enter the following command
- Next, type the following command
![]()
- Select the disk on which the Windows system is installed using the following command (in most cases, the list contains only one disk)

- Select the partition of the selected disk on which Windows is installed using the command listed below

- Use this command to make the volume active
Windows should now start normally. But if it doesn’t, contacting your local computer repair technician might be a good idea.
Keep in mind Windows errors can occur at any time and the best strategy to deal with them is to take concrete steps to prevent them from arising in the first place. One such action is updating your device drivers on a regular basis. While you can do this manually, the procedure is time-consuming. A better option is to use a reliable third-party tool, such as Driver Updater.
Automatic driver update tools offer many benefits, the most important ones being:
- You can update device drivers automatically
- The software scans and updates all outdated or missing drivers at one go
- The tool picks the right drivers for your device and operating system, so you won’t have to worry about installing an incorrect driver by mistake
- Automatic driver updates are 100% safe
Driver Updater is one of the best driver update tools out there. Outbyte Driver Updater will give you access to a database of over 1 million drivers. It will regularly scan your PC, suggesting new driver versions to install. Driver Updater contains drivers for a variety of Windows devices. With just one click, you can update drivers in your system.
Step 1
Click here to Install and launch the app
Step 2
Scan all devices
Step 3
Install or update drivers automatically
Leave a Reply